Wednesday, June 27, 2007

Daring Bakers Challenge: Bagels

IMG_3237


Before this month’s challenge I thought I didn’t like bagels, American bagels that is. The few bagels that I had until now were not memorable: too plain, too chewy, too tough; in other words, bad memories. Making bagels was really challenging for me since I have never made this kind of bagels before and have no experience on how the real bagel should taste or feel like. For me the kind of bagels that I grew up eating and loving has a texture crossed between bagels and brioche and flavored with anis seeds, sesame seeds and orange zest. I then decided to seek some advices from some bakeries around where I live, explaining them my situation, without broking my daring baker pledge of course. I really wanted to know what makes a bagel, a bagel and how to make sure that my bagels don’t float, since the water bath was the thing that scared me the most. Some baker were nice enough to take the time and explain it to me and some thought I was trying to steel their secret recipe. Some bagels were good; some of them were not that good.


IMG_3236


Days went by when I started checking with some studious fellow daring bakers that had already tried the bagel recipe. Two words came back over and over again: floating and sinking. My fear of the water bath for the bagels was then multiplied by one hundred.
Then came the Bagel Day. I followed the recipe while taking notes of my friend’s advices. Come the water bath stage and here I see all my bagels floating. Not only they were floating but also they were getting bigger and deformed. I thought about sinking them my self but then I remembered that I should only stick to the recipe. The result: my first batch of bagels was ugly, shameful, misshapen and chewyliscious. Yes, I even invented a word for them.
I was so disappointed, I told my self that I would never make bagels or eat bagels or even look at a bagel again. But then I remembered what the foundation of the daring bakers was all about. It is about trying once, twice until you learn. It’s about being patient and trying to see objectively what went wrong. What went wrong with my dough? I overproofed the yeast. Yes, you read it right, not the dough, the yeast: You know, the first stage when you mix the yeast with the water and you are supposed to let it rise 5 min, well with me I left it 30 min. From there, everything went super puffy.


IMG_3240


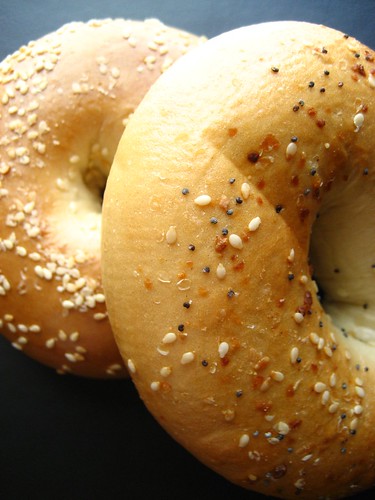
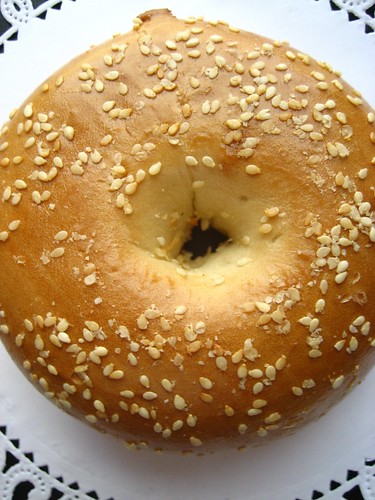
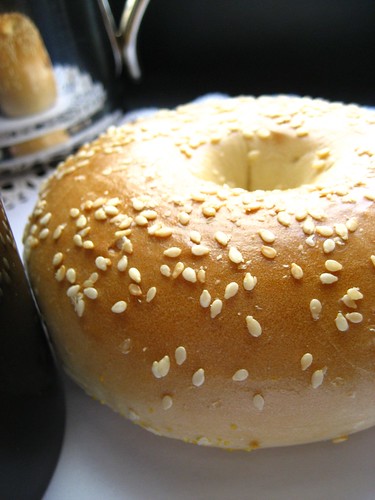
The following day, I started all over again: the yeast, 5 min this time, didn't add all the flour, kneading well and harder, punching down the dough with all the muscles that I don’t have, trying to shape as little as possible and using malt syrup instead of sugar. The result: Although not all the bagels went straight to the bottom of the pan, 5 out of 7 came out just as they were supposed to. They didn’t have the same shape but I was pretty happy with the result. The texture was just a little chewy with a lot of softness to it. For some people, it might not taste as a bagel but for me it was just the way I like it. I used sesame seeds and kosher salt as a topping for half of my bagels and poppy seeds, sesame seeds and garlic flakes for the others. As a filling I used Nutella instead of cream cheese and the garlic bagels were used as a sandwich bagels with lettuce, goat cheese and turkey patties. Sorry if I don’t have pictures of them but I couldn’t wait to eat them.
Once again thanks to Jenny and Freya for this challenge that made me appreciate the real, homemade bagel. You can head to their respective blogs for more details on the recipe.


IMG_3253

Friday, June 22, 2007

A Spicy Mortar / Un Mortier Epicé

chermoula


What do you get when you give a man a mortar and a kitchen. I will tell you everything in details next week.

Until then, have a great weekend everyone.

Wednesday, June 20, 2007

Tartelettes For Your Brain / Des Tartelettes Pour Votre Cerveau

cerises

According to health magazines, cherries, along with almonds, apricots, plums and peaches boost our supplies of the antioxidants that protect against free radical damage, which can injure the brain.
Cherries are packed with melatonin, a hormone found in all living creatures, which has been shown to be important for the function of the immune system and the heart.
So, cherries make you smart and are good for your health. Why am I the last one to know this kind of information? I would have used it as an excuse when I was a kid.
“Rose! Is that you who finished all the cherries that were in the fridge?”
“Yes, maman. But I was just feeding my brain so I can grow up being a smart person”
I bet my parents wouldn’t be able to argue with such an elaborate excuse, right?
Instead, I drove them crazy, lying and accusing my younger brother of doing it. Yes, I admit that when it comes to cherries, I was one selfish little girl.
But look at me now. Eating a lot of cherries has paid off. I am a smart woman and…euhh! That doesn’t sound credible!
Let’s do it again. Blablabla…. has paid off. Everyone tells me that I am a smart person… Much better.

cherry and almonds


You see there are two ways to know how smart of a person you are:
First, if you can predict in advance that taking the shoulder of the road in the middle of traffic jam isn’t going to solve anything.
Second, if you can ask yourself: “Do I really need two telescoping back scratchers even if the second one is free?”

You are not sure again if you really need to boost your brain, memory and mental focus, then there are three symptoms to detect a hungry brain:
- Standing in the middle of the room and asking yourself: “why did I came here for again?”
- Calling your friend by your pet’s name.
- Asking yourself: “ what was the third symptom again?”. I am serious. It just happened to me while writing it.

Which brings me to my recipe for a smart, brain booster tartelette, although it is a bit high in calories. The idea of this cherries and almonds tartelette with orange blossom water, cardamom and cinnamon came about seven years ago while I was still living at my parents’ house. My mother had made us for lunch her incredible Tajine of meddler, stuffed with almonds, orange blossom water and cinnamon. I loved how the subtlety of the almonds worked with the sweetness of the fruits and the orange blossom water.

Up to this day, these tartelettes are my favorite way of making dessert out of cherries. I use ground whole almonds because you can really taste the almond flavor in the filling when you leave the skin on. The cherries are marinated for an hour in the orange blossom water, the cinnamon and the cardamom, and then I use the marinade for the filling along with the almonds. It gives it a nice subtle aroma with a smooth, silky body and a flaky, buttery crust. I pitted the cherries by using a hairpin bend, a clean hairpin bend, and it works wonderfully.

These cherries and almonds tartelettes are guaranteed to be a hit for a nice dinner dessert, and also a great way to feed your brain without giving up on sweets. But to make sure that no unnecessary calories will be ruining your summer, go for a long walk after finishing your dessert.

Cherries and almonds tartelettes

cherry and almonds tartelettes


Recipe:
- 1 ½ lb cherries, pitted
- 1 tbsp sugar
- 1 tsp cinnamon
- ½ tsp ground cardamom
- 1 tbsp orange blossom water
- For the filling:
- 4 ½ ounces ground almonds, with the skin on
- 3 ½ ounces sugar
- 2 ounces butter, at room temperature
- 2 eggs
- For the pastry crust:
- 7 ounces of flour
- 3 ½ ounces butter, at room temperature
- ½ tsp sugar
- 1 egg yolk
- 1 tbsp orange blossom water
- 3 tbsp ice water

- To finish:
- 1 tbsp icing sugar

Put the cherries, sugar, cinnamon, cardamom and orange blossom water in a bowl. Mix all the ingredients together and let it marinate for an hour in the fridge.
Meanwhile, make the pastry crust. Mix the flour, the butter and the sugar together. Rub them between your hands until it becomes sand like. Add the egg yolks and the orange blossom water and mix until it all comes together. Do not overmix the dough. Cover with a plastic wrap and chill for ½ an hour. Make the cream. Mix the almonds with the sugar until combined. Add the butter, the eggs beaten and the juice of the cherry marinade. Whisk all together until it looks like a smooth cream.
Roll out the dough on a floured surface and line your greased tartelette molds with the crust. Chill for another 10 min. Line your crust with foil, filled with dried beans. Prebake your tartelette crust at 400F for 15 min, then remove the foil, reduce the heat to 350F and continue baking the crust for another 5 min to dry it out.
Fill the crust with the cream and top it with the cherries. Bake it until it is golden brown, about 20- 25 min. Let the tartelettes cool on a wire rack then dust with the icing sugar.

Tartelettes aux cerises et aux amandes

Tartelette


In francais please:
- 700g de cerises, denoyautees
- 1 c.s de sucre
- 1 c.c de canelle
- ½ c.c de cardamom
- 1 c.s d’eau de fleur d’oranger
- Pour la crème aux amandes:
- 125g de poudre d’amande, avec leur peau
- 100g de sucre
- 60g de beurre ramolli
- 2 oeufs
- Pour la pate:
- 200g de farine
- 100g de beurre ramolli
- 1 jaune d’oeuf
- 1 c.s d’eau de fleur d’oanger
-3 c.s d'eau glacé

Mettre les cerises, le sucre, la cannelle, la cardamome et l’eau de fleir d’oranger dans une jatte. Melanger le tout et reserver au frais pendant une heure. Entre temps faire la pate. Melanger la farine avec le sucre et le beurre. Frotter entre vos main jusqu’a ce que le mélange resemble a du sable. Ajouter le jaune d’oeuf et l’eau de fleur doranger. Melanger mais sans en abuser. Mettre en boule, couvrir de film plastique et laisser reposer pendant ½ heure au frais. Preparer votre crème aux amandes. Melanger les amandes, le sucre. Ajouter le beurre ramolli, les oeufs battu et le jus rendu par les cerises.
Abaisser votre pate. Garnir vos moules a tartelettes de la pate. Remettre au frais pendat 10 min. Garnir vos moiles d’aluminium remplie d’haricots secs et faites cuire la pate a blanc dans un four prechauffe a 200 C pendant 15 min. Puis reduire la temperature de votre four a 180 C, enlever les feuilles d’aluminium et continuer a cuire pendant 5 min pour assecher la pate.
Garnir vos moule de la crème aux amandes puis avec quelques cerises. Faites cuire jusqu’a ce que les tartelettes deviennent dorees, environ 20-25 min. Laisser refroidir sur une plaque a patisserie puis saupoudrer de sucre glace.


pot de cerises


Thursday, June 14, 2007

Soothing Muffin / Muffin Calmant

Soothing Muffin


Nice, France: August 16, 2003

I’ve been here for two weeks now. My internship is going very well although it is very hard sometimes to wake up at 7am after going to bed at 2am. Nice is so beautiful: La promenade des Anglais, La colline du Chateau, The Old Town, The flower market, the food, Oh the food! I haven’t seen everything yet but I just can’t wait to explore what Nice has to offer.

The only thing that I don’t like about Nice is the beach. The beaches of Nice are shingle and now my toes are all sore and it hurts. Well, I guess I will get used to it.

Today my sister and my nephew came to see me. I was so excited. We went strolling along the beach then went to The Old Town to have some ice cream. A friend of mine told me that you would find the best ice cream there. We had to check it out. We weren’t disappointed. The counter of ice cream was 6 feet long, with over 30 varieties of ice cream, gelatos and sorbets.

My sister went straight for her favorite flavor: caramel and coffee ice cream and I went for a flavor that caught my eyes right away: Lavender ice cream. A bite of it and I had the feeling to be… a dirty shirt inside a washing machine. The lavender ice cream reminded me of a fabric softener. It was too much lavender for me and I couldn’t finish it. My sister was really enjoying her ice cream, licking every drop that would fall on the sides. And I was there watching her.

What a torture!

Michigan, USA: June 10, 2007

Yesterday I bought a bag of lavender flowers. I was torn between making some muffins or sables. I went for muffins. I have never been scared of flowers before, but since my ice cream experience I am just terrified of everything that involves flowers and food together. I love the smell of lavender, I find it very calming but I just couldn’t imagine how it would taste in a muffin.

I took a basic vanilla muffin recipe and turned it into a lavender, lemon and pine nuts muffins. “Breath, Rose! Breath!” I was telling my self all the time. Once the lavender was mixed into the batter I could have sworn I was in a lavender field. It smelled like spring. Into the oven, 25 min later I had my muffins and they were beautiful. “Don’t rush it Rose! Let it cool completely then you can have a taste”.

My fear of lavender scent fabric softener was gone once I had those muffins. They were so fragrant, yet not overpowering. There was just the right amount of lavender. The only thing that I would add next time to the batter is some honey because it needed a little bit of sweetness. M thought they were “interesting”.
What? What does he mean, “interesting”? Have a lavender ice cream, Honey! That’s very “interesting”.

Lavender, Lemon and Pine nuts Muffins


Recipe:

- 1 ¾ cups plain flour
- 2 tsp baking powder
- ½ tsp baking soda
- ¼ tsp salt
- ¾ cup granulated sugar
- 1 tsp dried lavender flowers
- 1 tbsp candied lemon peels
- 1 ½ tbsp toasted pine nuts
- 2 large eggs
- 1 cup whole milk
- 6 tbsp unsalted butter, melted

In a bowl, stir together the flour, baking powder, baking soda, salt, sugar, lavender, pine nuts and candied lemon peels.
In another bowl, Combine the eggs, milk, and butter and beat just until blended. Add the dry ingredients and mix just until moistened. Do not overmix.
Spoon the batter into prepared muffin cups, filling each cup about three-fourths full. Preheat the oven to 425F and bake for about 15-18 min or until a toothpick inserted comes out clean. Let cool on a wire rack. Sprinkle some icing sugar on top. Store in an airtight container at room temperature for up to 2 days or freeze for up to 1 month.


Soothing Muffin


Muffins a La Lavande, Citron et Pignons de pin

In francais please:

- 280g de farine
- 2 c.c de levure chimique
- ½ de bicarbonate de soude
- ¼ c.c de sel
- 155g de sucre en poudre
- 1 c.c de fleurs de lavande, sechees
- 1 c.s de pelures de citron confites
- 1 ½ c.s de pignons de pin
- 2 gros oeufs
- 250ml de lait
- 90g de beurre, fondu

Dans une grande jatte, melanger la farine, la levure, la bicarbonate de soude, le sel, le sucre, la lavande, les pignons de pin et le citron.
Dans un autre bol, melanger les oeufs, le lait et le beurre jusqu’a ce qu’ils soient bien incorpores. Verser dessus les ingredients secs d’un seul coup et melanger. Ne melanger pas trop. Verser dans des moules a muffins et faites cuire dans un four prechauffe a 220C pendant 15-18 min. Laisser refroidir sur une grille a patisserie. Saupoudrer de sucre glace. Ces muffins se gardent pendant 2 jours dans une boite hermetique ou peut se congeler pendant un mois.


Soothing Muffin

Tuesday, June 12, 2007

Simply Flan / Flan, Tout Simplement

Flan


Sugar High Friday returns home to Jennifer at Domestic Goddess and in this month challenge she is asking us to make our favorite dessert. “The one you crave when you are on a diet or when you’ve been away from home for a long time”
It is hard to narrow my favorite desserts to a particular one since I always fall in love with a dessert that makes me forget the others. Sometimes I crave a chocolaty dessert, sometimes a creamy dessert or a fruity dessert. Sometimes I only want a scoop of ice cream or no dessert at all. You see for me dessert is about a mood, an atmosphere. While dessert can only mean for some people a good ending to a meal, for me it is more than that. Dessert is proven, at least at my house, to release tensions, to enchant senses and to transport you home even when you are at 4272 Miles away.
Flan is baked custard that is very popular in Spain. Like crème caramel, both built on a mixture of eggs and milk or cream, they are all about texture-smooth and satiny. Custards owe their legendary silkiness to the slow cooking of eggs and cream or milk until the ideal consistency is achieved. A water bath is used for baking Flan because it insulates the custards from the direct heat of the oven, ensuring the even, gentle cooking that is necessary to baking a successful, silky, creamy custard. Custards are perfectly done if it jiggles slightly when it’s gently shaken. It is very important not to overbake your Flan.
I have been eating Flan since I can remember, battling with my siblings to who get the biggest part and the most of caramel. I love Flan. My family loves flan. Needless to explain then why I choose Flan for this event. This is just the dessert that I crave after a light summer lunch, the dessert that my husband and I craved when we were pregnant and the one that spoiled my so-called healthy diet a few days ago.
I like my Flan to be creamy, soft and light, even though there is nothing light about it. I hate grainy, dense and eggs tasting Flan.

Here are some Troubles you may encounter with your Flan or any baked custard:
- Flan is grainy or watery: it means it was overbaked
- Flan is too wet in center: it means it was underbaked
- When making your caramel, sugar crystals form: You shouldn’t stir your caramel once the sugar has dissolved.

My Flan has no fancy spices and no twist to it. It is a plain vanilla Flan, because when I crave, I crave authentic desserts, mostly from my childhood.


Flan


Recipe: Serves 8

- 9 oz granulated sugar
- 1 vanilla pod or 2 tsp vanilla essence
- 1 2/3 cups milk
- 1 cup heavy whipping cream
- 5 extra large eggs
- 2 egg yolks

Put 6 oz of the sugar in a small pan with 4 tsp water. Bring to a boil over a high heat, swirling the pan to dissolve the sugar. Boil, without stirring, until the syrup turns a golden brown caramel.
Pour a little caramel into each mold. Pour the milk and cream into a pan, add the vanilla seeds or vanilla extract and bring the mixture close to a boil. Remove from the heat and let stand for 15-20 min.
In a bowl, whisk the eggs and extra yolks with the remaining sugar for 2-3 min until creamy. Whisk in the warm milk and cream mixture, and then strain it into the caramel-lined moulds.
Put the molds in a water bath. Cover the molds with foil paper and bake in a preheated 325 F oven for about 20-25 min. A toothpick inserted to test should come out clean. Remove from the water, leave to cool and refrigerate overnight.


Flan


In francais please: Pour 8 personnes

- 250g de sucre crystalise
- 1 gousse de vanille ou 2c.c d’extrait de vanille
- 400ml de lait
- 250ml de crème liquide
- 5 gros oeufs
- 2 jaunes d’oeufs

Mettre 175g de sucre dans une casserole avec 4c.c d’eau. Porter a ebullition sur grand feu en remuant la casserole jusqu’a ce que le sucre se dissout. Bouillir, sans remuer le sucre jusqu’a le caramel soit d’une belle couleur dore. Verser dans vos ramequins.
Mettre le lait et la crème dans une casserole et ajouter les graines de gousse de vanille ou l’extrait de vanille. Rechauffer a peine jusqu’a ce qu’il arrive a ebullition puis retirer du feu. Laisser infuser 15-20 min.
Dans un bol, melanger les oeufs, les jaunes d’oeufs et le sucre restant pendant 2-3 min ou jusqu’a ce que le mélange soit cremeux. Egouter votre crème et la verser dans lea ramequins de caramel. Couvrir d’une feuille d’aluminium et faire cuire au bain-marie, dans un four prechauffe a 160C pendant 20-25 min. Retirer du bain-marie doucement et laisser refroidir. Puis, mettre au frigo toute la nuit avant de le consomer.

Friday, June 8, 2007

Follow My Directions / Suivre Mes Instructions

couscous petit pois


Honey! You are being redundant. They are going to think that you are a couscous freak!”
I know I am being redundant and that I already talked about this subject in great detail before, but it just drives me crazy to see people on TV soaking couscous instead of steaming it!
Why steaming it instead of soaking it?
Well, we want to allow the grains of couscous to cook evenly without overcooking it or undercooking it. This is not the place for “al dente”.

Three words for an authentic homemade couscous dish: Steaming, Rubbing and Coating.

Steam your couscous in a couscous pot if you are a “couscous freak” like me, or a simple steamer lined with a chesecloth will work. No lid will be needed and the water shouldn’t touch the couscous.
Don’t be afraid to rub your couscous between your hands since it is the best and only way you will need to achieve this melt in your mouth texture that couscous is known for.

After steaming your couscous, don’t forget to finish it by coating it with butter, vegetable oil or olive oil while continuously rubbing it between your hands. This will help it keep its moisture and softness and will definitely convince you to throw the package directions away.

Green Peas and Golden Raisin couscous

Recipe:

- 1 ½ cup couscous
- ½ cup green peas
- ¼ cup golden raisins
- 6 mint leaves, chopped
- 1 tbsp pine nuts, toasted
- 3 tbsp olive oil
- Salt

Follow this recipe to prepare the couscous. Steam the green peas and golden raisins together until they are both tender. After coating the couscous with olive oil, mix in all the remaining ingredients by using your hands or a wooden spoon. Serve immediately.

couscous petit pois


Couscous aux Petis pois et Raisins Secs

In francais please:


- 300g de couscous
- 125g de petis pois
- 50g de raisins secs
- 6 feuilles de menthe, ciselees
- 1 c.s de pignons de pin, grilles
- 3 c.s d’huile d’olive
- Sel

Suivre cette recette pour la preparation du couscous. Faites cuire les petits pois et les raisins a la vapeur ensemble jusqu’a ce qu’ils deviennent tendres. Apres avoir enduit votre couscous d’huile d’olive, melanger tous les ingredients restants au couscous en utilisant vos mains ou une cuillere en bois. Servir aussitot.

Friday, June 1, 2007

Noir et Blanc / Black and White

milk


Separated and questioned, a couple gave us all the details about the effects that food blog has on their everyday life


-Stephanie: Eric was so happy that I made those chocolate and coconut macaroons. They are his favorite.

-Eric: I came home and the first thing I hear is: “aren’t they gorgeous! This time they are going to freak out!”

-Stephanie: Since he saw them at an Italian bakery, he has been so eager to try them.

-Eric: Don’t get me wrong, the macaroons were delicious but did she forget that I am on a diet? Can’t she stop tempting me with those never ending sweets?

-Stephanie: I usually don’t eat a lot of cookies. It is mostly for him that I baked these goodies. His f-a-v-o-r-i-t-e!

-Eric: I try not to eat a lot of sweets. I mean, come on! I gained four pounds since the beginning of her blog and she’s lost six.

-Stephanie: He has been so supportive since the launching of my food blog. Sometimes, he even gives me some advices on food styling and photography.

-Eric: It was fun, in the beginning. I am as much passionate about food as she is; but now, I just wanna have an enjoyable meal without constantly talking about the new recipes she is planning to explore or about the difference between flan, crème caramel and custard!


Chocolate and Coconut Macaroons

Recipe: adapted from Ina Garten’s coconut macaroons

- 14 ounces sweetened shredded coconut
- 14 ounces sweetened condensed milk
- 1 tsp vanilla extract
- 2 extra large eggs, at room temperature
- ¼ tsp salt
- For the chocolate glaze:
- 8 ounces semi-sweet chocolate
- ¾ cup heavy cream

In a bowl, mix the coconut with the condensed milk and the vanilla. Set aside. Whip the egg whites and salt until medium-firm peaks. Carefully fold the egg whites into the coconut mixture. Line a baking sheet with parchment paper and drop the batter using an ice cream scoop or simply too teaspoons.
Bake for 25 to 30 min in a preheated 325F until they are golden brown. Let cool on a wire rack.
In the meantime, place the chocolate in a bowl. Heat the cream until bubbles form around the edges. Pour it over the chocolate and whisk until the chocolate has melted. Dip the bottom of the coconut macaroons in the chocolate and put it on a large plate lined with parchment paper. Chill for about 2 hours or until the chocolate sets. Store the macaroons in an airtight container and refrigerate.

Tips: You will have some chocolate glaze left. If you don’t use it immediately, freeze it. When you will need it, just thaw it overnight and melt it on a pan of simmering water (bain marie)


coconut and chocolate macaroons

Macarons a la Noix de Coco et Chocolat

In francais please: Inspiree des macarons a la noix de coco d’Ina Garten

- 400g de noix de coco, sucree
- 400ml de lait concentre, sucre
- 1c.c de vanille
- 2 gros oeufs
- ¼ c.c de sel
- Pour le glacage au chocolat:
- 226g de chocolat noir
- 175g de crème liquide

Dans un bol, melanger la noix de coco, la vanille et le lait concentre. Dans un autre bol, mettre le sel et les blancs d’oeufs et battre en neige. Incorporer les blancs delicatement au melange de noix de coco. Garnir un grand plat allant au four avec du papier sulfurise et prechauffer votre four a 160C. A l’aide d’une cuillere a crème glacee ou de deux cuil a café, former des petites boules de la pate et mettre sur le plat. Faire cuire pendant 25- 30 min jusqu’a ce que la surface des macarons soit doree. Laisser refroidir sur une plaque a patisserie. Entre temps, mettre le chocolat dans un bol. Faites chauffer la crème liquide et enlever du feu juste avant l’ebulition. Verser doucement sur le chocolat et melanger a l’aide d’un fouet jusqu’a ce que le chocolat soit fondu. Tremper les macarons dans le chocolat et les poser ensuite sur une assiette garnie de papier sulfurise. Mettre au frais pendant 2 heures ou jusqu’a ce que le chocolat durcit. Ranger ensuite les mavcarons dans une boite hermetique et mettre au frigo.

Petites astuces: Il vous restera surement beaucoup du glacage au chocolat. Si vous n’allez pas l’utiliser tout de suite congeler-le et quand vous voudriez l’utiliser, sortez-le du freezer la veille et le jour venue le faire fondre au bain-marie.