Monday, August 25, 2008
Baked Apricots Filled with Almond Paste / Abricots Fourrés à La Pâte d’Amandes
I hated apricots for almost five years. I hated them like I now hate pistachios, like I once detested puddings, like I will always despise mint flavored chocolate.
Apricots were, and still are sometimes, deceiving and unpredictable. Apricots were rare, fleeting and dear one year, overwhelming, turned down and abundant the next; 70 pounds abundant, to be exact. And even with quite a big kitchen, they were crowding our space and our heart sitting by the wicker bread pin.
Of course we were delighted when we first received this sweet treasure. We polished it, smelled it and ate it at breakfast, lunch and dinner. We shared them with neighbors. We painted the pits, kept them in our pockets and invented games. My mother and I made apricots jam, apricots tarts, galettes, cakes, fruits salads and clafoutis. We were happy, although busy nearly every afternoon, worried about rotten apricots every night and growing tired of them every morning. Until summer 2003: 20 pounds of apricot jam in our kitchen, snug jeans and one bottle of Pepto Bismol. I was done with apricots.
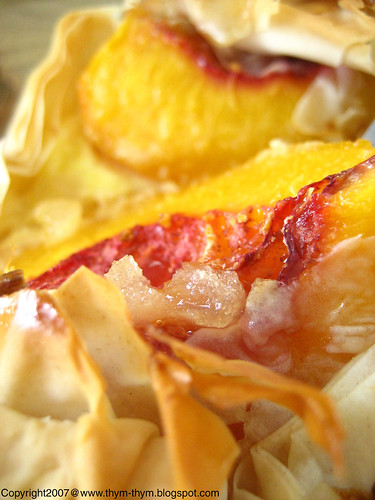
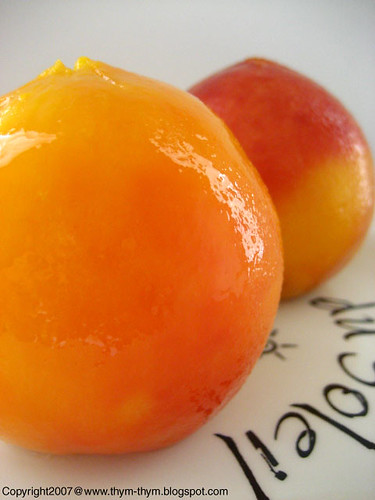
It took me five years to make peace with apricots again. But not any apricots: ripe, sun kissed, rose blushed apricots that were winking at me last Saturday at the farmer’s market. They were so beautiful, so sweet and meaty that I had to make the ultimate, dead easy, lazy friendly dessert that is Baked apricots with almond paste.
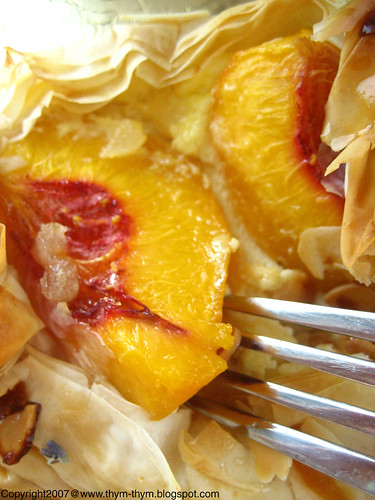
Almond paste based desserts are a staple in our kitchen and in many Mediterranean kitchens. While different recipes and varieties exist, the one that we use in North Africa is basically ground almond to which we add sugar and orange blossom water, or rose water, until we obtain a smooth paste. You halve the apricots, fill them with the almond paste and bake them until they start to soften slightly. That’s all. It is tart, sweet and wonderfully scented. Along with a scoop of ice cream, a cloud of crème Anglaise or Zabaglione, and I might even reconsider eating mint flavored chocolate again. Or may be not!
Baked Apricots Filled with Almond Paste
Recipe: Serves 4
- 8 apricots, ripe but still firm
- 4 ounces whole almonds, finely ground
- Caster sugar
- Orange blossom water
Preheat the oven at 350F. Butter a baking dish and set aside.
Halve and pit the apricots. Mix the ground almonds with some sugar, depending on the sweetness of the apricots. Taste the almonds and sugar mixture as you mix to see if you need to add more sugar or not. Start by adding 1 tbsp of orange blossom water to the almonds mixture and add more if necessary until you have a smooth paste.
Fill each apricot half with the almond filling and cover with the other apricot half. Continue with the remaining apricots.
Put them in your prepared pan and bake them for 10-15 minutes, or until the apricots start to soften slightly. Keep an eye on the apricots after 10 minutes, as you don’t want them to fall apart.
Serve warm as it is, or with a scoop of vanilla ice cream. The latter choice happens to be my favorite.
Note: This dessert should be consumed on the same day, as they become mushy once in the fridge.
You can find orange blossom water at Middle Eastern stores.
Abricots Fourrés à La Pâte d’Amandes
In Francais Please: Pour 4 personnes
- 8 abricots, pas trop mûrs
- 100g d’amandes entieres, finement hachées
- Sucre en poudre
- L’eau de fleur d’oranger
Préchauffer le four à 180C. Beurrer un plat allant au four et mettre de côté.
Couper les abricots en deux. Mélanger les amandes hachées avec un peu de sucre. La quantité du sucre depends de la douceur des abricots. Gouter au fur et à mesure le mélange d’amandes pour voir si il vous faut rajouter du sucre. Commencer par verser une c.s d’eau de fleur d’oranger sur le mélange d’amandes, et rajouter si necessaire jusqu’à obtenir une pâte homogene et souple.
Fourrer chaque moitié d’abricots de la pate d’amandes et couvrir de l’autre moitié du fruit. Continuer jusqu’a épuisement des fruits.
Arranger-les dans votre plat préalablement beurré et faire cuire 10-15 minutes, ou jusqu’à ce que les abricots soient tendres. Garder un oeil sur les abricots après 10 minutes de cuisson, car vous ne voulez pas que les fruits s’effritent.
Servir tiede, seuls ou avec une boule de glace à la vanille. La derniere proposition est celle que je préfere.
Note: Ce dessert doit se consommer le jour meme. Une fois au frigo, il commence à se ramollir
Tuesday, July 15, 2008
Greedily, Blissfully, Peacefully / Goulûment, Voluptueusement, Paisiblement
I wanted to call each and every one of you to tell you about this cake the minute I ate it. It was that good.
We baked it when my husband’s nieces, who now I just call my nieces, my sisters, my dear sisters, were here. The house was warm with their laughter, their helping hands in the kitchen, their midnight chitchat in bed and their little quarrels. Oh how I miss their chitchat with me in the kitchen and even their quarrels! They reminded me of my older sister and I.
I love having people over. I love seeing my guest room pleased and bright and being used for its actual purpose and not what was and is now a room where ironing table, a few days old folded laundry and mismatched baggage cohabit. I love to see my daughter playing and chasing her cousins, while being able to scream only one syllable of their names: “Sha!” “Meen!”
I loved our obstinacy to have dinners on the deck under pouring rain, laughing out loud at our “moist” salad. I loved our dinners on the deck under hungry mosquitoes, spraying and itching in pain. I loved our afternoons run to the near by supermarket to buy ice cream. I loved our expressions when we had our first tastes of Durian and then the second and third, and the look on our faces when we drove back home with this stinky fruit in the trunk of our car.
I drove you crazy with my persistence to stop you, even my hubby, from eating while standing up (you know it stresses me out)
I drove you crazy with my fake Pad Thai and your uncle with his charred-pseudo-grilled- shrimp. Remember?
I remember. I remember how happy I was to have you in my house, in my kitchen. I remember how we enjoyed going to the backyard to pick black raspberries and to make this cake together, which I chose to make, you agreed to help and we all loved to eat greedily, blissfully, peacefully, sitting on the countertop. I remember how sad I was to drop you at the airport and how hard it was to say goodbye and to let you go, my dear sisters.
I was drawn by this cake more than any other cake in Jamie Oliver cookbook mainly because the use of olive oil in the batter intrigued me. I’ve heard about this odd combination before but never had the courage to give it a go. What a waste of years! All my life I’ve been dipping bread in olive oil, which isn’t a bad thing either, when I could have used it to make this cake. This is pure genius. The olive oil gives richness and moisture and most importantly depth of flavor to the cake that no other vegetable or canola oil or even butter would have given. The crumb is light and the berries are just drenched in this lovely aroma of citrus and olive oil. The cake can be whipped up in ten minutes without even using a stand mixer. Weeks later and I still have the taste of this lovely combination in my mouth. Still have the lovely voices of my sisters in my heart.
Nada’s Cake
Recipe: Adapetd from Jamie’s Italy
- 4 large eggs at room temperature
- 1 ¼ cups sugar
- ¾ cup unsalted butter, melted
- ½ cup extra virgin olive oil
- ¾ cup milk
- 1 tsp pure vanilla extract
- 3 cups unbleached all-purpose flour, sifted
- 1 ½ tsp baking powder (This is the one I use all the time)
- A good pinch of sea salt
- Zest of 2 lemons, grated
- Zest of 2 oranges, grated
- 6 oz fresh black raspberries or blueberries or red sweet grapes such as Muscat or fragola
- A bit of butter to grease the pan
Preheat the oven to 350F. Generously butter a 9-inch pan and line the base with waxed paper. Set aside.
Either by hand or in a the bowl of stand mixer fitted with the paddle attachment, whisk the eggs and sugar until thick and pale yellow, about 3 minutes, then add the butter, olive oil, milk, lemon and orange zest and vanilla. Mix well, then mix in the flour, baking powder and salt until everything is thoroughly blended. Set aside for 10 minutes for the flour to absorb the liquid.
Stir about a quarter of the berries into the batter, pour into your prepared cake pan, and scatter the rest over the top. Bake the cake for 45- 55 minutes, or until the top is a deep golden brown and a toothpick inserted comes out clean.
Let it cool on a wire rack in the pan for 10 minutes, then run a knife along the sides of the pan to turn it out.
The cake can be stored at room temperature, wrapped, for up to four days. It is even better on the following day.
Gâteau Nada
In Francais Please: adaptée de Jamie’s Italy
- 4 gros oeufs, a temperature ambiante
- 270g de sucre en poudre
- 200g de beurre, fondu
- 125ml d’huile d’olive extra vierge
- 200ml de lait
- 1 c.c d’extrait de vanille
- 360g de farine, tamisée
- 1 ½ c.c de levure chimique
- Une bonne pincée de sel marin
- Le zeste de deuz citrons
- Le zeste de deux oranges
- 400g de framboises noires, de myrtilles, ou de petits raisins type Muscat
- Une noisette de beurre pour le moule
Préchauffer votre four a 160C. Beurrer génereusement un moule à gâteau de 22cm de diametre et garnir le fond de papier sulfurisé, puis mettre de côté.
Avec un fouet ou à l’aide d’un mixeur, battre les oeufs avec le sucre jusqu’à ce que le mélange devienne épais et d’une couleur jaune pale, environ 3 minutes. Ajouter le beurre fondu, le lait, l’huile d’olive, les zestes et la vanille. Bien mélanger puis ajouter la farine tamisée, la levure chimique et le sel et incorporer jusqu’à obtenir un mélange homogene. Ne pas trop mélanger. Laisser reposer 10 minutes afin que la farine absorbe un peu du liquide.
Incorporer le quart des fruits à la pate, verser dans le moule préparé et mettre le reste des fruits sur le gateau. Faire cuire 45-55 minutes, ou jusqu’à ce que la surface soit d’une belle couleur dorée et qu’un cure-dent inséré en ressort propre.
Laisser le gâteau refroidir dans son moule sur une grille patissiere pendant 10 minutes, puis passer un couteau autour des bords du moule et démouler.
Ce gâteau se conserve à temperature ambiante, couvert de film plastique, jusqu’à quatre jours. Il est d’ailleurs meilleur le lendemain de sa cuisson.
Wednesday, April 9, 2008
Easy, Moist, Light, Delicious and Moist / Facile, Moelleux, Léger, Délicieux et Moelleux
Ah! Banana cake! The word alone reminds you of slow weekends, family picnics and afternoons sitting by the window listening to the drip, drop of the rain while sipping a warm cup of tea.
To me, banana cake doesn’t ring a bell to my childhood memories, but bananas! Oh, yes.
Growing up, in the beginning of the 90’s in Algeria, it wouldn’t even cross my mind to put mashed bananas in a cake. It wouldn’t even cross my mind to let bananas go untouched and abandoned for days on the counter top. It wasn’t that we were that found of bananas, it was because we hardly ever see it in our kitchen. You see, bananas were to us what watermelons were to Japan: Expensive. They were so expensive and dear that eating them outside was considered an insult to those who can’t afford it.
Bananas were a “luxury” fruit. The one you see meticulously displayed in brown rattan baskets, along with pineapples, litchis and other exotic, unknown fruits at gourmet stores (we call these type of stores in our slang: pharmacist. I don’t know how this word came to be used that way, but we use it for all shops that are outrageously pricey. And we use it for the pharmacist as well. Got it?).
Bananas were to be bought on special events, on special days. My mother would buy it for us when she wanted it to spoil us, when we had good reports at school, when we had a birthday to celebrate, when they were on sale, which rarely happened. And when these days took place, my mother would cut the banana in half, hide it behind her back and ask us to choose. Otherwise, we would be measuring and studying the banana from all corners to see which half is bigger. Eating whole bananas were exceptional. But even with half a banana, we were happy, appreciating and extending seconds to minutes of lavish pleasure. (A funny story to show you the status of bananas at that time: I remember a distant cousin who went to live in France. After a few months there, he sent a picture to his parents of him near his refrigerator wide open, holding a bunch of bananas in his hand. How did I see this picture? His mother would carry the photo with her and show it to anyone asking after her son.)
Years went by, and now bananas went from rattan baskets at gourmet shops to donkeys pulling carts packed with bananas at the market. Even at rural markets. Bananas were cheap, even cheaper than potatoes at some point. We made banana tarts, banana mousse, banana papillotes with vanilla beans; we even tried banana tagine, which was quite good.
After some experiments, some misadventures and abandoned bananas on the counter top I came to the conclusion that I wasn’t found of bananas, but I love banana cake/bread.
I came across this recipe a while ago while browsing my usual blog reads. It appealed to me more than the others banana bread because it didn’t require the use of much ingredients and fatty calories. I know what you’re thinking about “healthy” cakes, and I feel the same way, but trust me, and trust David, this isn’t your typical dry, tasteless cake. This, my friends is the best banana cake I have ever had. I know I can exaggerate sometimes, especially when it involves baked goodies, but not today. Not only it is very easy to make and low in calories, which is always a plus for my hips, but it’s also moist, light, fragrant, delicious and moist. I know I said moist twice, but this is just how moist this cake is. David Lebovitz, who is a very talented pastry chef and a very funny Parisian, uses a combination of banana and cocoa nibs. Instead, I used banana and fresh Algerian dates, which was heavenly good. Why have I never thought about this combination before? Oh, yes! The pharmacists!
Banana and Dates Cake
You can use a mixture of all purpose flour and white whole-wheat flour, or just use the all-purpose one. Adding dates and orange zest to the batter was a personal choice, as I love the combination of both. You can fellow David’s delicious Directions by using chocolate chips or cocoa nibs instead of dates, and cinnamon instead of orange zest.
Recipe: Adapted from here
- 1 cup (120 g) all purpose flour
- ½ cup (90g) white whole-wheat flour
- 1-teaspoon baking powder
- ½ teaspoon baking soda
- ½ teaspoon salt
- 1 teaspoon Orange zest
- ¾ cup (150 g) sugar
- 2 tablespoons (55 g) melted butter (salted or unsalted)
- 1 large egg white
- 1 large egg, at room temperature
- 1 cup (250 ml) banana puree, made from about 2 very ripe medium-sized bananas
- ½ cup (125 ml) plain yogurt, regular or low-fat (I used regular yogurt, but you can use sour cream as well)
- ½ teaspoon vanilla extract
- 1/3 cup (60 g) Dates, pitted and diced
Butter a 9-inch (23 cm) square pan or a loaf pan and line the bottom with a sheet of parchment paper. Preheat the oven to 350F (180 C).
- Sift together in a bowl the flour, baking powder, baking soda, and salt. Mix in the sugar.
- In a large bowl, mix together the butter, egg white, egg, banana puree, sour cream, vanilla and orange zest, if using.
- Make a well in the center of the flour mixture and stir in the wet ingredients with a spatula until almost mixed. Add in the dates and stir until just combined, but don't over stir: stop when any traces of flour disappear.
- Scrape the mixture into the prepared pan and bake for 40 minutes, or until the center feels lightly springy and just done, and a toothpick inserted inside the cake comes out clean.
- Cool on a baking rack.
Storage: This cake will keep well for 3-4 days, or can be frozen, wrapped in plastic wrap, for a few months.
Cake à la Banane et Dattes
Vous pouvez utiliser un mélange de farine complete et farine blanche, ou utiliser seulement la farine blanche. Le choix de dattes et le zeste d’orange était purement personnel, car j’adore la combination des deux. Les dattes peuvent etre remplacé par de pépites de chocolat et le zeste d’orange par de la canelle.
In Francais Please: adapté d’ici
- 120g de farine
- 90g de farine blanche complete
- 1 c.c de levure chimique
- ½ c.c de bicarbonate de soude
- ½ c.c de sel
- 1 c.c de zeste d’orange
- 150g de sucre
- 55g de beurre, fondu (salé ou doux)
- 1 gors blanc d’oeuf
- 1 gros oeuf
- 250ml de purée de banane
- 125ml de yaourt nature (entier ou allégé)
- ½ c.c d’extrait de vanille
- 60g de dattes, dénoyautées et coupées en dés
Beurrer un moule carré de 23cm de diametre ou un moule à cake et garnir le fond d’un papier-parchemin. Préchuaffe le four a 180 C.
- Tamiser les farines, la levure, bicarbonate de soude, et le sel. Ajouter le sucre.
- Dans un grand bol, mélanger le beurre, le blanc d’oeuf, l’oeuf, la purée de banane, le yaourt, la vanille et le zeste d’orange.
- Faire un puits au milieu de la farine et verser dedans le mélange precedent en utilisant une maryse jusqu’à ce que le tout soit presque uniforme. Ajouter le dattes et mélanger juste ce qu’il faut pour bien les dispercer, mais ne pas trop mélanger: arrêter-vous quand toute trace de farine ait disparu.
- Verser la pâte dans votre moule beurré et faire cuire pendant 40 minutes, ou jusqu’à ce que le centre semble cuit et qu’un cure-dents en ressort propre.
- Laisser refroidir sur une grille à patisserie sans le démouler
Ce cake se garde bien pendant 3-4 jours, ou peut être congelé, enveloppé dans un film plastique pendant quelques mois.
Thursday, November 8, 2007
Pomegranate / Grenade
The Pomegranate is a fruit cultivated in some parts of Asia (Afghanistan, Pakistan, India, Iran and Japan) in California, Arizona and Latin America, and over the whole Mediterranean region.
It is the symbol of the city of Granada in Andalusia, Spain and the official logo of many cities in Turkey.
Fresh pomegranate season is from September to November in North America.
How to choose it:
The pomegranate should have a pronounced red color and a shiny skin, with no blemishes or bruises. It should also be heavy for its size to guarantee a juicy fruit.
How to peal it: (a very easy way)
After halving it with a knife, remove the white casings and invert the pomegranate in a way that the outer skin will be facing you and the inner seeds will be facing a bowl. Take a tablespoon and tap the pomegranate with the back of the spoon. The seeds will pop out of the pomegranate into the bowl.
How to eat it:
The seeds can be eaten raw or in a fruit salad and goes very well with lamb’s lettuce (mâche). It can be used in making syrup, juice, jelly, liqueur, sauces or jams. In India and Pakistan, they are widely popular in chutneys, relishes and curries. In Turkey, pomegranate sauce is used in salad dressings and to marinate meat while pomegranate syrup (thank you Hande!) is used in Muhamara (Turkish red pepper, cumin and walnut spread) and Güllaç (a famous Turkish dessert).
This recipe is my favorite way, if not the only way, I eat pomegranate since I was a kid.
It is basically pomegranate seeds scented with orange blossom water, which results in a refreshing and very aromatic fruit salad. Orange blossom water, if you are not familiar with, is distilled water that contains the essential oils of orange blossom. It is very sweet-scented and a little goes a long way.
A Simple, easy and very satisfying dessert. That's how I like to start my weekend.
Happy weekend everyone.
Orange Scented Pomegranate
Recipe: Serves 4 people
- 2 pomegranates
- 2 small tbsp granulated sugar
- 2 tbsp orange blossom water
Remove the seeds from the pomegranate and place them in a bowl. Add sugar and orange blossom water and mix using a spoon. Cover with a plastic wrap and chill for at least ½ hour before serving.
Grenade parfumée à l’orange
In francais please: Pour 4 personnes
- 2 grenades
- 2 petites c.s de sucre en poudre
- 2 c.s d’eau de fleur d’oranger
Récupérer les graines de grenade et les mettre dans un bol. Ajouter le sucre et l'eau de fleur d’oranger et mélanger à l’aide d’une cuillère. Couvrir de fil plastic et mettre au frais au moins ½ heure avant de déguster.
Thursday, September 20, 2007
Apples Season / La Saison des Pommes
You know autumn is right around the corner when apples start flooding markets and roadsides. While apples aren’t my all time favorite fruit, in part because I’ve always associated them with strict diet and hungry nights, I love using them in baking and salads.
Apples are not only a good source of vitamin C and antioxidants, they are also a very versatile fruit that can be transformed into jams, curds, sauces, preserves, chutneys, apple butter and more depending on your creativity and the varieties.
As I enjoy snacking with a Gala apples or a Golden Delicious, my favorite varieties of apples to bake with are Rome Beauty, Pink Lady and Granny Smith.
For this season of apples I started with apples and rosemary muffins for Sunday breakfast. Adding rosemary to the recipe was my personnal touch to a simple apples and nuts muffins. The combination of apples and rosemary might seem odd at first, but you will discover that the rosemary being slightly bitter and fragrant actually gives a nice smokiness and warmth to those moist muffins, different from the usual bland fruity muffin.
I used Golden Delicious for this recipe but you can use any kind of apples appropriate for baking, making you kitchen smells like an orchard, smells like autumn, smells like home sweet home.
Apples and Rosemary Muffins
Recipe: adapted from here
- 1 cup plain flour
- 1 cup whole wheat flour
- ¼ cup oat bran or wheat bran
- 2 tsp baking powder
- ½ tsp baking soda
- ¼ tsp salt
- 1 tsp ground cinnamon
- 2/3 cup firmly packed brown sugar
- 2 large eggs
- 1 ½ cups plain yogurt or buttermilk
- ¼ cup unsalted butter, melted
- 1 ¼ cups grated, peeled and grated apple (about 1 large)
- 1 tsp rosemary leaves, chopped
- ½ cup golden raisins
- 1 small apple, silvered
- 2 tbsp granulated sugar mixed with 1 tsp ground cinnamon
In a large bowl, stir together the flours, bran, baking powder, baking soda, slat, cinnamon, and brown sugar. Set aside.
Beat the eggs on low speed until blended, and then beat in the yogurt and butter. Add the dry ingredients and mix on low speed just until half moistened. Add the apple, raisins, and rosemary and stir just until evenly distributed. Do not over mix.
Spoon the batter into buttered muffins cups. Put a thin slice of apple on each muffin and sprinkle the cinnamon sugar evenly over the top. Bake in a preheated 400F oven for 15-18 minutes.
Let the muffins cool in the pan on a wire rack for 2 minutes, and then turn out onto the rack. Store in an airtight container at room temperature for up to 2 days or freeze for up to a month.
Muffins aux Pommes et Romarin
In francais please: adaptée d’ici
- 155g de farine
- 155g de farine complete
- 20g de flocons d’avoine
- 2 c.c de levure chimique
- ½ c.c de bicarbonate de soude
- ¼ c.c de sel
- 1 c.c cannelle
- 155g de sucre brun
- 2 gros oeufs
- 375g de yaourt nature
- 115g de pommes, épluchées et râpées
- 1 c.c de romarins, finement haché
- 60g de raisins secs
- 2 c.s de cucre mélange avec une c.c de cannelle
- 1 petite pomme, coupée en fines tranches
Dans une grande jatte, mettre la farine, avoines, levure, bicarbonate, sel, cannelle et sucre brun. Mettre de coté.
Battre les oeufs legerement, puis ajouter le yaourt et le beurre et battre. Ajouter ensuite les ingredients secs et mélanger juste pour que tout soit bien incorporé. Ajouter les pommes, les raisins et le romarin et mélanger. Ne pas trop mélanger.
Verser la pate a muffins dans un moule a muffins beurré. Mettre une fine tranche de la pomme sur chaque muffin et saupoudrer de sucre/cannelle le dessus de chaque muffin. Faites cuire dans un four préchauffé a 200C pendant 15-18 minutes. Laisser refroidir 2 min dans le moule puis demouler les muffins sur une grille de patisserie.
Ces muffins se gardent dans une boite hermétique a temperature ambiante pendant 2 jours ou peut se congeler jusqu’a 1 mois.
Monday, September 10, 2007
It's Never Too Late / Il n'est jamais Trop Tard
I waited twenty-four years to have my first cheesecake experience. It was three months ago in Denver where I had Kahlua Cocoa-coffee cheesecake. Nobody told me that once you have a bite of a good cheesecake, you get addicted to it and there is no coming back. The following day, my husband and I had another slice and the next day another one. Three days in a row all we had for late night dessert was Cheesecake, and the same flavor.
Now eating cheesecake is pretty easy but baking it is a different story. You see I have never baked cheesecakes before. I have, what we call: “cheesecakebakophobia” . Basically, my worst nightmare would be ending up with a giggly, uncooked cheesecake that would ooze out of my spring-form tin and landing in my baking sheet or worst in my oven.
And then, it all changed two months ago when I saw Haalo’s cheesecake. I was mesmerized. It was meant to be. Haalo’s cheesecake was going to be my first cheesecake baking experience. Why her cheesecake, you might ask? It has nothing special, does it? I went with this one because I trust Haalo’s recipes. If I had to list all the successful concoctions that went from her blog to my table, I would have to change my blog name to “Haalo’s second Kitchen” or “Cook almost anything… at least twice”. Secondly, as she was explaining the outcome of her cheesecake, she said three magic words that were like music to my ears: “it's soft and creamy but with a wonderfully light texture. The topping adds that bit of sweetness and the base is appealingly crunchy”. And what better than a creamy, light cheesecake with a crunchy crust.
The recipe is very easy to follow and I was surprised to see that the cheesecake doesn’t cook in a water bath like most of cheesecakes do. I halved the recipe and used the last handful of cherries found at the market this weekend to decorate the top along with my strawberry jam.
When slicing the cheesecake, I was charmed by the small bites, great for entertaining to pop in your mouth. Haalo was absolutely right about the texture. It’s creamy yet not heavy and very fresh with the ricotta cheese. You almost don’t have to use your teeth, except for the crust that is just buttery and crunchy with the adding of quick oats. The only thing that I would do differently next time is to use less jam for the topping because it was a bit sweet for my taste.
Other than that, it was a great experience, more addictive than eating the cheesecake. I came out victorious and I am proud of myself. I was a good girl this time; I only had one slice of it. Fine two…maybe three. It was late, I don’t remember.
Baked Strawberry and Cherry Cheesecake
Recipe: adapted from here
The crust:
- 5 ounces unsalted butter
- 4 ounces quick oats
- 4 ounces graham crackers
- 2 tbsp brown sugar
The filling:
- 13 ounces light cream cheese
- 4 ounces ricotta cheese
- 3 ½ ounces caster sugar
- 5 ounces light sour cream
- 2 eggs
- 2 tsp vanilla paste or extract
- 1 tbsp flour
The topping:
- 9 ounces cherries or any fruit in season and depending on your taste
- 7 ounces strawberry jam
Make the Base:
Butter a 20cm/8inch round spring-form tin - line the base with baking paper.
Place the butter in a saucepan to melt - when melted add the rolled oats, cookie crumbs and sugar and stir well to combine.
Pour the mixture into the lined tin and press it down firmly to create an even base.
Store in the fridge for 10-15 minutes.
Make the Filling:
Place the cream cheese, ricotta sugar and sour cream into the bowl of a mixer and beat until smooth.
Add the eggs, vanilla paste and plain flour and continue to beat until smooth.
Pour this over the chilled base and cook in a preheated 180°C/350°F oven for 40-45 minutes or until the filling is just set.
Remove from the oven but allow it to cool in the tin.
Make the Topping:
Place the jam into a small saucepan and heat gently until the jam has melted.
Let this cool a little before spreading it over the cold cheesecake, then top with your fruits.
You will notice that the cheesecake will have shrunk away from the sides of the tin so the some of the topping will ooze out over the edge.
Cover and place in the fridge for a few hours or overnight. For best result,take it out of the fridge one hour prior to serving.
Cheesecake aux Fraises et Cerises
In francais please: adaptée d'ici
- Pour la base:
- 125g de beurre, fondu
- 100g de flocon d’avoine
- 100g de petit biscuits secs, hache finement au robot
- 2 c.s de sucre brun
- Pour la garniture:
- 375g de cream cheese Philadelphia allégé, mou
- 100g de fromage ricotta
- 80g de sucre en poudre
- 125g crème aigre, allege
- 2 eggs
- 2 c.c d’extrait de vanille ou pate de vanille
- 1 c.s de farine
- Pour la decoration:
250g de cerises, ou votre fruit prefere de saison
200g de confiture de fraises
Preparer la base:
Beurrer un moule a cheescake (20cm de diametre) et garnir le fond de papier sulfurise.
Melanger le beurre fondu aux flocon d’avoine, sucre brun, biscuits jusqu’a complete incorporation.
Verser le mélange au fond du moule et bien applatir avec votre main pour obtenir une base uniforme. Mettre au frais 10 a 15min.
Preparer la garniture:
Mettre cream cheese, ricotta, sucre et crème aigre dans le bol d’un mixeur ou avec un batteur et melanger jusqu’a ce que le mélange devienne soyeux et lisse.
Ajouter les oeufs, vanille, farine et continuer a batter jusqu’a ce qu’elle redevienne lisse.
Verser sur la base prealablement refroidi et faites cuire dans un four prechauffe a 180C pendant 40-45 min ou jusqu’a ce que le cheescake soit ferme mais un peu mou au center quand vous le bougez legerement.
Laisser refroidir dans son moule.
Preparer la garniture:
Mettez la confiture de fraise dans une casserole et faites la tiedir. Entre temps, épépiner les cerises et mettre de côté. Verser la confiture sur le cheesecake encore tiede et decorer avec les cerises a votre guise.
Couvrir et mettre au frais pendant des heures ou toute une nuit.Sortir du frigo une heure avant de le servir, pour une meilleure degustation.
Thursday, July 26, 2007
Sweet Laziness / Douce Paresse
I am a total bore sometimes. I wish I could tell you that this dessert has a story of sweet childhood memories and stained white little dresses. I wish I could tell you that this dessert has grown on me through the years, reminiscence of a peach tree planted in the courtyard of my grandparents. I wish I could tell you that my inspiration came from a trip to south of Spain years ago, sitting on my father’s shoulders and indulging myself to sweet peach tarts. I wish I could tell you that while making this dessert, unicorns were stirring my ricotta, birds were singing at my window and bees were offering me their honey.
But I won’t. Because my only excuses behind making this improvised yet delicious dessert were a promise I made, a lazy afternoon and some ripe peaches. I am such a lame. I know. You can boo at me all you want, for now. Because once you’ve tasted my peach parcel with creamy ricotta and fragrant lavender honey, you will start cheering me up and start singing the merits of laziness for generations to come.
Peach Parcels with Ricotta and Lavender Honey
Recipe: Serves 4
- 2 ripe yellow peaches
- 3.5 oz Ricotta cheese
- 2 tbsp honey
- ½ tsp Orange blossom water
- 1 egg yolk
- 1 tsp candied ginger, diced
- ½ tsp dried lavender flowers, plus a few for decorating
- 1 tbsp flaked almonds
- Filo dough
- 2 tbsp melted butter
Using a knife, make an incision on top of each peach. In simmering water, blanch your peaches for only 2 minutes then start peeling off the skin. Cut each peach in quarter and set aside. In a saucepan, put 1 tbsp of honey with lavender pods. Bring to boil then set aside to infuse the honey with the lavender. Using a whisk, mix the ricotta cheese with the remaining honey, the egg yolk and the orange blossom water.
Cut 4 small rectangular out of the filo dough, and then process layering (see picture) brushing the dough with butter at each stage. Sprinkle the candied peaches on the peaches and close your parcel by forming any shape you want. Just keep in mind to leave an opening on top of the parcel. Bush with some butter again and drizzle some of the lavender honey on top of each parcel. Sprinkle with some flaked almonds and bake in a preheated 350F oven for about 20 min or until golden brown on top. Serve warm with some lavender pods on each parcel.
Croustillant de Pêche a la Ricotta et Miel de Lavande
In francais please: Pour 4 personnes
- 2 peches jaunes, mures
- 100g de fromage ricotta
- 2 c.s de miel
- ½ c.c d’eau de fleur d’oranger
- 1 jaune d’oeuf
- 1c.c de gingembre confit
- ½ c.c de fleurs de lavande sechees, plus quelques fleurs pour decorer
- 1 c.s d’amandes effilees
- 2 c.s de beurre fondu
A l’aide d’un couteau, faites une incision en forme de croix sur chaque peche. Mettre de l’eau a bouillir dans une casserole puis faites blanchir les peches pendant 2 min. Eplucher les peches et couper chacune d’entre elles en quatre. Mettre de cote. Dans une autre casserole, mettre une c.s de miel avec les fleurs de lavande et des que le miel commence a bouillir, retirer- le du feu et laisser de cote pour infuser. A l’aide d’un foeut, melanger la ricotta avec le reste de miel, le jaune d’oeuf, et l’eau de fleur d’oranger.
Couper 4 petits rectangles de votre pate a filo, puis commencer a monter votre dessert (voir photo) en badigeonnant de beurre fondu a chaque etape. Parsemer quelques morceaux de gingembre confit sur chaque peche et fermer votre petit rectangle sous la forme que vous desirer. N’oubliez seulement pas de laisser une petite ouverture au sommet de chaque portion. Badigonner de beurre fondu toute la surface de la pate a filo, Verser une peu du miel parfume a la lavande sur chauqe portion et saupoudrer d’amandes effilees. Faites cuire dans un four prechauffe a 180C pendant 20 min ou jusqu’a ce que la surface soit bien doree. Servir a temperature ambiante saupoudrer de quelques fleurs de lavande sur chaque croustillant.


