Tuesday, April 29, 2008
A Second Chance / Une Deuxième Chance
A few years ago, back when we were dating without even dating (that’s a long story!), my husband told me that he didn’t like bread pudding. He dropped it just like that, in the middle of our conversation, between a sip of half-an-hour-cold-espresso and him thinking about having a goatee. I didn’t know what to think of this situation. A man with a goatee! And who doesn’t like bread pudding! Will it work?
Needless to say how confused I was. But this happened during our first days of romance, and the rule number 123 of dating for dummies tells you not to take it too seriously when a man admits that he doesn’t like bread pudding, but they tell you nothing about the sudden urge of having a goatee! Confused? I know! Me too.
And what’s more confusing is that I agreed with his bread pudding aversion (but not with the goatee!) I agreed to the dislike of centuries old dessert without even arguing. I agreed to hate bread pudding when I know how much I love drowning my bread in milk before eating it. I agreed to dislike something I've actually never had before. I agreed to something I thought I, myself, hated for years, until this past weekend.
This past weekend there were no dating game, no loosing game, no mascara and no shiny shoes. This past weekend was about an unfinished business, an unknown dessert, and about using some of my leftover bread. And I have to admit that I cannot find better, cozier, and more charming way to use leftover bread than by making bread pudding. It’s every leftover bread's fantasy to end up swimming in a custard bath with raisins and nuts as bathtub toys.
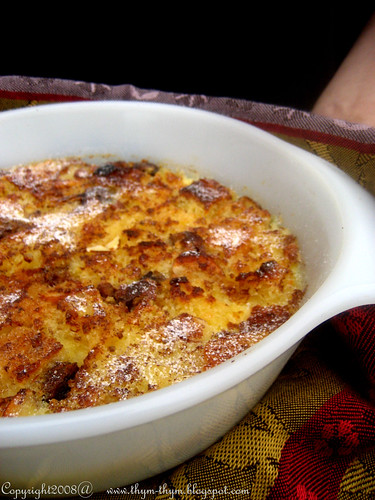
This bread pudding is the most popular sweet in Egypt. It’s called Om Ali, which means Ali’s Mother. The traditional way is to use baked fillo pastry broken into pieces with a mixture of cream and milk, but people find all sorts of ways of making it; with pancakes, with thinly rolled out puff pastry, and with pieces of bread.
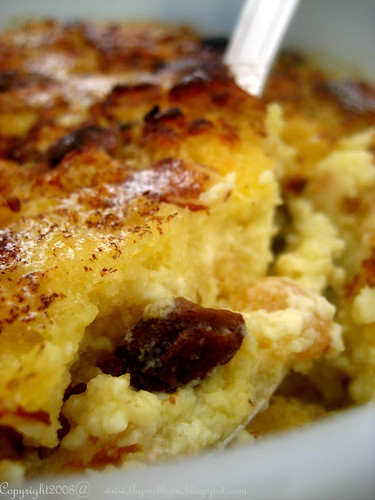
I went for “a lighter custard”, skipping the heavy cream and adding eggs to the mixture. The bread is soaked in an orange blossom water perfumed custard for 20 minutes, sprinkling raisins and nuts in between layers, and then baked until nicely browned and the pudding tips nicely out of its mold.
As I was taking the pudding out of the oven, my husband came to the kitchen and saw me holding the golden-crusted dessert in my arms and asked what it was. “Bread pudding”, I said. “But before you say anything, give it a chance!" I said "I know how much you hate bread pudding”
“Who told you I hate bread pudding? I hated the one I had once in my college years, not all bread puddings. Besides, yours looks scrumptious”, he replied
Needless to say how confused I was. But I am glad I gave both of them a second chance.
Om Ali : Egyptian Bread Pudding
Recipe:
You can also add some semi-sweet chocolate chips to the custard. It’s not traditional, but I am sure Om Ali wouldn’t mind.
- ½ lb days old of your favorite bread (I used this one)
- ¼ cup raisins
- ¼ cup coarsely chopped of your favorite nuts (I used pistachios and almonds)
- 3 large eggs
- ½ cup sugar
- 1 tbsp orange blossom water
- A pinch of salt
- 2 cups whole milk
- ½ tsp ground cinnamon, for dusting on top
Preheat the oven to 350F. Lightly butter a 2-qt (2L) baking dish.
Trim the crusts from the bread into ½ inch (12mm) cubes. Scatter the bread in the prepared baking dish, sprinkling the raisins and nuts in between the layers.
In a large bowl, whisk together the eggs, sugar, salt, and orange blossom water until blended, then whisk in the milk. Pour the mixture over the bread, dust with the cinnamon and set aside for 20 minutes to moisten the bread. Tilt the dish occasionally to keep the bread evenly covered with the liquid.
Place the baking dish in a bigger pan and pour hot water into the pan to reach halfway up the sides of the dish. Bake until golden brown and a knife inserted into the center comes out clean, 40-45 minutes. Carefully remove the baking dish from the water bath and let cool completely on a wire rack. Serve at room temperature or refrigerate to chill for up to 3 hours.
Om Ali: (La maman d’Ali) Pudding Égyptien
In Francais Please:
Vous pouvez aussi ajouter des pépite de chocolat si vous le souhaitez au pudding. Ce n’est pas trés traditionnel avec la recette, mais je suis sure que Om Ali fermera les yeux dessus.
Je soumet mon pudding a ma chere Marion et son jeu fort original “ Si j’avais du Pandan…”
Bien sur je dois me soumettre à ses questions tellement difficile avant de jouer:
1- De couleur verte
2- Shrek (Là sérieusement j’ai dû triché un peu parce que je croyais vraiment que c’était d’un vrai ogre que tu parlais. La honte! ;-)
3- Panda
- 250g de pain de quelques jours (J’ai utilise ce pain)
- 45g de raisins secs
- 45g de vos noix favoris, grossierement hachées (J’ai utilize pistache et amandes)
- 3 gros oeufs
- 125g de sucre
- ½ c.c de canelle en poudre
- 1 c.s d’eau de fleur d’oranger
- Une petite pincée de sel
- 500ml de lait entier
Beurrer légerement un plat d’une capacité de 2L allant au four. Préchauffer le four à 350F.
Retirer les croutes du pain et les couper en petits dés d’1 centimetre et les mettre dans votre plat en alternant avec noix et raisins secs.
Dans un grand bol, battre les oeufs, sucre, eau de fleur d’oranger, et le sel jusqu’a ce que tout soit bien incorporé, puis verser dessus le lait. Verser ce mélange sur les morveaux de pain, saupoudrer de canelle, et mettre de côté pendat 20 minutes pour laisser au pain le temps d’absorber le liquide. Remuer le palt de temps en temps pour que le pain reste toujours couvert du liquide.
Faire cuire le pudding au bain marie pendant 40-45 minutes, ou jusqu’à ce que le pudding devienne doré et qu’un couteau inseré à l’interieur en ressort sec. Retirer le plat du bain marie et laisser refroidir completement sur une grille à patisserie avant de servir. Servir à temperature ambiante ou mettre au frais pendant au moins 3 heures avant de servir.
Labels:
Breads,
Cakes and Cie,
gourmandises
Tuesday, April 22, 2008
My Favorite Pickled Beets Recipe/ Ma Recette Préférée de Betteraves au Vinaigre
I had my first pickled beets about a few months ago at the local fruit market, and I instantly fell in love with them. They were on a tray for people to sample along with pickled onions, cauliflower, cabbage and other bright veggies. As I stood there, my mouth started salivating at these vinegary pickles just like your mouth must be salivating right now as you are reading these pickled words.
The taste of the beets was different from fresh beets. They didn’t have this “earthy” flavor anymore. They were sour, sweet, spicy, although the vinegar was a bit overpowering the rest of the ingredients.
After a few attempts at recreating what I thought was the perfect combination of sweet, sour and spicy pickle, I find this recipe to be the perfect pickled beets I’ve had so far. I added spearmint to the marinade as I like the fresh note that it adds to the marinade, but you can use dill if it’s what you prefer.
Pickled Beets
Recipe: Gourmet, December 2000
- 1 cup cider vinegar
- 1/2 cup water
- 1/2 cup sugar
- 1/4 teaspoon mustard seeds
- 1/4 onion, halved
- 1 small bay leaf
- 3/4 teaspoon whole black peppercorns
- 1/4 bunch fresh spearmint
- 3 beets (1 lb without tops)
Betteraves Au Vinaigre
In Francais Please: Gourmet, Decembre 2000
- 250ml de vinaigre de cidre
- 125ml d’eau
- 125ml de sucre en poudre
- ¼ c.c de graines de moutarde
- ¼ oignon, coupé en deux
- 1 petite feuille de laurier
- ¾ c.c de graines de poivre noir
- ¼ bouquet de menthe
- 3 betterave (environ 500g sans leur tige)
- Bring all ingredients except beets to a boil in a 2- to 3-quart saucepan, stirring until sugar is dissolved. Cover and simmer 30 minutes.
- Mettre tous les ingredients à part les betterave dans une casserole de 2- à 3-Litres de capacité, porter à ébullition en remuant jusqu’à ce que le sucre se dilue. Couvrir et laisser frémir pendant 30 minutes.
- Meanwhile, Cook beets in a saucepan of boiling salted water until tender. Drain and cool. Slip off skins and cut into 1/2-inch pieces.
- Entre temps, faire cuire les bettraves dans une casserle d’eau bouillante salée. Egoutter et laisser refroidir. Retirer la peau et couper en morceaux d’un centimeter d’épaisseur.
- Cool the marinade, and then pour through a fine sieve into a bowl.
- Laisser la marinade refroidir, puis passer à travers une fine passoire.
- Stir together beets and marinade, then marinate, covered and chilled, 1 day.
- Mélanger les betteraves et la marinade, puis laisser mariner, couvert et au frais, pendant au moins 24 heures avant de servir.
Labels:
Appetizers,
Culinary Techniques,
The Basics,
Vegetables
Friday, April 18, 2008
At Noon / à Midi
I was born at noon. Warda was the name my nana gave me. She said she always wanted to give her daughter this name. She gave it to me. Warda. Flower. I was the second child, the second daughter; the second “floral” name in the family (my sister’s name is Yasmine, which means Jasmine).
I was born in a small clinic, in a small room. I was born on a warm spring day. My father still remembers the exact room where I was born. Every time we would go by the clinic he would show me the room and tell me these exact words: “Here! This is where you were born. You were a big baby and your face was so red that the nurse called you red mullet when handing you to your mother” I talked to him this morning, and he told me he is going to visit this exact room tomorrow. I smiled.
My parents were here when I gave birth to my daughter. My father walked me to the car and he didn’t want to let me go. He told me it was just yesterday that he was walking my mother to the clinic to bring me to the world, and now he was walking me to the car to have my first child. My mother smiled. I smiled. We both cried.
I was born into a loving home. I was born into a loving family. I was born into a family where my grandmother would make her memorable Jam Tart on birthdays.
Labels:
Besides My Kitchen,
Pies and Tarts
Tuesday, April 15, 2008
Coconut and Chocolate Pots de Crème / Pots de Crème au Chocolat et Noix de Coco
I live with a man who loves everything coconut. He would eat a steak tartar if it were sprinkled with toasted coconuts on top. And he hates steak tartar. In facts he hates any kind of meat that is still pink inside or, God forbid, outside.
So when asked about what to make for dessert last Sunday, his answer was obvious. He handed me the big can of coconut cream that my generous friend Christine gave me a couple of weeks ago. This brand of coconut milk is the best I have ever used. It’s thick, creamy, and very fragrant, even after cooking it.
I didn’t want to spend more than half an hour in the kitchen making this dessert. After all, it was Sunday and I am known to be quite lazy on Sundays; and on other days, too. I went to the pantry to see what I had: Bittersweet Chocolate was the first thing that caught my attention. (And my daughter’s attention too, who came running and screaming: “Cocay! Cocay!” this is her way of saying chocolate). Coconut cream, chocolate and some eggs; my choice was obvious as well. Coconut and Chocolate Pots de crème were to be our dessert.
Pots de crème, which refers to both the custard dessert as well as the small-lidded pots this dessert is served in, is traditionally made with a mixture of heavy cream and whole milk. My Coconut cream being so thick and fatty I substitute it for the heavy cream. I wouldn’t recommend using a non-fat or light coconut milk in this recipe, as the fat content is important for this type of custard. I guess you could try using a mixture of light coconut milk instead of the milk and heavy cream, but I don’t guarantee that your texture will be as silky and that you will have the same coconut scented result.
The custard is very easy to prepare. You can make it two days ahead and keep it chilled until ready to serve. The hardest part of the recipe is to wait a whole two hours while the custard is chilling in the fridge. My only advice to you is not to over bake it, as it will continue to set in the fridge.
And what did my coconut lover thought of this dessert? He started scrapping the bottom and the edges of the cup with his spoon. I guess this is the universal language for saying I love it.
Chocolate and Coconut Pots de Crème
Recipe: 6 servings
- 2 cups coconut cream (or Milk)
- ½ cup whole milk
- 5 ounces bittersweet or semisweet chocolate, chopped (I used bittersweet)
- 6 large egg yolks
- 1/3 cup sugar
Preheat oven to 325F. Bring coconut cream and milk just to simmer in heavy medium saucepan. Remove from heat. Add chocolate; stir using a wooden spoon until melted and smooth. Whisk yolks and sugar in a large bowl to blend. Gradually stir in, always using a wooden spoon, the hot chocolate mixture. Cool 10 minutes.
Divide custard mixture among eight espresso cups or six custard or soufflé cups. Place the cups in large baking an. Add enough hot water to come halfway up sides of cups. Cover with foil, and bake until custards are set but centers still move slightly when gently shaken, about 30 min if using the espresso cups, 40 minutes for the soufflé cups. Remove foil. Remove from water. Let cool on a wire rack for 15 minutes, then chill custards until cold, about 2 hours.
These pots de crème can be made 2 days ahead. Cover with a plastic warp and keep chilled.
Pots de Crème au Chocolat et Noix de Coco
In Francais Please: Pour 6
- 500 ml de crème de noix de coco (ou Lait)
- 100ml de lait entier
- 140g de chocolat noir, haché
- 6 gros oeufs
- 20g dee sucre
Préchauffer le four a 160C. Faites frémir la crème de noix de coco et le lait dans une casserole à fond épais. Retirer du feu. Ajouter le chocolat; mélanger avec une cuillere en bois jusqu’à ce qu’il soit fondu et soyeux. Battre les jaunes d’oeufs et le sucre. Peu à peu ajouter le mélange chocolate tout en remuant, toujours avec la cuillere en bois. Laisser refroidir 10 minutes.
Répartir la crème entre huit verres à espreeso ou 6 ramequins. Mettre dans un plat profound allant au four. Ajouter assez d’eau chaude afin d’arriver au milieu des verres ou ramequins. Couvrir de papier alluminium, et faites cuire jusqu’à ce que les pots de crème soient cuits et que le centre bouge un peu lorsqu’on les secoue doucement, environ 30 minutes si vous utilisez des verres à espresso, 40 minutes pour les ramequins. Retirer le papier. Retirer de l’eau. Laisser refroidir sur une grille patissiere environ 15 minutes avant de le mettre au frais au moins 2 heures.
Ces pots de crème peuvent être prepares deux jours avant. Couvrir de film plastique et garder au frais.
Wednesday, April 9, 2008
Easy, Moist, Light, Delicious and Moist / Facile, Moelleux, Léger, Délicieux et Moelleux
Ah! Banana cake! The word alone reminds you of slow weekends, family picnics and afternoons sitting by the window listening to the drip, drop of the rain while sipping a warm cup of tea.
To me, banana cake doesn’t ring a bell to my childhood memories, but bananas! Oh, yes.
Growing up, in the beginning of the 90’s in Algeria, it wouldn’t even cross my mind to put mashed bananas in a cake. It wouldn’t even cross my mind to let bananas go untouched and abandoned for days on the counter top. It wasn’t that we were that found of bananas, it was because we hardly ever see it in our kitchen. You see, bananas were to us what watermelons were to Japan: Expensive. They were so expensive and dear that eating them outside was considered an insult to those who can’t afford it.
Bananas were a “luxury” fruit. The one you see meticulously displayed in brown rattan baskets, along with pineapples, litchis and other exotic, unknown fruits at gourmet stores (we call these type of stores in our slang: pharmacist. I don’t know how this word came to be used that way, but we use it for all shops that are outrageously pricey. And we use it for the pharmacist as well. Got it?).
Bananas were to be bought on special events, on special days. My mother would buy it for us when she wanted it to spoil us, when we had good reports at school, when we had a birthday to celebrate, when they were on sale, which rarely happened. And when these days took place, my mother would cut the banana in half, hide it behind her back and ask us to choose. Otherwise, we would be measuring and studying the banana from all corners to see which half is bigger. Eating whole bananas were exceptional. But even with half a banana, we were happy, appreciating and extending seconds to minutes of lavish pleasure. (A funny story to show you the status of bananas at that time: I remember a distant cousin who went to live in France. After a few months there, he sent a picture to his parents of him near his refrigerator wide open, holding a bunch of bananas in his hand. How did I see this picture? His mother would carry the photo with her and show it to anyone asking after her son.)
Years went by, and now bananas went from rattan baskets at gourmet shops to donkeys pulling carts packed with bananas at the market. Even at rural markets. Bananas were cheap, even cheaper than potatoes at some point. We made banana tarts, banana mousse, banana papillotes with vanilla beans; we even tried banana tagine, which was quite good.
After some experiments, some misadventures and abandoned bananas on the counter top I came to the conclusion that I wasn’t found of bananas, but I love banana cake/bread.
I came across this recipe a while ago while browsing my usual blog reads. It appealed to me more than the others banana bread because it didn’t require the use of much ingredients and fatty calories. I know what you’re thinking about “healthy” cakes, and I feel the same way, but trust me, and trust David, this isn’t your typical dry, tasteless cake. This, my friends is the best banana cake I have ever had. I know I can exaggerate sometimes, especially when it involves baked goodies, but not today. Not only it is very easy to make and low in calories, which is always a plus for my hips, but it’s also moist, light, fragrant, delicious and moist. I know I said moist twice, but this is just how moist this cake is. David Lebovitz, who is a very talented pastry chef and a very funny Parisian, uses a combination of banana and cocoa nibs. Instead, I used banana and fresh Algerian dates, which was heavenly good. Why have I never thought about this combination before? Oh, yes! The pharmacists!
Banana and Dates Cake
You can use a mixture of all purpose flour and white whole-wheat flour, or just use the all-purpose one. Adding dates and orange zest to the batter was a personal choice, as I love the combination of both. You can fellow David’s delicious Directions by using chocolate chips or cocoa nibs instead of dates, and cinnamon instead of orange zest.
Recipe: Adapted from here
- 1 cup (120 g) all purpose flour
- ½ cup (90g) white whole-wheat flour
- 1-teaspoon baking powder
- ½ teaspoon baking soda
- ½ teaspoon salt
- 1 teaspoon Orange zest
- ¾ cup (150 g) sugar
- 2 tablespoons (55 g) melted butter (salted or unsalted)
- 1 large egg white
- 1 large egg, at room temperature
- 1 cup (250 ml) banana puree, made from about 2 very ripe medium-sized bananas
- ½ cup (125 ml) plain yogurt, regular or low-fat (I used regular yogurt, but you can use sour cream as well)
- ½ teaspoon vanilla extract
- 1/3 cup (60 g) Dates, pitted and diced
Butter a 9-inch (23 cm) square pan or a loaf pan and line the bottom with a sheet of parchment paper. Preheat the oven to 350F (180 C).
- Sift together in a bowl the flour, baking powder, baking soda, and salt. Mix in the sugar.
- In a large bowl, mix together the butter, egg white, egg, banana puree, sour cream, vanilla and orange zest, if using.
- Make a well in the center of the flour mixture and stir in the wet ingredients with a spatula until almost mixed. Add in the dates and stir until just combined, but don't over stir: stop when any traces of flour disappear.
- Scrape the mixture into the prepared pan and bake for 40 minutes, or until the center feels lightly springy and just done, and a toothpick inserted inside the cake comes out clean.
- Cool on a baking rack.
Storage: This cake will keep well for 3-4 days, or can be frozen, wrapped in plastic wrap, for a few months.
Cake à la Banane et Dattes
Vous pouvez utiliser un mélange de farine complete et farine blanche, ou utiliser seulement la farine blanche. Le choix de dattes et le zeste d’orange était purement personnel, car j’adore la combination des deux. Les dattes peuvent etre remplacé par de pépites de chocolat et le zeste d’orange par de la canelle.
In Francais Please: adapté d’ici
- 120g de farine
- 90g de farine blanche complete
- 1 c.c de levure chimique
- ½ c.c de bicarbonate de soude
- ½ c.c de sel
- 1 c.c de zeste d’orange
- 150g de sucre
- 55g de beurre, fondu (salé ou doux)
- 1 gors blanc d’oeuf
- 1 gros oeuf
- 250ml de purée de banane
- 125ml de yaourt nature (entier ou allégé)
- ½ c.c d’extrait de vanille
- 60g de dattes, dénoyautées et coupées en dés
Beurrer un moule carré de 23cm de diametre ou un moule à cake et garnir le fond d’un papier-parchemin. Préchuaffe le four a 180 C.
- Tamiser les farines, la levure, bicarbonate de soude, et le sel. Ajouter le sucre.
- Dans un grand bol, mélanger le beurre, le blanc d’oeuf, l’oeuf, la purée de banane, le yaourt, la vanille et le zeste d’orange.
- Faire un puits au milieu de la farine et verser dedans le mélange precedent en utilisant une maryse jusqu’à ce que le tout soit presque uniforme. Ajouter le dattes et mélanger juste ce qu’il faut pour bien les dispercer, mais ne pas trop mélanger: arrêter-vous quand toute trace de farine ait disparu.
- Verser la pâte dans votre moule beurré et faire cuire pendant 40 minutes, ou jusqu’à ce que le centre semble cuit et qu’un cure-dents en ressort propre.
- Laisser refroidir sur une grille à patisserie sans le démouler
Ce cake se garde bien pendant 3-4 jours, ou peut être congelé, enveloppé dans un film plastique pendant quelques mois.
Labels:
Breads,
Breakfast,
Cakes and Cie,
Fruity
Thursday, April 3, 2008
A Symbol Of Hospitality / Un Symbole D'hospitalité
You might know couscous as the “instant dish”, the package of grains you grab at the end of the week when your fridge is seriously empty and you go down the pasta aisle at the supermarket dragging your feet and your cart looking for a quick fix for tonight’s dinner.
You read the directions on the back of the package. It says something like: "Don’t read this, please! Run! It’s full of baloney and the directions will ruin this couscous and your dinner, too.
In other parts of the world (Especially in Algeria and Morocco) Couscous is a staple, an omnipresent dish that we serve on both happy and sad occasions.
The word couscous (called “Taam" in Algeria, “seksu” in Morocco, “kousksi” in Tunisia and “Maftoul” in Jordan, Lebanon and Palestine) is derived from the Berber word “seksu”, meaning well rolled, rounded.
There are as many couscous recipes as there are cooks: the couscous can be served with vegetables, all kind of seasonal vegetables, with a meat stew, with fish (whole fish, big chunks of white grouper, patties of sardines…etc) with olive oil, with butter, with honey, with preserved butter, with a poultry stew, savory and sweet, “royal” style with vegetables, meat and merguez sausage, or it can be served sweet with dried fruits, nuts and cinnamon, also known as “Seffa”.
Seffa is a popular beloved couscous dish where grains of couscous are generously coated with sweet butter and gently tossed with raisins (or any dried fruits available), nuts and a dust of warm cinnamon. It’s genius!
It is served at engagement parties, just after the exchange of the engagement rings, on weddings, during Ramadan, at funerals (usually made by neighbors in mounds and mounds to feed the mourners). Seffa is also served to a guest who comes to your house for the first time (I’ll make it up for you, Shayne and Christine!) After being offered courses after courses, the guest is honored with a bowl of Seffa, a symbol of welcome, hospitality, and to fully satiate him.
Seffa is also very popular during Rural Fairs and banquets where pounds and pounds of couscous are made for days by the finest cooks in the village and shared with the whole village to celebrate the end of a good harvest, or to wish for a better harvest for the next year.
Seffa is traditionally served in a big salad-bowl like called “zlafa”, made of wood or ceramic, set in the middle of a circular table for people to gather around. Each and everyone given a spoon would have to eat only from the nearest part of the couscous that is in front of him. It is considered very rude to “make a hole” in your part of the couscous then go to your neighbor’s “territory” and dig another hole just because he has more raisins than you do. It’s worst than the double dipping rule!
Despite being called a sweet couscous, it isn't considered as a dessert and it’s not utterly sweet since the sugar isn’t mixed into the couscous but is rather served separately in a small plate for people to add.
Other Couscous Recipes:
- Green Peas and Golden Raisins Peas
- Couscous with Lamb and Vegetables Stew
Seffa: Dried Fruits and Cinnamon Couscous
Recipe: Serves 4-6
- 1lb plain couscous
- 1 tsp kosher salt
- 1 tbsp canola oil
- 1 cup raisins
- ½ cup dried apricots, sliced
- ½ cup dates, pitted and sliced
- 1 handful of slivered almonds
- 1 tsp ground cinnamon
- ½ stick salted butter (or unsalted), diced
- Superfine sugar or brown sugar to serve.
Rinse the couscous in a colander under running water. Drain it well and invert into a bowl. Let it sit for 15 minutes.
Meanwhile, bring a big pot of water to a boil. Fluff the couscous by rubbing it between your hands. Put the couscous in the steamer insert of your couscoussier, (if you don’t have a couscoussier, use a large metal colander that will fit tightly above the pot). Place it over the boiling water, without touching the water, reduce the heat to medium and cook for about 30 minutes or until the couscous feels dense when you tap it gently with your hand.
Remove the couscous from the boiling water and invert it into a large bowl (don’t turn off the heat). Add salt, oil and one ladle of the boiling water and let it stand for about 10 minutes.
Without burning your fragile hands, rub the couscous between your hands to break up any lumps. At this point, if you taste the couscous, you will find it rather dry and uncooked. Add one ladle of boiling water at a time, and continue rubbing the couscous between your hands, until the grains feel soft to your tongue. It usually takes me two to three ladles of boiling water to have a soft, melt in your mouth couscous.
Rinse the steamer, or the colander, and grease it with some oil or butter. Put a layer of couscous in the steamer, then a layer of raisins and dried apricots and dates, and another layer of couscous. We want the dried fruits to steam and plump up perfectly without being mushy. Place the steamer over the boiling water again and steam for another 25-30 minutes.
Turn the couscous out, with the raisins, dried apricots and dates, into the large bowl and add the butter. Stir using a wooden spoon until the butter has melted, then use your hands to fluff the couscous and break up any lumps.
Serve the couscous as shown in the photo with the cinnamon sprinkled in stripes down the mound and the slivered almonds scattered over the top. Serve hot. Serve the sugar in a small bowl on the table for you and your guests to add to the couscous.
Saha Taamkoum! (Enjoy the couscous!)
Seffa: Couscous aux Fruits Secs et a La Cannelle
In Francais Please: Pour 4-6 personnes
- 450g de couscous
- 1 c.c de sel
- 1 c.s d’huile vegetale
- 150g de raisins secs
- 100g d’abricots secs
- 75g de dattes, dénoyauté et coupées en tranches
- 1 petite poignée d’amandes effilées
- 1 c.c de cannelle en poudre
- 50g de beurre
- Sucre fin ou sucre brun pour servir
Rinser le couscous, l’égoutter et le mettre dans un bol. Laisser secher au moins 15 minutes.
Entre temps, remplir votre pot de couscoussier d’eau et porter a ebullition. Frotter les graines de couscous entre vos mains pour les separer et mettre le couscous dans la partie superieur du couscoussier. (Si vous n’avez pas de couscoussier, vous pouvez utilisez une grande passoire en fer qui se tienne fermement sur une casserole). Mettre sur l’eau bouillante et laisser cuire sur feu doux environ 30 minutes.
Retirer le couscous du feu, mais sans eteindre le feu,et le transvaser dans une grande bassine. Ajouter le sel, l’huile et une louche d’eau bouillante. Laisser reposer 10 minutes.
Commencer a remuer le couscous doucement et sans bruler vos petites mains. A ce stade, si vous goutez quelques graines de couscous, vous remarquerez qu’elle sont pas tout a fait cuites. Frotter les graines de couscous entre vos mains et ajouter l’eau bouillante petit a petit jusqu’a ce que le couscous vous soit doux et fondant sur votre langue. J’ai besoin d’environ deux a trois louches pour avoir un couscous tendre et fondant.
Rinser le couscoussier des graines restante et le graisser avec une matiere grasse (beurre ou huile végétale). Verser e moitié du couscous puis les fruits secs et puis le reste du couscous. Remettre sur le pot d’eau bouillante et cuire encore 25-30 minutes.
Remettre le couscous et les fruits secs dans la bassine et ajouter le beurre. Mélanger a l’aide d’une cuillere en bois, puis avec vos mains.
Servir le couscous comme sur la photo: en dome avec la cannelle en bordures et les amandes effilées parsemée sur le dessus. Servir de suite. Servir le sucre dans une petite assiette a coté du couscous pour vous et vos invités.
Bon Appétit!
Labels:
Pasta,
The Casbah Delights
Subscribe to:
Posts (Atom)


