Sunday, March 30, 2008
Daring Bakers' March Challenge: Perfect Party Cake
I had mixed feelings about this month’s challenge. Obviously, I was very happy to see one of Dorie Greenspan’s mouthwatering recipes finally featured for the Daring Bakers to explore. On the other hand, the “Perfect Party Cake” seemed to be a little too grandiose for only two adults and a toddler; and I hate any cake that has butter cream as a filling or frosting.
My plans were made. My mission was clear:
1- I had to substitute another filling and frosting for the yucky butter cream. In this case, I made a chocolate mousse for the filling and a Ganache Soufflé (Whipped chocolate) for the frosting.
2- Since I was going for a chocolate and orange combination, I used orange zest in the batter instead of lemon zest and brushed the cake with an orange marmalade instead of the strawberry jam.
A few weeks ago, I was having a friend of mine, and her family over for dinner. I decided to make this cake hoping it will be the perfect party dessert.
I made the cake a day ahead. The cake was very easy to work with, much easier than making a basic genoise. It rose perfectly in the oven and has a crumbly and soft texture when it cooled down. I wrapped it up and stored it at room temperature for tomorrow to be filled and frosted.
The following day, I made the chocolate mousse, which was delicious, and frosted the cake with ganache soufflé and decorated the edges with coconut flakes.
I believe my next step was what turned this Perfect Party Cake into Perfect Hall of Shame Cake: I refrigerated the cake and served it to my poor guests only half an hour after getting it out of the fridge. And it was cold that day.
Having used a chocolate mousse as a filling and heavy cream for my ganache soufflé, I though I should refrigerate the cake to let it set. It was a mistake. The cake that once was so moist, so delicate, and so fragrant suddenly turned out into a dried Sahara desert.
Still my guests ate it all. They were polite and nice to me. But I couldn’t retain my disappointment. I couldn’t believe I served them something I have never made before (My mother always warns me not to try new things when I have people over. I didn’t listen to her. Again!)
And the worst of it all is that I had the nerve to wear a big, proud smile on my face when I was bringing the cake to the table.
I couldn’t take it much longer. I had to confess my sins. Especially when I saw my husband, the one who is supposed to support me no matter what I serve, rolling the cake in his mouth for hours and giving me the look of I know what's wrong with this cake. I had to speak. I had to speak before someone else does. I spoke: “ The cake is kind of dry! I think it would have been nice to brush it with a syrup to moisten it a bit”. They all nodded in agreement as if they were just waiting for the toddlers to start screaming of despair or for somebody to explode and throw the cake at me and wipe this smile off of my face once and for all.
I am exaggerating a bit. The cake didn’t end up in the trash, but still, it was a big disappointment and I take full responsibility for it. Though the texture was quite nice the following day when I left out for more then two hours before having a slice.
Bottom line, the sponge cake itself was great, and I will use this recipe again instead of the genoise. But this time I won’t refrigerate it. But if I have too, I will serve it two hours after getting it out of the fridge.
So thank you morven for this baking lesson and for this month’s challenging challenge.
Tuesday, March 18, 2008
Orange, Cinnamon and Raisins Sweet Rolls, with Orange Butter/ Petits Pains à L’Orange, Cannelle et Raisins secs, et son Beurre à L’Orange
It rains in my heart
As it rains on the city;
What is this langor
That permeates my heart?
Il pleure dans mon coeur
Comme il pleut sur la ville;
Quelle est cette langueur
Qui pénètre mon coeur?
Paul Verlaine, Romances sans paroles (1874)
My friends! Forgive my lack of words lately.
I haven’t been posting as often as I should, and I feel bad about it. As much as I love you guys. As much as I adore sharing my kitchen adventures, my laughs, my past and future with you, I felt a need to take a break. To sit down and breathe.
My heart felt empty these past few days. My heart felt hollow. But I promise, it’s not as bad as it seems, and I am not a big whiner, I swear. As my nana would have said: “ Flush your whining down the toilet…you can be sure it won’t come back!” She was a philosopher in her own way.
I still need some time, to clear up my mind from various old dusts. I still need to borrow my husband’s shoulder to rest on, and a soft pillow to sleep on, but I will be OK! I’ll be fine! The weather isn’t helping either… and this song too.
Next time will be more joyful. I promise! In the meantime, I brought you my cinnamon and orange scented soft pillows to share with you. My heart was growing bigger and stronger as these little buttery rolls were baking, filling my house with a warm cinnamon and yeasty scent.
My heart was happy.
Orange, Cinnamon and Raisins Sweet Rolls, with Orange Butter
Recipe: Adapted from Gourmet, November 2005. For 12 sweet rolls
- 3 tablespoons warm water plus 2 teaspoons water at room temperature
- 1 package active dry yeast (2 ¼ teaspoons)
- ½ cup plus 1 teaspoon sugar
- 5 to 5 ½ cups unbleached all-purpose flour
- 1 tablespoon finely grated fresh orange zest
- 2 teaspoons salt
- 1 teaspoon cinnamon
- ½ cup raisins (steamed)
- - 1 teaspoon anise seeds (optional)
- 1 cup warm milk
- 1 ½ teaspoons vanilla
- ¾ stick (6 tablespoons) unsalted butter, softened, plus additional for greasing bowl
- 4 large eggs at room temperature
- - For the Orange Butter:
- 1 stick (½ cup) salted or unsalted butter, softened (I used salted butter)
- 1/3 cup orange marmalade
1-Stir together warm water, yeast, and 1 teaspoon sugar in bowl of mixer fitted with paddle attachment and let stand until foamy, about 5 minutes. (If mixture doesn't foam, discard and start over with new yeast.) While yeast is foaming, whisk 4 cups flour with zest, salt, raisins, anise seeds (if using) and cinnamon in a bowl.
2-Add milk, vanilla, butter, and remaining ½ cup sugar to yeast, then mix at medium speed until combined. Beat in 3 eggs, 1 at a time, then add orange cinnamon flour and mix until combined well.
3-Replace paddle attachment with dough hook attachment and mix at medium-low speed, adding more flour (1 to 1 1/2 cups), 1/4 cup at a time, until a smooth but slightly sticky dough forms, about 5 minutes. Transfer dough to a work surface and knead by hand until smooth and elastic (dough will remain slightly sticky), about 3 minutes. (I used only an additional 1cup of the flour. The dough will look sticky, but once kneaded (as shown in this life changing video) it will regain a smooth texture)
4- Form dough into a ball and transfer to a large buttered bowl, turning dough to coat with butter.
Cover bowl with kitchen towel and let dough rise in a draft-free place at warm room temperature until doubled in bulk, 1 1/2 to 2 hours.
5- Line a 17- by 14-inch baking sheet with parchment paper.
Turn out dough gently, without ripping it off the bowl, onto work surface and fold it over. Cut dough into 12 equal pieces. Cup your hand over 1 piece and, using your thumb and pinkie to keep ball inside your cupped hand, push dough lightly with heel of your hand against work surface while rolling in a circular motion to form a smooth ball. Repeat with remaining pieces of dough, arranging balls 1 inch apart on baking sheet.
6- Cover loosely with kitchen towel and let dough rise in a draft-free place at warm room temperature until doubled in bulk, 1 to 1 1/4 hours. Put oven rack in middle position and preheat oven to 400°F.
Whisk together remaining egg with remaining 2 teaspoons water in a small bowl. Cut a 1-inch X (1/4 inch deep) in top of each roll with kitchen scissors. Brush rolls lightly with egg wash and bake until golden and rolls sound hollow when tapped on bottom, 15 to 20 minutes. Brush them with a simple sugar syrup (to have this shiny finish, but it's optional). Transfer rolls to a rack and cool, at least 20 minutes. Serve with the Orange Butter.
7- To make the orange butter:
Pulse butter and marmalade in a food processor, a mixer, or simply by using a fork until combined well. Transfer to a small crock or serving bowl. Butter can be made 5 days ahead and chilled, covered. Bring to room temperature before serving.
- Note:
Rolls can be baked 1 day ahead and cooled completely, then kept in sealed plastic bags or a large airtight container at room temperature. (I prefer them on the following day) You can reheat them on a baking sheet in a 350°F oven 10 minutes.
Petits Pains à L’Orange, Cannelle et Raisins secs, et son Beurre à L’Orange
In Francais Please: Adaptée de Gourmet, Novembre 2005. Pour 12 Petits pains
- 3 c.s d’eai tiede plus 2 c.c d’eau a temperature ambiante
- 1 sachet de levure bloulangere (2 ¼ c.c)
- 50g de sucre en poudre plus 1 c.c
- 600 a 780g de farine
- 1 c.s de zeste d’orange
- 2 c.c de sel
- 1 c.c de cannelle en poudre
- 100g de raisins secs (cuits a la vapeur)
- 1 c.c de graines d’anis (facultatives)
- 225 ml de lait entier tiede
- 1 ½ c.c de vanille
- 90g de beurre mou, plus une noisette pour beurre le bol
- 4 gros oeufs à temperature ambiante
- Pour le Beurre à l’Orange:
- 115g de beurre salé ou doux (J’ai utilisé le salé)
- 50g de marmelade d’orange
1- Mélanger la levure, le sucre et l’eau tiede dans le bol d’un mixer et laisser mouser environ 5 minutes. Entre temps, mélanger 480g de farine avec le sel, canelle, raisins secs, zest d’orange et graines d’anis (si vous en utilisez)
2- Ajouter le lait, beurre et les 50g de sucre a la levure, puis bien mélanger. Ajouter 3 oeufs, un à un, puis ajouter le mélange de farine et battre encore jusqu’ à ce que tout soit homogene.
3- Si vous utiliser un kitchen aid, mettre l’attachement pour le pain et petrir la pate en ajoutant le reste de la farine petit à petit (120g a 180g), jusqu’à ce que la pate devienne reguliere et un peu collante, environ 5 min. Transvaser la pate vers votre plan de travail et petrir encore pour que la pate devienne elastique (la pate restera plus au moins collante), environ 3 min. (Pour ma part, je n’ai ajouté que 120g de farine. La pate vous semblera tres collante mais une fois travaillée (voir video), elle sera plus homogene).
4- Rouler la pate en boule et la mettre dans un bol beurré. Couvrir d’un film plastique ou un torchon et laisser lever 1 ½ à 2 heures.
5- Garnir une tole a patisserie d’un papier-parchement.
Verser la pate doucement sans tirer dessus sur votre plan de travail et la plier en deux. Former un doudin et couper 12 petites boules de la pate. Former des boules et les mettre sur la tole a patisserie. Les espacer de 3 cemtimeres environ.
6- Couvrir d’une serviette et laisser lever 1- 1 ¼ heures. Préchauffer le four à 200C. Mélanger l’eau avec l’oeuf restant et badigeonner les petits pain avec. Faites cuire jusqu’à ce qu’ils deviennent dorés et semblent creux quand vous taper doucement la base, environ 15-20 minutes. Badigonner d'un syrop au sucre pour avoir ce fini brillant, mais c'est facultatif). Laisser refroidir sur une grille à patisserie au moins 20 minutes avant de servir
7- Pour le Beurre à l’Orange: Mélanger le beurre mou et la marmelade dans un robot ménager, un mixer ou simplement à l’aide d’une fourchette. Mettre dans une assiette ou un petit ramequin et servir avec les petits pains. Ce beurre peut etre prepare 5 jours avant, couvert d’un film plastique et mis au frais. Ramener à temperature ambiante avant de servir.
- Note:
Les petits pains peuvent etre cuit un jour avant, refroidit completement et conserve dans un sachet ou une boite à fermeture hermétique, à temperature ambiante. (je le préfere le lendemain de sa cuisson) Vous pouvez aussi les réchauffer pendant 10 minutes à 160C et les servir tiede avec le beurre à l’orange.
Wednesday, March 12, 2008
A Spicy Salad For Your Eyes / Une Salade épicée Pour Vos Yeux
When I was about four-year old, I used to wear glasses. I had a slight squint (my siblings used to all me cross-eyed).
I used to go to the eye doctor every week, and every time we would come back from his office my father would show me a building on the far left side of the street and ask me if I can see it clearly. Most of the time my answers were an exasperating no! He would console me with a kiss on my forehead and tells me that I would do better next time and that for now a plate of carrots salad would help my eyes get better.
I don’t know if it was my mothers’ spicy carrot salad that helped my eyes get back on the right track, but at least it was a good excuse for me to have the biggest part.
This salad is very popular in Algeria and Morocco. It is usually served in a small plate along with two or three colorful seasonal salads. My mother usually boils the carrots, slices them then tosses them with a cumin vinaigrette. I came across a cute bunch of tiny carrots the other day at the grocery store and decided to leave them whole and roast them. The salad can’t be easier: Just whisk the vinaigrette, pour it over the carrots and roast the colorful bounty for about 15-20 minutes, until the carrots are caramelized and your whole house smells like a Mediterranean spice shop.
You can serve this salad slightly warm, but I think it tastes better after a few hours, to give the warm spices and the carrots a little while to “ripen”.
Another Favorite Salad:
- Roasted beets Salad
Spicy Roasted Carrot Salad
Recipe: Serves 6
- 2 thin carrot bunches, peeled
- 1 fat garlic clove, finely diced
- Lemon juice
- 2 tbsp garlic oil
- ½ tsp honey
- 1 tsp cumin seeds
- ½ tsp paprika
- 1 pinch ground cinnamon
- 1 tbsp fresh cilantro, chopped
- ½ tsp Kosher salt
- Freshly ground pepper
Position a rack in the middle of the oven, and preheat to 400F.
In a small bowl, whisk together the garlic oil, garlic, honey, cumin seeds, paprika, cinnamon, salt and black pepper. Set the vinaigrette aside.
In a baking sheet, toss together the carrots with the vinaigrette, and bake until caramelized and tender, about 15-20 minutes.
Serve with a drizzle of lemon juice and chopped cilantro.
Salade épicée de Carottes Rôties
In Francais Please: Pour 6 personnes
- 2 bottes de carottes plus au moins fines
- 1 grosse gousse d’ail, finement hachée
- Jus de citron
- 2 c.s d’huile d’ail
- ½ c.c de miel
- 1 c.c de graines de cumin
- ½ c.c de paprika
- 1 pincée de cannelle en poudre
- 1 c.s de coriandre frais, hachée
- ½ c.c de sel (pas de sel de table)
- Poivre noir fraichement moulu
Mettre la grille du four au milieu, et préchauffer a 200C
Dans un petit bol, mélanger l’huile d’ail, l’ail, miel, graines de cumin, paprika, canelle, sel et poivre. Mettre cette vinaigrette de coté.
Mettre les carottes sur une grande tôle et les enduire de la vinaigrette. Cuire au four jusqu’a ce que les carottes deviennent tendres et caramélisées, environ 15-20 minutes.
Servir avec un filet de jus de citron et la coriandre hachée.
Thursday, March 6, 2008
How To Make Roasted Garlic Oil in 3 Easy Steps / Comment Préparer L'huile D'ail En 3 Etapes Faciles
Warning:
You shouldn’t make or even read this recipe if you are a Vampire, a mosquito, a dog or a cat (garlic apparently causes anemia in cats and dogs), Tom Cruise, Steven Spielberg, Silvio Berlusconi, or if you are on your way to a job interview, a meeting or a club.
Side effects may include: dependence, happiness, sudden sense of proud, garlicky smell of your kitchen, your clothes and you; runaway of your family, your friends, your pets; loneliness.
If dependence on Garlic Oil lasts more than four hours, please, don’t sue me!
Roasted Garlic Oil and Roasted Garlic Mash
Recipe: Bon Appétit, April 2003
- 2 large garlic heads, cut horizontally in half
- 2 cups pure olive oil
- 2 sprigs fresh thyme, or 2 teaspoon dried thyme
- 1 teaspoon black peppercorns, toasted
Huile d’Ail Rôti et Puree d’Ail Rôti
In Francais Please: Bon Appétit, Avril 2003
- 2 têtes d’ail
- 500ml d’huile d’olive
- 2 branches de thym, ou 2 c.c de thym séché
- 1 c.c de grains de poivre, grillés
- Cut the garlic heads horizontally in half.
- Couper les têtes d’ail en deux horizontalement.
- Put the garlic heads cut side down in a small casserole or ovenproof pot and pour the olive oil over them. Add the thyme and pepper. Cover with a lid or foil and bake in a preheated 300 F oven for 45 minutes to 1 hour, until the garlic is soft enough to mash.
Carefully, remove the garlic from the oil and set aside.
- Deposer les têtes d’ail côté coupé en bas sur un plat allant au four et verser dessus l’huile d’olive. Ajouter le thym et le poive noir. Couvrir d’un couvercle ou d’une feuille d’alluminium et faire cuire dans un four préchauffé à 150C pendant 45 minutes à 1 heure, jusqu’à ce que l’ail soit tender pour pouvoir le reduire en purée.
Retirer l’ail tout doucement de l’huile d’olive et mettre de côté.
- Strain the oil into a bowl and let cool, then pour into an airtight container. The oil will keep in a cool and dark place for at least a month. You can use the garlic oil in just about anything. I love it particularly in my salad dressing, with a touch of honey. Delicious!
- Faire passer l’huile d’olive au chinois et laisser refroidir, puis verser dans un bocal ou une bouteille a fermeture hermétique. L’huile se gardera pendant au moins un mois dans un endroit frais, à l’abri de la lumiere. Vous pouvez utiliser l’huile d’ail dans tous vos plats. Je l’aime particulierement dans mes vinaigrette, avec un peu de miel. Un vrai Délice!
- To make the garlic mash, squeeze the cloves out of their papery husks into a bowl. Mash the roasted garlic with a fork. Store mash in an airtight container in the refrigerator for up to 1 month. This is a very useful substance to have on hand for your roasted chicken, lamb, vegetables, stews, soups…etc.
- Pour faire la purée d’ail, presser les gousses d’ail de leur enveloppes sur une assiette. Ecraser à l’aide d’une fourchette. Conserver au frigo dans un recipient à fermeture hermétique pendant au moins un mois. Cette purée d’ail est trés pratique, elle relevera vos poulets rôtis, vos legumes, soups, ragouts…etc.
Tuesday, March 4, 2008
Savory Cheddar, Goat Cheese and Cilantro Cake / Cake Salé aux Cheddar, Fromage de Chèvre et Coriandre
I don’t remember which one came first: cooking, or the words that came with the recipes.
My mother had a small collection of pocket size French Cookbooks that I loved reading. The cookbooks had no pictures and no stories, just recipes, words and may be some drawing here and there. Yet, these books played a major role in the life of a teenage girl who wanted to learn the art of cooking.
Leafing through a cookbook that has no pictures, I was more drawn to a recipe that calls itself “Pain Bourguignon”, “Braised green lentils on a bed of Escarole”, “Anna potato cake” or even “Eggs en Cocotte” than to the ones with a less phonetic impact. Once I gave my poor siblings a taste of what was at the time my obsession with the word: Pilaf. Say it again, slowly: P-I-L-A-F! The way the tongue caresses the palate gently makes it sound more mystifying and delicious.
One sunny Friday, when my parents said they would be away for the afternoon, and that they might be late for supper, I nodded my head religiously to my mother’s leftover-reheating recommendations while the word Pilaf danced sensuously and discreetly in my mind. Once my parents had left, I had my rice, my onion, my chicken stock and my seasoning on the counter top. I was a girl on a mission.
The rice was beautiful, served in a royal blue glass dish, fluffed with a fork and decorated with some chopped parsley. I sat in my Mother’s place and served my siblings some of the rice and the other leftovers. I was proud of my self. Even more proud to explain my siblings how this wasn’t any kind of rice, this was P-I-L-A-F Rice! (With the tongue rolling, of course!)
The first bite was a little unexpected. But I decided to stay quiet and continued on with another spoonfuls, hoping that my siblings wouldn’t notice. Then my older sister put down her fork. “It’s undercooked, some grains are still raw,” my sister said, and went on to eat my mother’s leftovers.
“No, it’s not undercooked, it’s Al-dente” (Another word that I loved using at that time, too!)
Then my younger brothers followed and I couldn’t convince them anymore to eat it; even when I asked them to fish the raw grains out.
I almost finished my plate, but inside I was devastated with the knowledge that I have made a mistake somewhere in the recipe. I served my family a dish of partially raw rice and tried to make them believe that this was how the dish was to be served: Crunchy Pilaf!
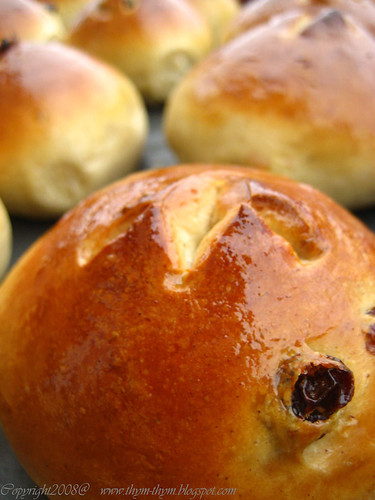
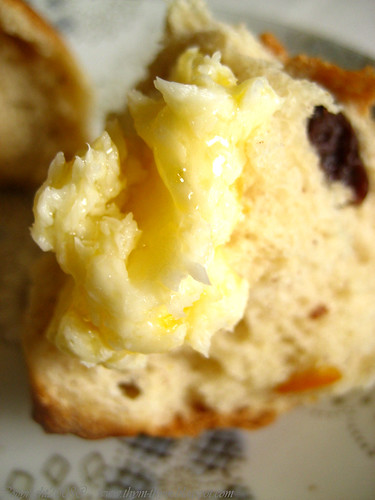
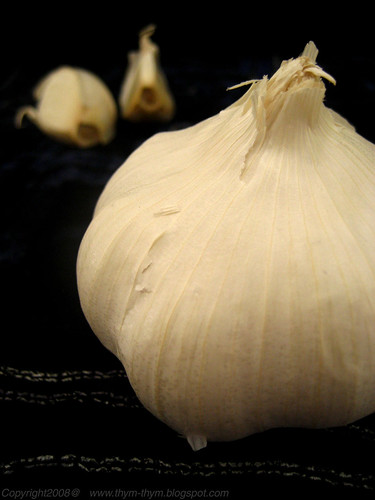
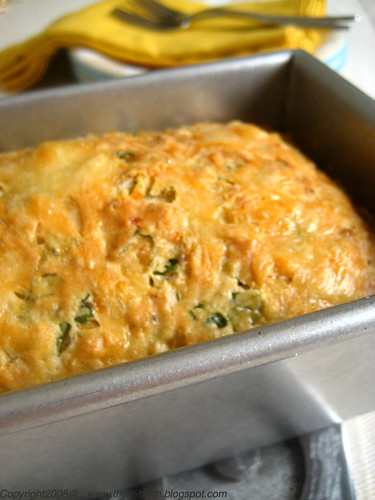
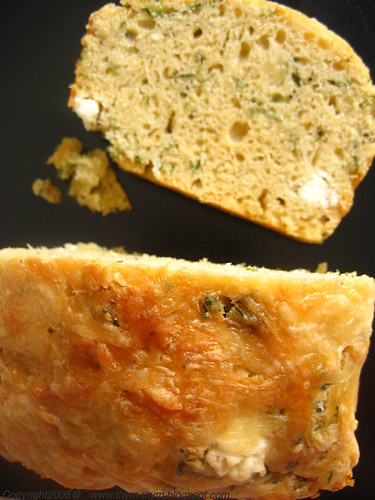
Ever since this episode, I have learned how to make Pilaf Rice properly. But I still love using beautiful, exotic names for my dishes to impress the crowd. Even though the recipes are still the same. Somehow, I find it more alluring to introduce this Savory Cake as a Savory Cheddar, Goat Cheese and Cilantro cake than: Savory Quickbread, which is just what it is in reality. But much more.
I made this recipe from Dorie Greenspan’ Serious Eats chronicles: Baking with Dorie. The cake is simply marvelous and oh, so easy to make. You basically whisk all the dry ingredients together in a bowl, the wet in another, and then you gently combine the two. Pour, bake, let it cool, and you’ve got yourself a moist, delicious and cheesy cake that would make any novice baker proud. The only minor changes that I made to the original recipe was to use a mix of white whole-wheat flour and all-purpose flour, to use cilantro instead of chives (it was a manner of availability) and to use goat cheese for its fresh note. I love to serve this savory cake with salads, or as a toast for my sandwiches. After a few days, when it dries out, I like to slice it, toast it, and dice it into croutons to garnish my salads or soups.
Savory Cheddar, Goat Cheese and Cilantro Cake
Recipe: Adapted fom Here
- 1cup all-purpose flour
- ¾ cup white whole wheat flour
- 1 tablespoon baking powder
- 1/2 to 1 teaspoon salt (it depends on what cheese and add-ins you're using. I used 1 tsp)
- 1/4 teaspoon freshly ground black pepper (or more to taste; you could even add a pinch of hot pepper)
- 3 large eggs, at room temperature
- 1/3 cup whole milk, at room temperature
- 1/3 cup extra-virgin olive oil
- 3 ounces coarsely grated cheddar or other cheese
- 2 ounces fresh goat cheese or other cheese, cut into very small cubes
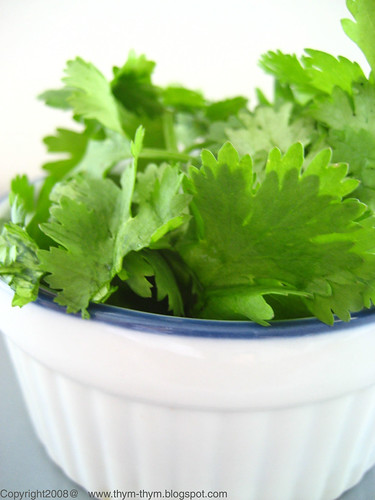
- 1/2 cup chopped cilantro or other herbs
- 1/3 cup toasted walnuts, chopped (optional)
Put the flour, baking powder, salt, and pepper in a large mixing bowl and whisk the ingredients together to combine. Put the eggs in another mixing bowl; whisk for about 1 minute, until they're foamy and blended. Whisk in the milk and olive oil.
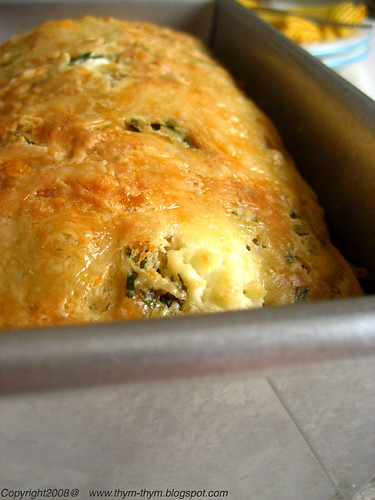
Pour the wet ingredients over the dry ingredients and, using a sturdy rubber spatula or a wooden spoon, gently mix until the dough comes together. There's not need to be energetic—beating the dough toughens it—nor do you need to be very thoroughly. Just stir until all the dry ingredients are moistened. Now, stir in the cheese, grated and cubed, the herbs and the toasted walnuts, if you're using them. You'll have a thick dough. Turn the dough into a buttered loaf pan and even the top with the back of the spatula or spoon.
Slide the loaf pan into a 350F-preheated oven and bake for 35 to 45 minutes, or until the bread is golden and a slender knife inserted into the center of the loaf comes out clean. Transfer the pan to a cooling rack, wait about 3 minutes, then run a knife around the sides of the pan and turn the loaf over onto the rack; invert and cool to room temperature right-side up.
The cake can be served when it is still slightly warm, but like Dorie herself, I prefer it when it has cooled completely.
Well wrapped, the cake will keep for about 2 days at room temperature or for up to 2 months in the freezer (thaw in the wrapper). It is normal that the cake may seem a little dry after a couple of days. At that point, it's good to toast the slices. I like to use them as little croutons in my salad and soups, too.
Cake Salé aux Cheddar, Fromage de Chèvre et Coriandre
In Francais Please: Adapté d'ici
- 110g de farine
- 100g de farine blanche complete
- 1 petite c.s de levure chimique
- ½ a 1c.c de sel (tout depends du fromage que vous utilisez et de ce que vous voulez ajouter. J’ai mis 1 c.c)
- ¼ c.c de poivre noir faichement moulu
- 3 gros oeufs, a temperature ambiante
- 100ml lait entier, a temperature ambiante
- 100ml d’huile d’olive extra vierge
- 85g de cheddar, grossierement rapé
- 50g de fromage de chevre, coupé en en dés
- 125ml coriandre, haché
- 100ml noix, grossierement hachées (facultatives)
Dans Une grande jatte, mélanger les farines, la levure, le sel et le poivre. Dans un autre bol, battre les oeufs pendant un minute jusqu’à ce qu’ils deviennent mousseux et bien incorporés. Ajouter le lait et l’huile d’olive.
Verser tous les ingredients liquides sur les ingredients secs, et mélanger doucement à l’aide d’une spatule ou une cuillere en bois. Ne pas trop mélanger ou le cake sera dur et sec. Ajouter le fromage rapé et le fromage de chèvre en cubes, les noix et Mélanger encore. Votres pate sera épaisse. Verser la pate sur un moule à cake beurré et lisser la surface du cake à l’aide d’une maryse ou le dos d’une cuillere a soupe.
Glisser le cake au four, et faire cuire à 180C pendant 35-45 minutes ou jusqu’à ce que le cake soit doré et qu’un couteau inséré à l’interieur du cake en ressort propre. Laisser le cake dans sans moule pendant 3 minutes, puis démouler sur une grille à patisserie et laisser refroidir à temperature ambiante à l’endroit. Vous pouvez le servir tiede, mais je le préfere tout comme Dorie, completement refroidi.
Bien envelopé dans un film plastique, le cake peut se garder pendant 2 jours à temperature ambiante ou pendant 2 mois au congélateur (décongeler-le en le laissant dans le film plastique). Il est normal que le cake durcisse après quelques jours. A ce stage, il est préférable de griller les tranche en toast (J’aime les griller et les couper en dés pour décorer salades et soupes.


