Saturday, September 29, 2007

Daring Bakers September Challenge: Cinnamon Buns

Cinnamon rolls4


When I saw that this month’s challenge was going to be Cinnamon Buns, I laughed.
Although I have never had cinnamon buns before, I share with these yeasty treats a funny story. It all started less than two years ago, my hubby and I were entering the mall when I started feeling nauseous: “The smell of cinnamon is so strong today, almost repellent.” I told him. “ I don’t smell anything.” He replied, noticing that I really wasn’t feeling good. "Are you pregnant?” he asked joking.
A few days went by and I confirmed that I was indeed pregnant, and yes cinnamon buns were my free pregnancy test before the real revealing test. For the next nine months I couldn’t stand the smell of cinnamon and avoided to go pass cinnabon as much as possible.

Cinnamon rolls


Thankfully my repulsion for cinnamon faded away after I had my daughter and I was really excited to make cinnamon buns for the first time, as I love everything that involves yeast and kneading.

I made the buns earlier this month, as I knew I would be pretty busy later when moving out of our apartment.
I didn’t want to add any nuts or any other spice to the dough because I wanted to experiment the authentic taste of the buns.
The dough was wonderful to work with though I didn’t expect it be that soft. I preferred to use whole milk instead of buttermilk, and didn’t want to make sticky buns because nor my husband and I are adept of caramel glaze.

Cinnamon rolls3


The smell of cinnamon buns in my kitchen was just fabulous, and they tasted wonderful as well. In fact I loved them so much, I ended up making another batch two days later. I glazed some of the buns and kept the others plain to dunk in my mug of milk.

But something intrigued me in the recipe: the quantity of fondant glaze was just too much. I still have half of it in my fridge.

So what to think about my first cinnamon buns experience? Well baking it twice gives you an idea of how much I loved it. The recipe is already in my repertoire and I even added a note to myself next time I make it: “Add more cinnamon, it wasn’t strong enough”.

Thank you Marce for the recipe and for this marvelous choice. And be sure to head over to her blog for more details on the recipe.

Friday, September 28, 2007

Butternut Squash

Butternut Squash


Butternut squash, also known in Australia as Butternut Pumpkin is a winter squash available in early fall through winter. It originates in Mexico when it is believed that the natives there where eating butternut squash as early as 5500 BC.
Butternut squash has a vase like shape with a hard, thick yellow to a light tan skin and is filled with seeds. It grows on a vine; the flesh is orange, to deep orange when ripe, with a sweet flavor and a nutty flavor similar to sweet potato or pumpkin.

- How to store it: With their thick skin, butternut squash can be kept longer than summer squashes. Store in a cool dry place (between 53F- 64F/ 12C- 18C) for up to two months. If the squash has been cut, wrap it with a plastic wrap and put it in the crisper for up to three days. Butternut squash freezes very well: peel it, cut it in pieces and freeze it.
- How to cook it: Once peeled, discard the seeds and cut it in pieces. Then it’s up to you, butternut squash can be boiled, roasted, baked, steamed and stir-fried. It can be used in soups, gratins, lasagna, raviolis, and pasta in general, as a ratatouille, or even in sweet tarts, flans and jams.
- Nutritional values: Butternut squash is known to be a good antioxidant low in calories, before you add the generous dollop of butter to it, and diuretic and laxative.
- Good with spices: Cinnamon, anise seeds, cardamom, ginger, mace, clove, nutmeg, paprika, turmeric, cumin, ras-el-hanout, and allspice.
- Good with herbs: sage, savory, tarragon and thyme.

Some Updates:
Now that I am done with my Friday Basics, I would like to pass on some awards.
I am not teaching you anything by saying this, but let me just say it: blogging is so much more than writing posts, taking pictures and having feedbacks. It’s way more than that. It is the experience you share with your readers, who then become your friends. As I started this blog about seven months ago, I never thought I would be so addicted to it and how many people from all over the world would cross my path. We share this same passion for cooking with its good and even failed adventures and we open up about our personal backgrounds without feeling ashamed of what we do, of what we say or how we might be judged. It just feels like home.
So from the bottom of my heart, to all of you who have always been a regular, to those who have left some sweet notes and to those who have only took a glimpse at what I do, I say Thank You.
Now lets go back to the awards. The lovely Nora of Life's Smorgasbord, who is just a sweet and brilliant person, awarded me with the Thoughtful Blogger Award.

"The Thoughtful Blogger Award is for those who answer blog comments, emails, and make their visitors feel at home on their blogs. For the people who take others’ feelings into consideration before speaking out and who are kind and courteous. Also for those bloggers who spend so much of their time helping other bloggers design, improve, and fix their sites. This award is for those generous bloggers who think of others.”

And I would like to pass this award to:
- Haalo is just one of my favorites. Sweet, kind and shares all what she knows to help others.
- Marion. This woman is talented, generous, caring and very smart.
- Anh is a genuinely sweet woman. She always has the kind word that makes you smile.
- Shayne, my friend, takes kindness to a whole new level. This woman won’t hesitate to call you to tell you how much she loved your post.
- Ivonne, what can I say about her. She is Ivonne, the Godmother of thoughtfulness, generosity and passion.

I wish I could give more awards to all of you but they ask just for five.
Another thing before I go, you will notice for th next week or so that I won’t be blogging as much as usual. We are in the process of moving to another house, which we are very excited about and my days are filled with boxes, boxes and more boxes. I will post about the Daring Bakers Challenge and will be back in a few days hopefully, after I get my things more organized.
Until then, have a wonderful weekend my friends, eat well and be happy.

Thursday, September 20, 2007

Apples Season / La Saison des Pommes

Apple and Rosemary Muffin


You know autumn is right around the corner when apples start flooding markets and roadsides. While apples aren’t my all time favorite fruit, in part because I’ve always associated them with strict diet and hungry nights, I love using them in baking and salads.
Apples are not only a good source of vitamin C and antioxidants, they are also a very versatile fruit that can be transformed into jams, curds, sauces, preserves, chutneys, apple butter and more depending on your creativity and the varieties.
As I enjoy snacking with a Gala apples or a Golden Delicious, my favorite varieties of apples to bake with are Rome Beauty, Pink Lady and Granny Smith.
For this season of apples I started with apples and rosemary muffins for Sunday breakfast. Adding rosemary to the recipe was my personnal touch to a simple apples and nuts muffins. The combination of apples and rosemary might seem odd at first, but you will discover that the rosemary being slightly bitter and fragrant actually gives a nice smokiness and warmth to those moist muffins, different from the usual bland fruity muffin.
I used Golden Delicious for this recipe but you can use any kind of apples appropriate for baking, making you kitchen smells like an orchard, smells like autumn, smells like home sweet home.

Apples and Rosemary Muffins


Apples and Rosemary Muffins

Recipe: adapted from here
- 1 cup plain flour
- 1 cup whole wheat flour
- ¼ cup oat bran or wheat bran
- 2 tsp baking powder
- ½ tsp baking soda
- ¼ tsp salt
- 1 tsp ground cinnamon
- 2/3 cup firmly packed brown sugar
- 2 large eggs
- 1 ½ cups plain yogurt or buttermilk
- ¼ cup unsalted butter, melted
- 1 ¼ cups grated, peeled and grated apple (about 1 large)
- 1 tsp rosemary leaves, chopped
- ½ cup golden raisins
- 1 small apple, silvered
- 2 tbsp granulated sugar mixed with 1 tsp ground cinnamon

In a large bowl, stir together the flours, bran, baking powder, baking soda, slat, cinnamon, and brown sugar. Set aside.
Beat the eggs on low speed until blended, and then beat in the yogurt and butter. Add the dry ingredients and mix on low speed just until half moistened. Add the apple, raisins, and rosemary and stir just until evenly distributed. Do not over mix.
Spoon the batter into buttered muffins cups. Put a thin slice of apple on each muffin and sprinkle the cinnamon sugar evenly over the top. Bake in a preheated 400F oven for 15-18 minutes.
Let the muffins cool in the pan on a wire rack for 2 minutes, and then turn out onto the rack. Store in an airtight container at room temperature for up to 2 days or freeze for up to a month.

Apple and Rosemary Muffins


Muffins aux Pommes et Romarin


In francais please: adaptée d’ici
- 155g de farine
- 155g de farine complete
- 20g de flocons d’avoine
- 2 c.c de levure chimique
- ½ c.c de bicarbonate de soude
- ¼ c.c de sel
- 1 c.c cannelle
- 155g de sucre brun
- 2 gros oeufs
- 375g de yaourt nature
- 115g de pommes, épluchées et râpées
- 1 c.c de romarins, finement haché
- 60g de raisins secs
- 2 c.s de cucre mélange avec une c.c de cannelle
- 1 petite pomme, coupée en fines tranches

Dans une grande jatte, mettre la farine, avoines, levure, bicarbonate, sel, cannelle et sucre brun. Mettre de coté.
Battre les oeufs legerement, puis ajouter le yaourt et le beurre et battre. Ajouter ensuite les ingredients secs et mélanger juste pour que tout soit bien incorporé. Ajouter les pommes, les raisins et le romarin et mélanger. Ne pas trop mélanger.
Verser la pate a muffins dans un moule a muffins beurré. Mettre une fine tranche de la pomme sur chaque muffin et saupoudrer de sucre/cannelle le dessus de chaque muffin. Faites cuire dans un four préchauffé a 200C pendant 15-18 minutes. Laisser refroidir 2 min dans le moule puis demouler les muffins sur une grille de patisserie.
Ces muffins se gardent dans une boite hermétique a temperature ambiante pendant 2 jours ou peut se congeler jusqu’a 1 mois.

Tuesday, September 18, 2007

Worth the Sweat / ça Vaut la Peine de Dégorger

Aubergine


Do you sweat your eggplant?
I used to. When I was still living under my parent’s roof, following my mother’s cooking rules I had always to sweat eggplants before cooking them. “It will absorb less oil if you sweat them,” she would tell me. Then, I moved away, get married and became rebellious against some of what I’ve learned, thinking it was obsolete, a waste of time to sweat my eggplants. I have my own kitchen, my own knifes and pans, no more: “It’s for dessert, don’t touch it!” I can do what I want; eat what I want, when I want.

I don’t fry eggplants; I roast them or broil them so there is no need to sweat them, I would tell my self. Of course I was wrong and my mother was right once again.

Sweating eggplant before cooking it not only helps tenderize the flesh’s texture but also reduces some of its bitter taste. When buying eggplants, choose the one that are firm to the touch with a smooth and shiny skin and no blemishes. And when it comes to the size the smaller the better. Big eggplant tends to be too spongy, bitter and with a tougher outer skin than the small ones. Although now available in markets throughout the years, eggplants are at their very best from August through October when they are in season.

I saw this recipe of ricotta balls on Nicky and Oliver’s gorgeous website and I had to try it right away; especially when I saw that the recipe was taken from Arte, one of my all time favorite TV channels.
On their website, they served them just as is with the salsa, but I wanted something different, definitely not pasta as it sounded a bit heavy for dinner. So this is how I came up with this vegetarian stuffed eggplant rolls for the enjoyment of my hubby who is a great meat-eater. Actually, even him didn’t miss the meat, as it is a very satisfying, very smooth and melt in your mouth dish. The ricotta stuffing has a texture similar to gnocchi but lighter and fresher, and the eggplant its self has a meaty quality to it and a bite that goes perfectly with the creaminess of the ricotta.

Overall, I would recommend this recipe to anyone who loves eggplant, but also to anyone who is still reticent to eating or cooking with eggplant. It was a very enjoyable dinner indeed, worth the sweating and waiting.
I am taking this recipe to the popular Weekend herb blogging, hosted this week by Myriam.

Aubergines


Stuffed Eggplant Rolls

Recipe:
- 1 eggplant, sliced vertically
- Kosher salt
For the Salsa finta
- 4 tbsp olive oil
- 1 mid-sized onion, finely diced
- 2 tbsp tomato puree
- 21 ounces canned tomatoes, whole or crushed (including juice)
- A generous dash of sugar
- Sea salt (or Kosher salt), freshly ground black pepper
- A handful of fresh basil leaves
For the Polpette di ricotta:
- 9 ounces ricotta
- 1 ½ ounces freshly grated parmesan
- 1 mid-sized egg
- 3 ½ ounces breadcrumbs
- A handful chopped fresh parsley
- Sea salt (or Kosher salt), freshly ground black pepper and nutmeg to taste
- 2-3 tbsp of salsa finta

Sprinkle the sliced eggplant with a very generous amount of kosher salt. Put them over a colander and sweat it from 30 minutes to 1hour and a half, until a brown liquid comes out of the eggplants. Rinse and pat dry the eggplants. Brush each side of eggplants with some olive oil. Broil them or grill them on each side until golden brown. Season with salt and pepper while still hot. Set aside.
For the sauce: In a pan heat the oil. Add onions and sauté until translucent. Add the tomato puree, then the canned tomatoes, crushed. Season the sauce with salt and pepper and the sugar.
Let it cook for 15 minutes and add more salt and pepper if necessary.
For the ricotta balls: Drain the ricotta over a fine-mesh sieve for at least an hour. In a large bowl, put the ricotta with the Parmesan, egg, two or three tbsp of salsa finta and parsley. Add the breadcrumbs gradually until you achieve a consistency that allows you to roll the ricotta into balls. Season with salt and pepper and a pinch of nutmeg. Mix until well incorporated. If the mix is too smooth add more breadcrumbs and if too firm add more salsa finta.
Form into logs and stuff each broiled slice of eggplant with it. Roll the stuffed eggplants and keep them tightly closed with toothpicks, Put them in the pan of salsa finta and let them cook on a low heat for about 10 minutes stirring from time to time to ensure even cooking. Just before serving add the basil leaves.

Aubergine


Roulade d’Aubergine

In francais please:
- Une aubergine, coupee verticalement en lamelles
- Du sel
Pour La Sauce Finta:
- 4 c.s d’huile d’olive
- 1 oignon moyen
- 2 c.s de tomate en conserve
- 600g de tomates pelées et coupée
- Une bonne pincée de sucre
- Sel, poivre fraichement moulu
- Une poignée de basilic
Pour Les boulettes de Ricotta:
- 250g de ricotta
- 40-50g de parmesan fraichement râpé
- 1 oeuf moyen
- 100g de chapelure
- Une poignée de persil, haché
- Du sel, poivre
- 2-3 c.s de sauce finta

Mettre les aubergines dans une passoire. Saupoudrer genereusement de sel et laisser degorger de 30 min jusqu’a 1 heure 30. Rincer les aubergine et bien les secher a l’aide d’une serviette. Badigeonner chaque lamelle d’huile d’olive et griller ou cuire sous le grill du four jusuq’a ce qu’elles deviennent bien dorées. Mettre de coté.
Pour la sauce finta, faites chauffe l’huile d’olive dans une poele. Ajouter les oignons et laisser cuire jusqu’a ce qu’il deviennent transluscides. Ajouter la tomate en conserve, les tomates coupée en dés, sel, poivre et le sucre. Laisser cuire 15 min et assaisonner plus si necessaire.
Pour les boulettes de ricotta, mettre le fromage de ricotta dans une étamine et laisser égoutter pendant une heure. Dans une jatte, mettre la ricotta, le parmesan, l’oeuf, deux ou trios c.s de sauce finta et le persil haché. Ajouter la chapelure petit a petit jusqu’a ce que vous puissiez faire des boulettes du mélange. Sel, poivre et une pincée de noix de muscade. Mélanger bien. Si le mélange est trop liquide ajouter le reste de chapelure, si il est trop sec ajouter plus de sauce finta.
De ce mélange de ricotta, faire des petits boudins que vous mettrez au milieu de chauqe lamellas d’aubergines. Rouler les aubergines et fermer avec des cure-dents. Mettre les roulades d’aubergine dans la sauce finta et laisser cuire encore 10 min, en tournant de temps en temps pour que la cuisson de la ricotta soit uniforme. Ajouter le basilic juste avant de servir.


Friday, September 14, 2007

Baking Tips

Pastry Crust


I have been negligent on keeping up with my posts this week but I just couldn’t help it. There have been some changes that needed to be taken care of and I can’t believe it’s already Friday. I didn’t want to let down my Friday Basics and for today I’ve chosen to share with you some common troubleshooting in baking and how to prevent them. Whether it is in making cakes, pies, bread, cookies or even quick breads and custards.

Yeast Breads
- Dough is rising too fast: Kitchen is too warm; transfer to cooler location. If you use instant yeast (also known as quick-rise, rapid-rise), then it is predictable your dough rises 50 percent faster than active dry yeast, which allows too little time for the bread to develop flavor. My advice, go with the dry yeast.
- Dough is rising too slowly, or is not rising: Kitchen is too cool, or water in which yeast was proofed was too warm or too cool; transfer to warmer location. Or, yeast is too old and no longer active. After opening yeast, keep it in the fridge and don’t forget to check the expiration date before using.
- Bread lacks flavor or tastes too yeasty: Dough was proofed too long. Common with instant yeast.
- Bread is dense and too moist: Bread was not proofed long enough.
- Bread look slack: Dough was overproofed, or the oven was insufficiently heated.
- Bread is too hard and chewy: Bread was overbaked at too low a temperature.

Quick Breads
- Bread caved in: Rose too fast because of too much leavening.
- Bread is too dry: Baked too long or not enough fat or liquid.
- Bread is underbaked in spots: Oven was not hot enough; oven heats unevenly.
- Bread is too dense or tough: Batter or dough was overmixed.

Cookies
- Cookies spread too much during baking: Butter was too soft when added, or dough was placed on hot baking sheet.
- Cookies are burned on bottom: Cookies were too thin, oven was too hot, pan was too thin or too low in the oven, or pan was not rotated during baking.
- Cookies did not bake evenly: Pan was not rotated during baking.
- Cookies fell apart when removed from pan: Cookies were removed too soon.

Pies and Tarts
- Pie or tart is sticky and hard to roll out: Too much water was added, use extra flour when rolling; dough is too warm, put it back in the fridge for 30 minutes before proceeding.
- Pie or tart dough is stiff and hard to roll out: Not enough water was added to dough, or dough is too cold, let it warm up a bit.
- Blind-baked crust pie or tart dough did not hold its shape: Too few pie weights were used for blind baking; dough did not rest long enough or was too soft.
- Blind-baked crust dough shrank in pan: Dough was not chilled long enough, or was stretched too much when lining the pan. I always freeze my crust, lined in the pan for 15 minutes before baking it, and it works every time.
- Pie or tart crust is not fully baked on bottom: Crust was not partially baked before filling was added; especially with custards and juicy fruits.
- Pie or tart crust is dense rather than dense: Butter and dough were overworked.

Cakes
- Cake did not rise: Ingredients were overmixed, knocking too much air out of batter.
- Cake is cracked in the middle: oven temperature was too low.
- Cake is high on the edges but is sunken in the middle: oven temperature was too high.
- Cake stuck to pan: cake was too hot when removed from pan, or pan was not properly prepared.
- Cake is soggy on the bottom: Cake was left to cool too long in pan.

Custards and Soufflés
- Custard is lumpy: Custard was overcooked on stovetop or was not strained.
- Custard is grainy or watery: Custard was overbaked.
- Custard is too wet in center: Custard was underbaked.
- Bread pudding is dry: Bread did not sit long enough to absorb the custard before being baked.
- Soufflé did not rise: Soufflé batter was overfolded and air was knocked out, or oven was not hot enough.
- Soufflé is dry: egg whites were overwhipped, or soufflé was overbaked.

Source: Essentials of Baking

Monday, September 10, 2007

It's Never Too Late / Il n'est jamais Trop Tard

cerises


I waited twenty-four years to have my first cheesecake experience. It was three months ago in Denver where I had Kahlua Cocoa-coffee cheesecake. Nobody told me that once you have a bite of a good cheesecake, you get addicted to it and there is no coming back. The following day, my husband and I had another slice and the next day another one. Three days in a row all we had for late night dessert was Cheesecake, and the same flavor.
Now eating cheesecake is pretty easy but baking it is a different story. You see I have never baked cheesecakes before. I have, what we call: “cheesecakebakophobia” . Basically, my worst nightmare would be ending up with a giggly, uncooked cheesecake that would ooze out of my spring-form tin and landing in my baking sheet or worst in my oven.
And then, it all changed two months ago when I saw Haalo’s cheesecake. I was mesmerized. It was meant to be. Haalo’s cheesecake was going to be my first cheesecake baking experience. Why her cheesecake, you might ask? It has nothing special, does it? I went with this one because I trust Haalo’s recipes. If I had to list all the successful concoctions that went from her blog to my table, I would have to change my blog name to “Haalo’s second Kitchen” or “Cook almost anything… at least twice”. Secondly, as she was explaining the outcome of her cheesecake, she said three magic words that were like music to my ears: “it's soft and creamy but with a wonderfully light texture. The topping adds that bit of sweetness and the base is appealingly crunchy”. And what better than a creamy, light cheesecake with a crunchy crust.
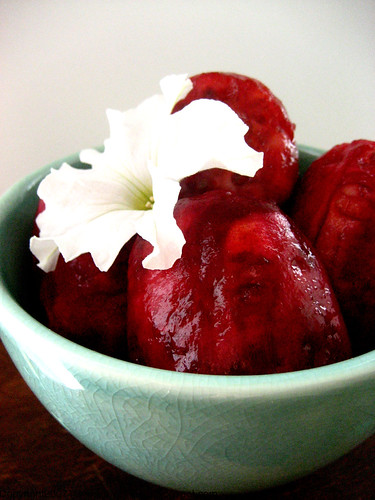
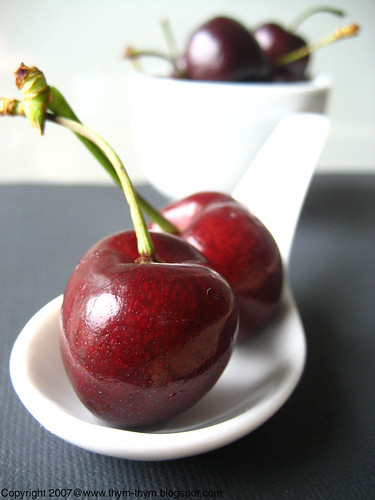
The recipe is very easy to follow and I was surprised to see that the cheesecake doesn’t cook in a water bath like most of cheesecakes do. I halved the recipe and used the last handful of cherries found at the market this weekend to decorate the top along with my strawberry jam.
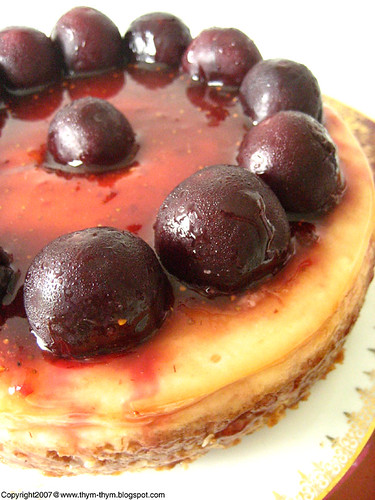
When slicing the cheesecake, I was charmed by the small bites, great for entertaining to pop in your mouth. Haalo was absolutely right about the texture. It’s creamy yet not heavy and very fresh with the ricotta cheese. You almost don’t have to use your teeth, except for the crust that is just buttery and crunchy with the adding of quick oats. The only thing that I would do differently next time is to use less jam for the topping because it was a bit sweet for my taste.
Other than that, it was a great experience, more addictive than eating the cheesecake. I came out victorious and I am proud of myself. I was a good girl this time; I only had one slice of it. Fine two…maybe three. It was late, I don’t remember.


Cherry and Strawberry Cheesecake


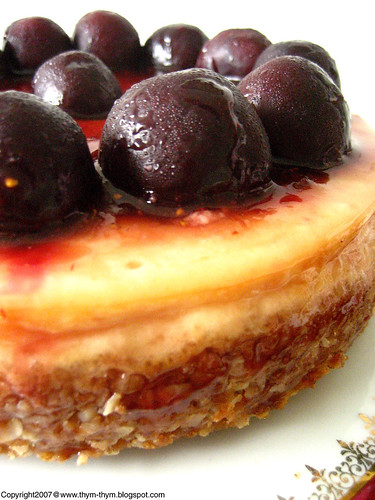
Baked Strawberry and Cherry Cheesecake

Recipe: adapted from here
The crust:

- 5 ounces unsalted butter
- 4 ounces quick oats
- 4 ounces graham crackers
- 2 tbsp brown sugar
The filling:
- 13 ounces light cream cheese
- 4 ounces ricotta cheese
- 3 ½ ounces caster sugar
- 5 ounces light sour cream
- 2 eggs
- 2 tsp vanilla paste or extract
- 1 tbsp flour
The topping:
- 9 ounces cherries or any fruit in season and depending on your taste
- 7 ounces strawberry jam

Make the Base:
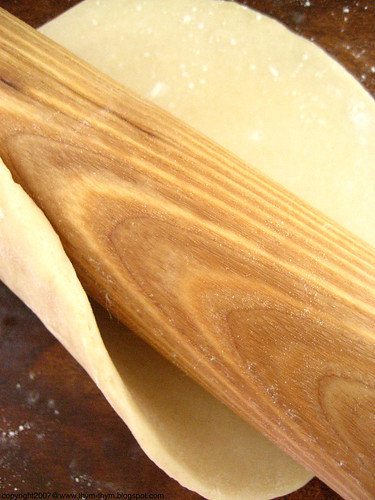
Butter a 20cm/8inch round spring-form tin - line the base with baking paper.
Place the butter in a saucepan to melt - when melted add the rolled oats, cookie crumbs and sugar and stir well to combine.
Pour the mixture into the lined tin and press it down firmly to create an even base.
Store in the fridge for 10-15 minutes.
Make the Filling:
Place the cream cheese, ricotta sugar and sour cream into the bowl of a mixer and beat until smooth.
Add the eggs, vanilla paste and plain flour and continue to beat until smooth.
Pour this over the chilled base and cook in a preheated 180°C/350°F oven for 40-45 minutes or until the filling is just set.
Remove from the oven but allow it to cool in the tin.
Make the Topping:
Place the jam into a small saucepan and heat gently until the jam has melted.
Let this cool a little before spreading it over the cold cheesecake, then top with your fruits.
You will notice that the cheesecake will have shrunk away from the sides of the tin so the some of the topping will ooze out over the edge.
Cover and place in the fridge for a few hours or overnight. For best result,take it out of the fridge one hour prior to serving.


Cheescake


Cheesecake aux Fraises et Cerises

In francais please: adaptée d'ici
- Pour la base:
- 125g de beurre, fondu
- 100g de flocon d’avoine
- 100g de petit biscuits secs, hache finement au robot
- 2 c.s de sucre brun
- Pour la garniture:
- 375g de cream cheese Philadelphia allégé, mou
- 100g de fromage ricotta
- 80g de sucre en poudre
- 125g crème aigre, allege
- 2 eggs
- 2 c.c d’extrait de vanille ou pate de vanille
- 1 c.s de farine
- Pour la decoration:
250g de cerises, ou votre fruit prefere de saison
200g de confiture de fraises

Preparer la base:
Beurrer un moule a cheescake (20cm de diametre) et garnir le fond de papier sulfurise.
Melanger le beurre fondu aux flocon d’avoine, sucre brun, biscuits jusqu’a complete incorporation.
Verser le mélange au fond du moule et bien applatir avec votre main pour obtenir une base uniforme. Mettre au frais 10 a 15min.
Preparer la garniture:
Mettre cream cheese, ricotta, sucre et crème aigre dans le bol d’un mixeur ou avec un batteur et melanger jusqu’a ce que le mélange devienne soyeux et lisse.
Ajouter les oeufs, vanille, farine et continuer a batter jusqu’a ce qu’elle redevienne lisse.
Verser sur la base prealablement refroidi et faites cuire dans un four prechauffe a 180C pendant 40-45 min ou jusqu’a ce que le cheescake soit ferme mais un peu mou au center quand vous le bougez legerement.
Laisser refroidir dans son moule.
Preparer la garniture:
Mettez la confiture de fraise dans une casserole et faites la tiedir. Entre temps, épépiner les cerises et mettre de côté. Verser la confiture sur le cheesecake encore tiede et decorer avec les cerises a votre guise.
Couvrir et mettre au frais pendant des heures ou toute une nuit.Sortir du frigo une heure avant de le servir, pour une meilleure degustation.


Friday, September 7, 2007

Prickly pears / Figue de Barbarie / Chumbo

Chumbo


Last weekend, hubby and I bought a huge box, huge considering that it was only for the two of us, of Prickly pears, or as some may call them cactus pears, Indian figs or if you are like me, I call them Chumbo (its Spanish term).
We were so excited, like kids in front of a giant pile of candy we couldn’t wait to take a bite out of it. What do two people like us do with all these prickly pears? Well, like we always do. He peels them, I put them in the fridge until well chilled and then we pop them in our mouth, one after the other, laughing at how many chumbo we ate all in once.

I know you can make jellies, jams, and drinks out of it, but when you have such a beautiful and ripe fruit; there is not much you should do to enhance what it already has.
Prickly pears can be found in abundance in the west and Southwest of the untied states and as Far East as Nebraska and throughout much of Mexico. It also flourishes in Mediterranean regions, such as North Africa, South of France, south of Italy, southern Portugal, southern and eastern Spain, in the island of Malta, Turkey, Israel and else where in Bulgaria, South Africa, Australia and chili.

Like all cacti, prickly pears are about 90% water. The young stems (called nopal), fruits (called Tuna) seeds and flowers of the prickly pears are all edible. Most of the markets in the United States, Europe and Australia sell prickly pears cleaned from their spines, but if you can’t find them without their spines you’ll have to be very careful when peeling and removing the spines as they can remain embedded in the skin, causing significant discomfort, redness and sometimes infection. Wear protective gloves. Put the prickly pears in a bowl filled with water and try to scrub the spines gently using a scrubbing brush. Do not splatter.

The stems are commonly used in Mexican cuisine in dishes such as huevos con nopales (eggs with nopal), or “tacos de nopales” and the fruits are used in a popular alcoholic beverage: Tequila.
When collecting pads, choose the young glossy green ones. The older ones are fibrous and though. Prepare them by peeling them, dicing them and adding them to salads, soups and stews as a thickener or bake them.

The fruit, ripen in late summer is sweet, very refreshing and with a granular texture due to the tiny seeds inside. The fruit can be red, yellow/orange or pale green depending on the region. The seeds in India are dried and grind into pastry flour and the gel-like liquid of a prickly pear can be used as a conditioner. Now how versatile is that.

Source: Wikipedia.org
wwmag.net

Wednesday, September 5, 2007

Smells like Autumn / ça sent l'automne

Mediterranean Roasted Cauliflower


I don’t know where August went. I wake up and the calendar tells me it’s September. Is it possible? But I like autumn. I like this month of the year. I like how the trees turn yellow and red and purple; the smell of the moist soil after the rain. I like how the nights start to be chilly and that we have our wedding anniversary and a lot of birthdays to celebrate.
Even the kitchen is in a different mood in autumn. The big pots and pans come out of the deep stove drawer. The oven is running at full speed nearly all the time. The freezer is crowded with summer vegetables that will lighten up our wintry days, and cauliflower odors are back in my apartment.
I have learned, lately to appreciate cauliflower. Not because “ I grew up” like my mother would say but because of two different cooking methods introduced to this veggie: Roasting and as a soup. If you can call “soup” a cooking method. But you get my point.
All I can remember from my short life of eating cauliflower is a mushy, stinky, overcooked vegetable made edible by my mother’s cheesy, well-seasoned béchamel sauce. This woman knows how to make you eat your vegetable even when they are stinky. And the funny part is that we would ask for more. What a béchamel sucker my sibling and I were.
Time has changed and my taste buds too. Although I cannot say that cauliflower has become my favorite vegetable, I can say that I am more comfortable, even excited when I see it freshly displayed at the market. I even bought two cauliflowers in two weeks, which is quite impressive for somebody who used to hate it.
Roasting the cauliflower at 400F (200C) until golden brown and al-dente is the perfect way to bring out the flavor of the vegetable, but without the mush and the whiff. This cooking process gives a nice smokiness and sweetness to the cauliflower that can’t be found when steaming or boiling for instance. The texture is perfect but not tough, and the rosemary, along with the garlic oil and capers give a deep, fragrant touch to the dish.
When buying cauliflower, the best way to keep it in your fridge is to remove it from any plastic bag, to wrap it in a damp and clean kitchen towel and store it in the crisper. It will remain moist and for up to three days without spoiling.
A lot of people like to soak the raisins. I know I used to do it. But then came along my mother-in-law who taught me this great method of re-moisturizing the raisins, but without spoiling shape or color. Steam them. Over boiling water, cover them with plastic wrap (the plastic wrap should be in direct contact with the raisins) and steam them for 20min. You will have fully puffed raisins that are tender and moist. You will thank me later for this one.
This dish, which I decided to call Mediterranean Roasted Cauliflower for all the flavors that it has and for my love for the Mediterranean, is simple yet very satisfying. It’s sweet with the roasted cauliflowers and the sultana raisins and the juicy grape tomatoes, and also a hint of sourness from the capers. You can serve it as a side dish to roast chicken, or as a main course for a light, autumn lunch.


Mediterranean Roasted Cauliflower


Mediterranean Roasted Cauliflower

Recipe:
- 1 big cauliflower, cut into florets
- 1 tbsp rosemary leaves
- 3 tbsp extra virgin olive oil
- 3 garlic cloves, silvered
- 15 cherry tomatoes, halved
- 1 tbsp capers, drained
- 1 tbsp pine nuts, toasted
- 1 tbsp sultana golden raisins, steamed
- Salt, pepper
- Lemon wedges to serve

Heat 1 tbsp olive oil in a pan. Add the garlic slices and let it cook on medium heat until translucent. Don’t let it burn or it will become bitter. Remove from the heat and let it infuse.
Preheat the oven to 400F. Put the cauliflower florets in a single layer in a baking sheet. Add 1 tsp rosemary leaves, the remaining olive oil, salt and pepper. Toss to coat evenly and bake, uncovered until the top is lightly browned. Test with toothpick for desired doneness.
Remove the garlic from the pan and add the capers, pine nuts, sultanas and tomatoes. Sautee quickly until the juice comes out of the tomatoes. Season with salt and pepper.
Remove the cauliflower from the oven and toss gently with the tomato capers mixture.
Sprinkle the remaining rosemary leaves on top and serve warm, with a lemon wedge to taste.


Mediterranean Roasted Cauliflower


Chou-fleur rôti à la Méditerranéene

In francais please:
- 1 gros chou-fleur, coupé en feurettes
- 1 c.s de feuilles de romarin
- 3 c.s d’huile d’olive
- 3 gousses d’ail, effilees
- 15 tomates cerise, coupées en deux
- 1 c.s de capres, égouttes
- 1 c.s de pignons de pin, grilles legerement
- 1 c.s de raisins secs, cuits a la vapeur
- Sel, poivre
- Des quartier de citron pour servir

Fairtes chauffer 1 c.s d’huile d’olive dans une poele. Ajouter l’ail et laisser cuire jusqu’a ce que les lamellas d’ail deviennent translucides. Eviter de le bruler car l’ail deviendra amer. Retirer du fau et laisser l’huile s’infuser de l’ail.
Prechauffer le four a 200C. Mettre les fleurettes de chou-fleur dans un plat allant au four, sans les entasser les uns sur les autres. Ajouter 1 c.s de feuilles de romarin, le rest d’huile d’olive, sel et poivre. Melanger bien jusqu’a ce que les fleurettes deviennent bien imprégnees d’huile et faites cuire, sans couvrir jusqu’a ce que la surface devienne doree. Tester avec un cure-dents pour la tendreté desirée du legume.
Retirer l’ail de la poele et ajouter les capres, les pignons de pin, les raisins secs et les tomates. Faire sautre rapidement jusqu’a ce qu les tomates commencent a donner leur jus. Saler, poivrer. Retirer le choufleur du four. Melanger delicatement au mélange tomates et capres. Saupodrer des feuilles de romarin restantes. Servir tiede, avec sur chaque assiette un quartier de citron pour presser sur le chofleur, selon le gout de chacun.

My sister (5 years old) and me (2 years old) at our grandparents.
Happy Birthday big sister.