Friday, August 31, 2007

Flours ID

Flours


Flour, made by milling grains such as wheat, rye, and corn, is the baker’s most essential, most basic ingredient.
The type of grain and the way the flour is milled help determine its defining characteristic: the amount of protein it contains. The protein, present in wheat flours, and in very small amount in rye and oat flour, forms what we call gluten. It is what makes the dough elastic when kneaded.
You can control the amount of gluten by the type of flour you use and how much you manipulate the dough or batter before baking: Kneading rigorously is recommended for yeast bread. Stirring the ingredients briefly instead of kneading is recommended for quick breads and cakes. It produces a mixture with little gluten and a tender crumb.
A variety of flours are used in baking. The most common are described below:

Wheat Flours:
All-purpose (plain) flour: A mixture of both hard and soft wheat is the most common flour on the U.S. market. All-purpose flour is available bleached (chemically treated) and unbleached. Bleaching makes the flour whiter and increases the flour ability to hold sugar and water, while the unbleached flour tends to contain more protein and has a more agreeable flavor.
Bread Flour: is milled exclusively from hard wheat and is high in protein. This is the kind of flour you will use for example in the making of baguettes.
Cake (soft-wheat) Flour: made from soft wheat, is milled more finely than the other wheat flours and is low in protein and high in starch. It is generally the best choice for delicately crumbed cakes and similar baked goods. It has to be sifted prior to use to aerate it and to remove any lumps.
Semolina Flour: is made from durum wheat with the bran removed. It is used in some Italian breads (Ciabatta, Cocodrillo…) and desserts and to keep breads from sticking to the baking sheet. Look for a fine grind for baking (cornmeal).
Whole-wheat (Wholemeal) Flour: is ground from whole-wheat berries. It retains all three parts of the grain: the endosperm, the bran, and the germ, and therefore contains more vitamins, minerals, starch, and fiber than other flours ground from only the endosperm. It is lower in protein than all-purpose flour and gives a dense bread with a nutty, sweet flavor.
Other Flours
Corn
is the source of many different product used in baking.The dried kernels are ground into cornmeal of different textures, from fine (also known as corn flour) to coarse. Stone ground corn meal has a nuttier flavor than fine or medium-grind cornmeal.
Silky, powdery cornstarch is ground from the heart of the kernel and used as a gluten-free thickener. I use it also to lighten up the flour in my cakes when I don’t have cake flour. The rule goes: ¾ of all-purpose for ¼ of cornstarch.
Oats: they can be ground into flour for bread making. However, being very low in gluten, you will have to combine it with wheat flour to make bread and other raised baked goods. Old- fashioned rolled oats are common in cookie and muffin recipes. They are interchangeable with quick oats in many recipes, although the old-fashioned are preferred for their superior texture. Instant oats and steel-cut oats are best for eating as cooked cereal. Oat bran is used to add flavor, texture and nutrients to yeast and quick breads.
Rye Flour: milled from rye berries, is low in protein. There are three different kinds of rye flour: dark, light and medium. Rye flour gives a distinctively flavored, dense, more rustic and earthy bread than wheat flour. Coarse dark rye flour is sometimes labeled Pumpernickel flour.
Chestnut Flour: After harvesting, chestnuts are dried then milled into flour. Being gluten-free, it can be used combined with all-purpose flour in bread making or any raised baked item. The rule goes: 30% chestnut flour for 70% all-purpose flour, or more depending on anyone’s palate. It can be used alone when making either sweet or savory crepes and tart crust. Enhances the flavor of chocolate, hazelnuts, almonds and chocolate.
Buckwheat Flour: Buckwheat is a fruit. The flour is made from the grains of the fruit. It’s gluten-free and therefore can be used alone when making bread. Because of its bitterness, it is common to combine buckwheat flour to other flours, such as wheat or potato flour.
It can be used alone in making crepes, pancakes, blinis, Japanese Soba and Pasta (mixed with semolina). It can be stored for only two months.

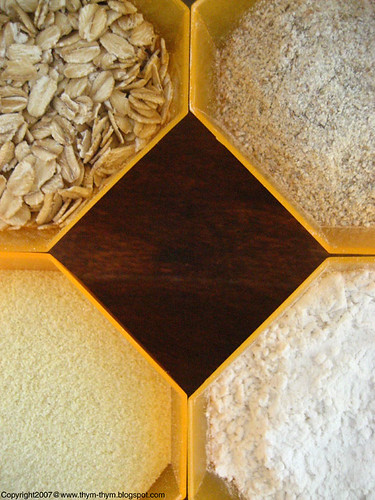
*Photo: Left to right, from top left: Ol-Fashioned Rolled Oats, Rye Flour, Semolina Flour, Cake Flour.

Source: Supertoinette.com
Essentials of Baking,Williams-Sonoma


Thursday, August 30, 2007

Stuffed with Upgrades/ Farcies avec Options

Stuffed Globe Zucchinis


I gave up trying to keep up with my younger brother’s slang. I avoid employing the ones that used to be trendy at the time when I was in high school, because he would laugh at me. He makes me feel “outdated” and he is only three years younger than me.
When I was about sixteen or seventeen and my parents would leave us alone at home for the day, I was the one in charge of cooking lunch. My brother hated it. Not my cooking, but my taking over the kitchen without my mother in sight meant one thing: recipes experimentations. My recipes involved greens, tons of vegetables and sweet and savory dishes. In other words, all what my brother hates.
When we set at the table, he would ask me with mockery: “So how do you call this dish?”
Me: “ blablabla…”
Him: “ Well it does have some upgrades, doesn’t it?”
Me: “Upgrades? What do you mean?”
Him: “Options, the real deal, the juicy stuff… I am talking about meat!”
Me: “?!?!!…”
My brother is a big meat lover. Just go ahead and give him any kind of dish that engages big chunks of meat, red meat preferably, and he will praise your cooking skills for the rest of the day. Luckily, he has learned to appreciate other dishes that don’t systematically involve meat. This dish is one of his favorites. I know he would rather have it without dried fruits but everyone has his or her own upgrades.
I usually cook pilaf rice, but was intrigued this time by Chelo, the Iranian steamed rice.
The traditional way of cooking Chelo is soaking the rice in salted water for a minimum of 2 hours, draining then cooking it in fresh water; and then “steaming” it for 40 min with some butter in a pan covered with a lid and a dishtowel. The corners of the dishtowel are then folded over the lid.
The rice becomes soft and fluffy, never soggy and sticky.
This is a quicker method of cooking Chelo. Don’t skimp on the soaking time, though. A minimum of 30 min is required to soften the grains and improves the flavour of the finished dish. You can use either basmati rice or long grain rice. I used ground lamb to stay in the Mediterranean/ Middle Eastern theme, but you can use ground beef, ground turkey or even no meat at all if you are a vegetarian.

Stuffed Globe Zucchinis

Recipe:
- 4 globe zucchinis
- 1 spanish onion, finely minced
- 1 tbsp vegetable oil
- ½ lb ground lamb (or beef)
- ½ cup vegetable or chicken stock
- 1 turnip, diced
- 1 tbsp golden raisin
- 5 dried apricots, diced
- 1 tbsp cilantro leaves, finely chopped
- Salt, pepper
- For the Persian rice:
- 1 ½ cups water
- ½ tsp salt
- 6 oz basmati rice
- 1 ½ tbsp butter

Place the water and salt in a pan and pour in the rice. Set aside to soak for at least 30 min and up to 2 hours. Bring the water and rice to a boil, and then reduce the heat and let it simmer for 10-15min, until the water is absorbed.
Add the butter to the rice. Cover the pan with a tight-fitting lid and steam over a very low heat for about 30 min.
Meanwhile, heat the oil in a pan over medium heat. Add the lamb and sauté quickly just to give it a nice color. Add the onion, turnip and season with salt and black pepper. Pour in the stock, cover and let it simmer until the meat is cooked through, about 15 min. Uncover the pan, add the dried fruits and let the liquid reduces. Sprinkle some cilantro on top of the meat mixture and combine with the rice prepared earlier. Set aside.
Preheat the oven to 400F. Cut the top off the zucchinis. Using a spoon, scoop the flesh out of the zucchinis. Season with salt and black pepper and set aside on a greased baking pan.
Spoon the rice and meat mixture to the zucchinis; place the top on each of them. Cover the baking dish with foil and bake until the zucchinis are tender, when poked with a toothpick, about 30min. Let it cool slightly and serve.

Courgettes Rondes Farcies

In francais please:
- 4 courgettes rondes
- 1 oignon blanc, finement hache
- 1 c.s d’huile vegetale
- 1 navet, coupe en petits des
- 400g d’agneau hache
- 100 ml de bouillon de volaille ou legumes
- 1c.s de raisin secs
- 5 abricots secs, coupe en des
- 1 c.s de coriandre hache
- Sel, poivre
- Pour le riz Perse:
- 375ml d’eau
- ½ c.c de sel
- 175g de riz basmati
- 20g de beurre

Mettre, l’eau, le sel et le riz dans une casserole. Laisser tremper au moins 30 min ou jusqu’a 2 heurs. Porter le riz a ebullition, puis reduire le feu et laisser cuire pendant 10-15 min juqu’a ce que l’eau soit absorbe.
Ajouter le beurre mais sans le melanger. Couvrir la casserole fermement d’un couvercle, puis faites cuire sur feu tres doux pendant 30 min.
Entre temps, faites chauffer l’huile dans une poele. Ajouter la viande et faites sauter rapidement. Ajouter l’oignon, le navet et assaisonner de sel et de poivre. Couvrir du bouillon et laisser cuire jusqu’a ce que la viande soit completement cuite, environ 15 min. Ajouter les fruits secs at laisser le liquide reduire sur feu vif. Parsemer les feuilles de coriandre au dessus. Melanger la viande au riz et mettre de cote.
Prechauffer le four a 200C. Couper le chapeau de chaque courgette et mettre de cote. Vider les courgettes a l’aide d’un cuillere. Assaisonner l’interieur de sel, poivre et mettre les courgettes dans un plat allant au four, legerement huile. Remplir les courgette du mélange riz-viande. Couvrir le plat d’une feuille d’alluminium et faites cuire jusqu’a ce que les courgettes deviennent tendres quand on les perce avec un cure-dents, environ 30min. Laisser refroidir legerement et servir.

Wednesday, August 29, 2007

Daring Bakers August Challenge: Eric Kayser's Milk Chocolate and Caramel Tarts

Milk Chocolate and Caramel tarts


Saying that I was reticent about this month’s challenge is an understatement. My fear? The combination of milk chocolate and caramel that I find really odd. To me milk chocolate is just too sweet, and caramel…well it’s sugar!
I was afraid I would end up with something that tastes more like an overly sweet candy than a tart.
Dark chocolate being not allowed, I started to think about other ways to make the tart tastes a little less sweet than it sounds, without having to break my daring baker pledge or being pointed to as a rebel.

Milk Chocolate and Caramel tarts


What I did differently:
First, I divided the recipe in half. Nothing to do with sweetness you might say, but it was to minimize any final bad surprise.
Second, I wanted to have small portions, similar to petits fours, so I went with my mini brioche molds.
Third, I replaced ground hazelnut in the crust by ground walnuts. I find walnuts being bitter than hazelnuts. If it makes any sense!
And finally, I used walnuts halves to decorate my tiny tarts instead of caramel bits.
Overall, everything went smoothly. I tried to use the dry method to making caramel Veronica, but immediately switched to my usual water and sugar method when I saw it drying out. The caramel was a success, smooth with a gorgeous color.
I didn’t expect the pastry to puff that much when baking. My brioche molds being so small, I didn’t have much space left to fill it with the caramel and the milk chocolate mousse. The shortbread pastry was so flaky and melts in your mouth with the exact amount of sweetness, that I couldn’t stop eating it.

Inside


The milk chocolate mousse was surprisingly not as sugary as I imagined it would be! The only mistake that I made is when I finished making the mousse, before even pouring it over the cooled caramel, my daughter woke up from her nap, crying. I had to put the bowl of mousse in the fridge and went to console her. Fifteen minutes later, after wiping her tears and feeding her, I remembered the mousse. It had already set, so when pouring it over the caramel it looked more like a puree than a mousse.
Despite some bumps here and there, my hubby and I enjoyed these tarts very much. We shared most of them with his co-workers who just went crazy for them.
Now the combination of milk chocolate and caramel makes more sense to me, thanks to Patricia and Vero. But when it comes to chocolate nibbling, I am a dark chocolate girl through and through.
You can head to Patricia's and Veronica's blogs for the recipe.

Friday, August 24, 2007

Zucchini

Globe Zucchinis


Zucchini

Also known as Courgette, is a small summer squash that has its ancestry in the Americas. It can either be yellow, green or light green. The word zucchini comes from the Italian word zucchino, meaning a small squash. It is one of the rare vegetables that can be found in savory dishes as well as sweet dishes and breads.
The zucchini flowers are also comestible. With pistils removed (for female flowers) and stamens removed (for male flowers). The male flower is the one with a thin stem, and it is usually the one used for cooking, as the female flower is responsible for “giving birth” to the zucchini. Remove any insect from inside the flowers and clean gently with a damp kitchen towel, as they are very delicate. Pat dry, if needed, and you can serve them in different ways: deep fried as beignets or tempura, stuffed, in omelets, sautéed, baked, in soups or pasta or rice.
- How to choose them:
Firm to the touch, smooth, with a nice shiny color, preferably thin and no more than 6 inches long. Bigger zucchinis tend to be tougher, bitter and mealy.
- How to store them:
Store them in a plastic bag in the refrigerator crisp drawer for up to four days. Do not wash them until ready to use. Softness is a sign of deterioration.
- How to freeze them:
Slice the zucchinis and blanch them for two minutes. Shock them in ice cold water to set the color and stop the cooking. Drain and seal in an airtight container or Ziploc bags. They can be kept in the freezer from ten to twelve months. Cook without thawing them.
- How to cook them:
Cook them with a minimum of water added. It is better to steam them instead of boiling them, as they are known to retain a lot of liquid. When in possession of young zucchinis, no need to cook them. Just trim the stem and slice the zucchini into rounds, using a mandolin or a vegetable peeler. Serve as a salad with some fresh thyme and raspberry vinaigrette.
Zucchini can be sautéed, baked, stuffed (globe zucchinis are the perfect choice), steamed, grilled, fried (beignets, fritters) and jams. They are considered an important ingredient in the making of Ratatouille, zucchini bread and zucchini and chocolate cupcakes.
Whatever dishes you wish turning your zucchinis into, just remember to not overcook or you will end up with a mush.
Next week, I will show what I have done with my globe zucchinis. Although it is easy to guess, don’t you think?
If you have a favorite zucchini recipe you would like to share, drop it in the comment section. After what, I will randomly choose one of them, which I will be trying, and illustrating on my blog with your name, of course, as the original author.
Until next time, have a great weekend my friends.

Source: About.com
Wikipedia

Wednesday, August 22, 2007

A Family Affair / Une affaire de famille

Parmesan Black Pepper Crackers

When the weather is hot and the air is humid that it makes my hands sweat and my feet puff out, the stove becomes my worst enemy and the oven, my bête noire. I avoid all temptations that might tickle my papilla. I turn off the TV and the laptop. I put away all food magazines, and restrain my self from reorganizing for the umpteenth time my cookbooks and recipe folders. I lunch on salads and fruits and brag about how I lost some more pounds.
But when I can say, at least for most of the time, that I do restrain my self from eating too much; I wouldn’t say the same for cooking. And how can you do so when you were raised in a house where any event, and I mean any event, involves pans shaking, vegetables waltzing, bread mopping and a minimum of 15 people gathered around the table. As if it wasn’t enough to have the cooking syndrome in my genes, I married a man that smells, feels and guesses what is on the menu the minute he crosses the entry door. He gets as much excited as I do about a new recipe and some gorgeous vegetables at the market. And he always has the nice word that I like to hear at the end of the meal: “Thank you Honey! It was delicious". He is my kind of gourmand.

Parmesan Black Pepper Crackers

Every time I spot a new recipe, adrenaline rushes inside my body making my eyes popping out of my head and my mouth water. I become amnesic as I instantly forget about all what I was doing at that exact moment and runs to the kitchen to start my experimentations.
Ina Garten in one of her episodes made these Crackers using Parmesan and Black pepper. These crackers have more body than your usual crackers. They are very similar to shortbreads, crumbly and melt in you mouth. Her recipe calls to use one teaspon of thyme, which after baking won’t look enough. The thyme gets lost between the bolder flavor of both Parmesan and black pepper. You can use fresh thyme but I am guessing dried thyme or any other herb would work as well. I added to the crackers nigella seeds to add more crunchiness and as it bake the nigella seeds gives its smokiness that I just love. I generally use nigella seeds as a topping on my bread but I must say that this is another way where I will be using it.
This is a very versatile recipe that you can twist and personalize as much as your inspiration goes. Because when it comes to cooking or baking, there are no rules, and certainly not the weather, that can stand against your passion and your genes.

Parmesan Black Pepper Crackers

Parmesan Black Pepper Crackers

Recipe: adapted from Barefoot Contessa. Yields about 30 crackers
- 1/4 pound (1 stick) unsalted butter, at room temperature
- 3 ounces freshly grated Parmesan
- 1 1/4 cups all-purpose flour
- 1/4 teaspoon kosher salt
- 1 tbsp chopped fresh thyme leaves
- 1/2 teaspoon freshly ground black pepper
- 2 tbsp Nigella seeds
- 1 egg white, lightly beaten

In a bowl, mix the butter until creamy. Add the Parmesan, flour, salt, thyme and black pepper and mix to combine. The dough will be sticky and very soft. Put the dough into a floured surface and shape it into a 13- inch long log.
Wrap the dough and freeze it for 30min or until needed. You will still be able to slice it.
Using a sharp knife or an electric knife, slice the log into ½ inch thick discs. Spread the nigella seeds in a plate and roll the border of each cracker, first in the egg white then in the nigella seeds. Arrange the crackers on a sheet pan, lined with parchment paper. Bake at 350F oven for about 20min or until the edges start to brown.
Serve with a platter of cheese and grapes.

Biscuits Salés aux Parmesan et Poivre Noir

Parmesan Black Pepper Crackers


In francais please: Adaptee de Barefoot Contessa. Pour 30 biscuits
- 113g de beurre, a temperature ambiante
- 85g de parmesan fraichement rape
- 300ml de farine
- ¼ c.c de sel
- 1 c.s de feuilles de thym
- ½ c.c de poivre noir fraichement moulu
- 2 c.s de graines de nigelle
- 1 blanc d’oeuf, legerement battu

Dans un bol, melanger le beurre mou jusqu’a ce qu’il devienne vremeux. Ajouter le parmesan, le sel, farine, poivre noir et thym. Melanger jusqu’a obtention d’une pate mollle et collante. Transvaser la pate vers une surface legerement farinee et former en boudin d’une longeur de 33cm.
Envelloper la pate dans un film plastique et mettre au congelateur pendant 30min oujusqu’a ce que vous en aurez besoin. La pate ne se congelera as completement tant que vous l’utiliser le jour meme. A l’aide d’un couteau bien eguise ou d’un couteau elecrtique, couper le boudin en discs d’un centimetre et demi d’epaisseur. Mettre les graines de nigelles dans une assiette et rouler les bords de chaque biscuit, premierement dans l’oeuf battu puis dans les graines de nigelle. Arranger les biscuits dans un grand plateau, garni de papier fulfurise. Faites cuire dans un four prechauffe a 180C pendant 20 min ou jusqu’a ce que les bords des biscuits deviennent legerement dores.
Ces biscuits s’accompagnent parfaitement avec un plateau de fromage et des fruits.


Friday, August 17, 2007

A Birthday and a Cupcake / Un Anniversaire et un Cupcake

Chocolate Zucchini Cupcake


No, I haven’t forgotten about my blog nor about you, my friends. My duties of a mother had me spending more time with my little girl than in front of my lap top screen. Wednesday was my daughter’s first birthday. I still can’t believe that she is already a year old. I was getting used to telling her age by the months.
“How old is she?” “She is 10 months old”
My little girl is getting bigger.
All this week I was trying to picture how her birthday would be like. I knew I would make some sort of a cupcake. I spent days looking for the perfect cupcake recipe. A zucchini chocolate cupcake sounded like a “baby friendly” cupcake. Everything had to be perfect for my little angel. I smiled thinking about how she would try to blow off her first candle. How she would look cute in her first princess dress. How she would destroy her cupcake. How she would pinch the cream cheese frosting between her thumb and index and then slowly bringing it into her mouth. Her father and I would be laughing at how she would make a big mess of her self while keeping the camera rolling. I would struggle the following day scrubbing the cream off of my carpet. But it was all worth it, I would tell my self. It was my little sunshine first birthday.
The D-day came. My little girl was so pretty in her yellow princess dress. She barely allowed me to comb her hair, but still it was fine. I like it when it’s curly and messy anyway. She was excited when she saw the balloons, the ribbons and the garland on the walls. She set in her high chair and waited for mommy to bring the dessert. What she didn’t know is that it was a special dessert. Mommy is going to allow her to eat her cupcake and make a big mess as much as she wants to. By the time I brought the cupcake and lighted the candle, She was starting to get a bit sleepy, scratching her eyes and her hair. We sang Happy birthday in three languages to wake her up. She wanted to grab the candle, still lighted, between her hands but my husbands blew it off before she can hurt her self. We tried to make her, at least, have a bite of her birthday cupcake, but all she wanted to do was sleeping. We managed to take some pictures. She finally took a bite of the cream cheese frosting. She laughed every time she would pinch some frosting and bringing it into her mouth. Obviously, she was very excited about it. We tried to keep her awake as much as we could but she was too tired. A quick run to the bedroom to bring her presents before she goes to bed, I told my husband. The next thing you know, this little girl was not sleepy anymore. She stayed an hour playing with her new favorite toys, talking and laughing and tossing them to her father.
Although her birthday didn’t turn out as planned: There were no cupcake battles and no sticky carpet, it was one memorable birthday. It was our little girl first birthday. We will remember it as being the birthday she started wearing a beautiful dress and yawning the whole time and ended playing with her toys and wearing only diapers.
The cupcakes were so good; I ate two of them before the birthday had even started. But it was just to make sure that it was right enough for her.

Her First Birthday


My favorite Chocolate Zucchini Cupcakes

Recipe: adapted from here
- 1/2 cups brown sugar
1/4 cup melted butter
3/4 cup vegetable oil
3 eggs
1 tsp vanilla
1/2 cup buttermilk
2 cups grated zucchini
1 cup chocolate chips
2 cups unbleached flour
1 cup cocoa, sifted
1/2 tsp salt
2 tsp baking soda
1 tsp allspice
1 1/2 tsp cinnamon (I used only ¾ of a tsp)

Sift the dry ingredients into a bowl and set aside.
In a bowl, mix the sugar with oil and butter. Add the eggs one at a time and mix until well incorporated. Stir in vanilla, buttermilk, the grated zucchini and chocolate chips.
Slowly add the ingredient to the wet ingredients and mix until well combined.
Spoon the batter into muffin pan, lined with muffin cups. Bake in a preheated 350F for about 35, or until it looks almost done in the oven. Do not overbake them; otherwise they will turn out dry. Cool on a wire rack. The chocolate chips inside will stay soft for the whole day (at least it did for me. It might be the weather)

Chocolate Zucchini cupcake


Mes Cupcakes préférés aux Chocolat et Courgettes

In francais please:
Adaptee d’ici
- 360ml de sucre brun
- 60ml de beurre fondu
- 180ml d’huile vegetale
- 3 oeufs
- 1 c.c d’extrait de vanille
- 120 ml de babeurre
- 480ml de courgettes rapees
- 240ml de pepites de chocolat noir
- 480ml de farine
- 240 de cacao, non sucre
- ½ c.c de sel
- 2 c.c de bicarbonate de soude
- 1 c.c de mélange d’epice pour pain d’epice (kubeb)
- 1 ½ c.c de canelle (j’ai utilize seulement ¾ d’une cuil a café)

Dans un bol, faites passer les ingredients secs a la passoire et mettre de cote.
Melanger le sucre avec l’huile et le beurre. Ajouter les oeufs un a un et bien melanger a chaque fois. Ajouter babeurre, courgettes, chocolat et vanille. Bien melanger. Verser doucement les ingredients secs sur les mélange chocolat et bien melanger jusqu’a ce que tout soit bien incorpore. Verser dans un moule a muffin ligné de godets de muffins. Faites cuire dans un four prechauffe a 180C pendant 35min ou jusqu’a ce que les cupcakes semblent presuqe cuits. Ne les faites pas trop cuire au risqué d’avoir des cupcakes secs. Laisser refroidir sur une grille a patisserie.

Tuesday, August 14, 2007

Some Tips and a Recipe / Des Astuces et une Recette

Strawberry Jam


Picture this: Less than three years ago, a young woman stands in the middle of a grocery store. She is lost. She just started to learn about the country and the language and why do people use the word “stuff’ for everything, and she is lost in the middle of a grocery store. Standing in the breakfast section in front of a gigantic range of jams, she reads all these labels: jam, preserve and jelly. She is lost. She knows what jelly is, but what about the two others? What’s the difference? Which one is "confiture"? She starts looking at the consistency of each and every one of them to figure out which one is jam. She didn’t expect to see all these names. Looking for a sign, some help, a dictionary may be. She goes back and forth, watching what people would pick the most from this pile of sugary jars. She figured this might help her. No, still lost. She finally picked the one that looked the most familiar to her, hidden in the world section and written in French: Bonne Maman apricot jam. She went back home, turned her laptop on and looked for the definition: Properly, the term jam refers to a product made with whole fruit, cut into pieces or crushed. The fruit is heated with water and sugar to activate the pectin in the fruit. The mixture is then put into containers*.
The term Preserves is usually interchangeable with Jam, however some cookbooks define Preserves as cooked and gelled whole fruit (or vegetable), which includes a significant portion of the fruit**.

So jam and preserve are the same, she tought. Why do they make it sound so confusing?
Lost, she was no more. Came the summer, she was determined to make her own pots of jams for the winter to come. This way the only dilemma she would have to face will be to either spread her jam on a slice of Rye and orange bread or a tart shell.

Tartine

Before we get to the recipe, allow me to share with you some tips and basics about making jam:
Jam jars should have lids and rings that help creat a vaccum seal. Ball and Kerr are good brands to use. When sterrilizing your jars, use canning tongs, specifically made for gripping jars. They are very helpful.
Some fruits (like apricot, pear, mango, watermelon, green tomatoes..etc) need to macerate in sugar for 24h before cooking them. Adding lemon juice when starting the cooking process help preserve the natural color of the fruit.
Usually the rule goes, for every 2 pounds(1 kilo) of fruits add 1 ½ lb(750g) sugar or 1 1/3(600g) if the fruits are too sweet.
The success of a good jam resides between the time of cooking( not too long and not too short) and the balance between acidity and fruit pectin. It goes from 20 to 45 min of cooking, depending on the fruits. Some fruits, lacking in pectin, might need more time to cook. But you should:
1- always keep an eye on them.
2- Have them on medium-high heat and stiring regularly.
3- Never put the lid on as it will overflow and you also want the jam to thicken by evaporating.
4- Skim the foam that might form on top.
If you have a copper pot, use it to make jams. It is the best tool, according to chefs, for jams. It conducts heat evenly and alows pectin molecules to interact between themselves.
If your jam has crystallized, slowly add some boiling water to dissolve it.
An easy tip to know when your jam is ready: Put a little bit of it in a spoon and set aside for 30sec. If it rinkles when touching it with your pinkie, then it’s ready. If not continue cooking it a bit more. Try again later.
Some fruits jam combinations:
- Apricot: almonds, honey, ginger, vanilla, walnuts and lavender
- Cherry: Kirsch, Rhum and vanilla
- Lemon: Orange blossoms and vanilla
- Strawberry: black pepper, balsamic vinegar, raspberry, blackberry
- Raspberry: black pepper, strawberry, thyme, blackberry
- Pear: cinnamon, red wine
- Peach, nectarine: Vanilla, walnuts, ginger, clove, lemon, bitter almonds
- Apple: vanilla, cinnamon, anis star, cardamom, lemon balm, rhum, lavender, rose water, mint.
- Squash: orange zest, anis star
- Rhubarb: lemon, raisins, cinnamon, apple

Tartine

Strawberry Preserve

Recipe: adapted from Food and Wine, July 2007
- Juice of 2 lemons, strained
- 4 ½ cups sugar
- 2 pounds medium strawberries, hulled


In a large, deep skillet, pour the lemon around the sugar. Cook over medium heat undisturbed until most of the sugar starts to melt. Gently stir the sugar until completely melted. Using a moistened pastry brush, wash down any sugar crystals from the side of the skillet.
Add the strawberries and boil over medium-high heat, mashing them gently then, if you don’t like to have pieces of strawberries in your preserve, puree them using a long stand mixer. Let it cook until it reaches 220F (or 8 degrees above boiling point, depending on altitude), about 10 min. Continue to boil until the preserves are thick, about 4 min longer.

 Strawberry Jam


Confiture de Fraises

Recette: adaptee de Food and Wine, Juillet 2007
- Le jus de 2 citrons, passé a la passoire
- 1,064 l de sucre
- 900g de fraises de taille moyenne, equeutees

Dans une marmite profonde, verser le jus de citron autour du sucre. Faire cuire sur feux doux, sans le remuer jusqu’a ce que le sucre commence a fondre. Remuer le sucre doucement a l’aide d’une cuillere en bois pour que le sucre soit completement fondu. A l’aide d’un pinceau a patisserie, legerement mouille brosser doucement tous cristaux qui peuvent se former autour du sucre.
Ajouter les fraises et porter a ebullition sur feu relativement élevé. Ecraser les fraises ou si vous ne voulez de morceaux dans votre confiture, broyer le tout a l’aide d’un mixeur a soupe. Laisser cuire jusqu’a ce que la confiture atteigne 104 C (ou 4 degres au-dessus de l’ebolution dependant de l’altitude), environ 10min. Laisser bouillir, sans couvrir encore 4 min, ou jusqu’a ce que la confiture soit epaisse.

*,**: Wikipedia
Source: Supertoinette.com

Thursday, August 9, 2007

Sage Pesto / Pesto de Sauge

Sage Pesto2


I am ashamed of my self. I have just noticed, a couple of days ago, that I didn’t keep my promise of sharing my sage recipe with you as planned two weeks ago. I have no excuses for letting you down and for disgracing my blog. I try to always keep my promises and when I don’t I start fidgeting around the house telling my self that people won’t trust me anymore. I even wrote about it down on my journal:
“Dear journal, I dishonored my loyalty towards my friends. Remember my last post about sage? No? The Friday posts, remember? Ouff! You are slow on the uptake, aren’t you? Ok! To sum up I will say that I promised a recipe, which is my new take on pesto using sage and lemon zest, but failed to deliver it on time. I am unforgivable! What? You think that I should shut up and continue on with the recipe and they might forgive me? You think? Fine, fine I’ll keep it quiet.


Sage Pesto


Sage Pesto

Recipe:
- 3 tbsp pine nuts, lightly toasted
- ½ cup parmesan cheese, freshly grated
- The zest of ¾ of a lemon
- 1 tbsp lemon juice
- 2 big garlic cloves, peeled
- 3 sage sprigs (about 30 leaves)
- ¼ cup extra virgin olive oil
- Salt, pepper

Pluck the sage leaves and put them in a blender with garlic, pine nuts, parmesan cheese, the zest and the juice of he lemon. Blend until smooth. With the blender running add slowly the olive oil until it looks like a thick paste. If you like your pesto a little lighter in texture you can always add more olive oil. Season to taste. Keep in the fridge.

Pesto


Pesto de sauge

In francais please:
- 3 c.s de pignons de pin. Legerement grille
- 100g de parmesan, frechement rape (environ 30 feuilles)
- Le zest du ¾ d’un citron
- 1 c.s de jus de citron
- 2 grosses gousses d’ail, épluchees
- 3 brins de sauge
- 50ml d’huile d’olive
- Sel, poivre

Cueillir les feuilles de sauge des brins et mettre dans un robot ménagere ave l’ail, les pignons de pin, le parmesan, le zest et le jus du citron. Mixer jusqu’a ce que le mélange devienne homogène. Avec votre robot en marche, verser doucement l’huile d’olive pour obtenir une purée assez épaisse. Si vous aimez votre pesto plus leger, en terme de consistence, vous pouvez toujours rajouter plus d’huile d’olive. Assaisoner a votre goût. Garder au frigo.

Tuesday, August 7, 2007

A Crush on Carrots / Un Amour de Carottes

Carrot Tatin


I am known to be a sensitive person. Stop laughing honey. I can see you from here. Where was I again? Oh yes, the sensitive part of me.
I am a very sensitive person: I am the kind of person who will cry hours after the generic of a movie, the kind of person who won’t kill a spider because it’s just wrong, but will most definitely kill a cockroach. I am the kind of person who will feel really bad when I forget watering my plants or when I, unintentionally, hurt somebody else’s feeling. I am the kind of person who will collect park tickets and dried roses as memories, and the kind of person who can’t stop cooking again and again her latest crush. Even if it is as simple as a carrot dish.
I had this idea of a savory tart Tatin, instead of the traditional apple Tatin, after I saw some cute cherry tomatoes tartlets Tatin.
Instead of using tomatoes, I decided to use carrots because I can’t have enough of caramelized carrots with herbs. I usually use sage with my carrots but this time I went with thyme as I wanted a more woody and rustic flair to my tart.
The tart can be made in individual sizes and served as little appetizers.
Now, what’s so special about caramelized carrots on a crust? Nothing, in fact.just the beauty of a simple dish that doesn’t need a lot of skills or time to make and which happened to be my latest discovery and my shameless sweet crush.


Rustic Carrots Tart Tatin


Carrots


Recipe:
- See recipe here for Pastry crust, but do not use the sugar and substitute the 1 tbsp of orange blossom water by ice water
- 10 mini carrots, peeled (depending on the size of your pan)
- 5 sprigs of fresh thyme
- 1 tsp brown sugar
- Salt, pepper


Make the pastry crust and let it chill until needed. In the meantime, melt 1 tsp butter with 1 tsp vegetable oil in a cast iron pan. Put the carrots in a pan. Season with salt and pepper and let them cook covered on medium heat. Uncover the pan and flip the carrots when they become tender. Let them cook this time uncovered. When cooked through, transfer the carrots to a cutting board and split them in half. Set aside.
Roll out the pastry crust and cut a circle a little bigger than the size of your pan. Freeze the rest of the crust for another time.
Put three sprigs of thyme in the pan and add the brown sugar on top. Cook on medium low heat just until the sugar starts to melt. Put the carrots back to the pan.
Cover the carrots with the crust disc and tuck on the sides. Let it cook, again on medium-low heat for 5 min then put in a 350F until golden brown on top, about 15 to 20 min.
Let it cool in the pan for 10 min then invert to a plate. Sprinkle with the remaining thyme leaves and serve, as a suggestion, with a peppery salad, such as escarole or endive.

Tarte Tatin Rustique aux carottes

Carrots tatin


In francais please:
- Voir ici la recette pour la pâte, mais sans sucre et en subsituant la c.s d’eau de fleur d’oranger par de l’eau glacé
- 10 mini carottes, épluchees (le nombre depends de la taille de votre poele)
- 5 brins de thym frais
- 1 c.c de sucre brun
- Sel, poivre

Faites votre pâte et mettre au frais jusqu’a utilization. Entre temps, dans une poele, antiadhesive, allant au four, faites fondre 1 c.c de beurre avec 1 c.c d’huile vegetale. Versez les carottes dans la poele. Assaisonnez de sel, poivre et laisser cuire couverts sur feu doux. Decouvrir la poele et retourner es carottes quand ils commencent a cuire d’un côté. Laisser cuire sans couvercle. Quand les carottes sont cuites, transvaser les carottes vers votre planche de travail et les couper en deux. Mettre de côté.
Faites sortir la pâte et l’etaler sur une surface legerment farine. Couper un disc de la pâte avec un diameter un peu plus grand que celui de votre poele. Congeler le reste de pâte pour une autre utilisation.
Remettre votre poele sur feu tres doux et mettre dedans trois brins de thym, puis le sucre brun. Laisser sur feu jusqu’a ce que le sucre commence a peine a fondre. Remettre les carottes dans la poele. Couvrir les carottes du disc de pâte en faisant en sorte de bien la faire rentrer sur les bords. Laisser cuire 5 min puis continuer sa cuisson dans un four prechauffe a 180C pendant 15- 20min ou jusqu’a ce que la pâte devienne doré.
Soritr du four et laisser refroidir dans la poele 10 min puis invertir dans une assiette. Servir avec une salade de frisée ou d’endives.

Friday, August 3, 2007

Press Mentions and other

- Listed in The British Newspaper Guardian Unlimited, Favorite food blog section; November 2, 2007

- DMBLGIT August 07 winner. Best for Originality.

- Mentioned in Blogher in an article entitled: Worth Its Salt: A mother’s lesson; October 13, 2007

- Mentioned in Apartment Therapy: The kitchen, under Summer Breakfast; July 31, 2007

- Won second place, "Vos Plus Belle Photos Culinaires"; November 28, 2007

- Mentionned in Blogher in an article entitled: How The Time Has Flewn, for favorite post; December 29, 2007

- Mentionned in Blogher in an article entitled: Rolling in The Granola; January 15, 1008

My Sweet Dates

Stuffed dates


I just couldn’t wait to share with you this sweet present that my parents sent us today. My favorite dates in the whole wide world: Algerian Deglet Noor Dates. To me, they are just the best dates ever: sweet and fingers sticky dates stuffed with my mother’s homemade almond paste. I am in heaven. My mother has been telling me all this week about the pounds and pounds of stuffed dates that she was making for my cousin’s wedding but I didn’t imagine a single minute that she had some made just for us. Now I will ask my hubby to hide them away because I can’t stop eating them. And because my mother knows how much I love cute boxes in all forms and shapes, she sent them in the cutest sugar box I have ever seen. Oh! And did I mention that my sister spoils me too with jam filled cookies, a cookbook and chocolate. I am in heaven. Just in heaven.
Merci beaucoup maman et papa pour tout votre amour. Merci aussi ma soeur chérie pour ta gentillesse et ta générosité.

Thursday, August 2, 2007

Butter- Free / Sans Beurre

Cherry Chocolate Brownies


Dear Myriam,

Feel no pressure by reading this letter to pick me as your next Browniebabe, although I will be honored if you do so.
I think I can be a great Browniebabe because not only my brownies are simply marvelous, with all modesty of course, but they are also filled with love and no butter. Yes, not an ounce of butter. Except if you count the tiny bit of butter that I used to grease the pan!

My chocolate and Cherry brownies will satisfy your cravings for brownies while allowing you to slip into your favorite swimming suite with all confidence. My brownies are hips and thighs friendly; just ask mine they will testify. No need to run, no need to worry because my brownies are only 137kcal per serving but 100% sweet and tasty.

Filled with cherries and prunes, my brownies are perfect for summer as they are moist, smooth, fruity and fudgy. Want to dress it up a little bit for a special dessert? No problem, just serve it on a cloud of Crème Anglaise and your guests will praise your talent for years to come.

So Myriam, My brownies are ready to be crowned and my waist can’t wait to be wrapped by your gorgeous apron. If you do pick me, which I think you should but again no pressure here, I will be the happiest girl and the butter-free Browniebabe of them all.

Best Wishes
Warda

PS: please pick me!

Butter- Free Chocolate Cherry Brownies

Brownies

Recipe: adapted from here
- 6 oz Prunes, pitted
- 3 ½ oz semi-sweet chocolate
- 2 egg whites, whisked to soft peaks
- 1 egg
- 3 tbsp unsweetened cocoa powder, sifted
- 2.64 oz all-purpose flour, sifted
- 5 ¼ oz brown sugar
- A pinch of salt
- 1 tsp vanilla extract
- 7 oz pitted and halved cherries, fresh or in syrup

Put the prunes in a saucepan with ¼ cup of water and cook for about 10min until the prunes softened and it’s left of the liquid only 2tbsp.
Put the chocolate in a heatproof bowl and set over the prunes until the chocolate has melted. Transfer the prunes to a food processor and blend to have a smooth puree.
In a mixing bowl, mix the prunes with the egg, the cocoa powder, flour, salt, chocolate, sugar and vanilla, until you have a smooth yet sticky batter. Using a wooden spoon, fold in gently the egg whites, followed by the cherries.
Grease and flour a 9-inch square pan and fill with your brownie batter. Don’t worry if the batter feels sticky, it’s the prune puree that gives this texture. Smooth the top with a damp spoon and bake at 375F for about 35min or until it feels firm to the touch. Cut into squares and can be served with Crème Anglaise.
Tips: Store the brownies in an airtight container at room temperature and covered with baking or wax paper. They will keep their freshness and moisture for up to four days. They are better eaten the next day.


Brownie Chocolat et Cerises sans Beurre

Chocolate Cherry brownies


In francais please:
adaptée d'ici
- 175g de pruneaux d’Agen, dénoyautes
- 100g de chocolat noir
- 2 blancs d’oeufs, battus en neige
- 1 oeuf
- 3 c.s de cacao sans sucre, tamisé
- 75g de farine
- 150g de sucre brun
- Une pincee de sel
- 1 c.c d’extrait de vanille
- 200g de cerises dénoyautees et coupees en deux (fraiche en en sirop)

Mettre les pruneaux dans une casserole avec 100ml d’eau et faire cuire sur feu doux pendant 10 min jusqu’a ce que les pruneaux deviennent plus tendres et qu’il en reste de l’eau de l’eau que 2 c.s. Mettre le chocolat dans un bol et poser sur les pruneaux jusqu’a ce qu’il fonde. Transferer les pruneaux vers le robot menager et mixer jusqu’a obtention d’une puree homogene. Melanger la puree de pruneaux a l’oeuf entier, le sucre, le cacao, la farine, le sel, le chocolat fondu et la vanille. Vous obtiendrez un mélange epais et homogene. Incorporer delicatement les oeufs en neige a l’aide d’une cuillere en bois et enfin les cerises. Beurrer et fariner un moule carré de 20cm et verser dedans votre pate a brownie. Lisser la surface a l’aide d’une cuillere legerement mouillee et faire cuire dans un four prechauffe a 180C pendant 35min ou jusqu’a ce que la surface soit ferme au toucher. Couper en carrés et servir, comme je l’ai fait, avec une crème Anglaise.
Astuces: Conserver dans une boite a fermeture hermetique et couverte d'un papier sulfurise. Se conserve jusqu'a quatre jours. Ces brownies sont meilleurs le lendemain.