Friday, February 29, 2008

Daring Baker's February Challenge: French Bread

French Bread Loaf


First and most of all, I would like to thank Mary and Sara for their hard work explaining every step in making Julia Child’s French bread. Thank you, ladies!

I was very pleased with this month’s challenge, as I love bread very much. I love to eat it, to smell it, to touch it’ and to watch it rise slowly in the oven. I don’t imagine a table without some crusty bread. And a salad; but that’s another story.
As I said before, I was pleased to be making French bread, but also very nervous. Especially after the “assiduous student” told us how much it took them to make this bread: ten hours. Yes, ten!

After days of insomnia and hot flushes thinking about the ten hours, I finally get the courage to make it two days ago. I read the recipe over and over again. I read my fellow Daring Bakers advices and misfortunes. I set my ingredients, tied my apron around my waist, performed The All Blacks Haka and started making French bread. The dance really helped!


French Bread


Although the recipe is very long, it took me about eight hours from start to finish, it wasn’t that complicated. It’s mainly flour, water, yeast and salt mixed together, and most of the time was about the rising of the dough.
The only thing I did differently from the recipe is reducing the amount of salt to 1½ tsp as a lot had complained about the bread being too salty.

Overall, the bread developed a nice crust and a beautiful golden color. But the crumb was a bit dense and chewy. I am presuming it had to do with the last rise where I was in a hurry to bake it.

Thanks again Mary and Sara for this wonderful challenge and for all your efforts and generosity. For more information about the recipe, head over to their blogs; and don’t forget to visit my fellow Daring Bakers chef d’oeuvre.

Monday, February 25, 2008

A Soup To The Rescue / Une Soupe à La Rescousse

Leek and Thyme Soup


This soup is what helped us, my husband and I, from starving this past weekend after we had a stomach bug. You don’t know how important it is what you put into your body until you find your face distorted with pain.

I had big plans for this past weekend. Plans that involve a Thai lunch with my friend and her family, a Sunday breakfast perfumed with freshly baked cinnamon rolls and an afternoon walk to the park with my daughter and my husband.
Instead, all I can remember from this past weekend is the bathroom, blankets in the family room and questions like: “Are you feeling better? Did you take your medicine? Do you want something to eat?” To which all of the answers was an echoing: No!

It sucks to be sick!
It sucks to be sick on a weekend.
It sucks even more to be sick on a weekend and having to eat a bland, boring soup.
But this soup isn’t boring! No! Although it doesn’t have all the warm spices that I usually put in my soups, it is nonetheless very good, with a hint of sweetness from the leeks and a woody taste from the thyme and bay leaf. Because nobody likes dull soups, especially when you are sick.

Hope you all had a healthier weekend!

Feel Good Leek and Thyme Soup

Recipe: Serves 4
- 3 medium leeks, cleaned and roughly sliced
- 1 small onion, peeled and roughly chopped
- 2 fat garlic cloves, peeled.
- 2 small potatoes, peeled and roughly diced
- 1 tbsp olive oil
- 1 tbsp dried thyme (or fresh if available)
- 1 big bay leaf
- 4 cups water (or vegetable stock)
- Salt, freshly ground black pepper

Heat the olive oil in a large pot. Add the onions, garlic and leeks, and stir to coat them with the oil. Let them cook on a medium heat until lightly browned. Add the potatoes, thyme and bay leaves and stir again. Cover with the water. Add bay leaf, salt and pepper, and cover with a lid. Let simmer until the potatoes are fork tender, about 20 minutes.
Discard the bay leaf and blend the soup using a hand blender. Season if needed, and serve right away.

Soupe aux Poireaux et thym

In Francais Please: Pour 4 personnes
- 3 poireaux moyens, nettoyés et grossierement hachés
- 1 petit oignon, épluché et grossierement haché
- 2 grosses gousses d’ail, épluchées
- 1 petite c.s d’huile d’olive
- 1 c.s de thym séché (ou frais si disponible)
- 1 large feuille de laurier
- 1L d’eau (ou bouillon de legumes)
- Sel et poivre noir fraichement moulu

Faites chauffer l’huile d’olive dans une cocotte. Ajouter l’oignon, les gousses d’ail et les poireaux, puis mélanger pour bien couvrir les legumes d’huile. Laisser dorer pendant quelques minutes. Ajouter les pommes de terre, le thym et la feuille de laurier et mélanger encore. Couvrir d’eau. Assaisonner de sel, poivre et couvrir. Laisser mijoter jusqu’à ce que les pommes de terre deviennent tendres, environ 20 minutes. Retirer la feuille de laurier et mixer la soupe. Réctifier l’assaisonnement si nécessaire et servir tout de suite.

Friday, February 22, 2008

Me and One Easy Dessert / Moi et Un Dessert Facile a Faire

My Cow


I have been tagged this past week by Jaime and Naomie for a Meme. Basically, I have to share with you 7 things you don't know about me. It was hard to choose. An entire life can't be summed up in 7 lines, but here it is:

- Breakfast is my favorite meal of the day, and I drink at least 2 cups (500ml) of cold milk daily. I hate hot milk; it has to be mixed with coffee or chocolate for me to be able to drink it.
- I have a small collection of cows’ figurines around the house. What once started as a joke between my husband and I has now expended to salt and pepper shakers, kitchen apron, cell phone holder…etc. This cute cow on the photo is my latest baby, given to me by my beloved sister. Thank you very much, Y!
- I speak Arabic, French and English, and understand some Spanish. My husband is way better than me in Spanish and he likes to show it off from time to time just to upset me. Which always works!
- I don’t like Hummus. Although I love Chickpeas. Did you know that Hummus means Chickpea in Arabic? I am sure you all know it!
- I went to law school for one year before finding out that it was boring, corrupted and exhausting. I studied French Literature after that. I enjoyed it very much and miss sometimes my college years.
- I get scared easily. Very, very easily. My husband takes advantage of it a lot, and I am afraid I might have a heart attack one of those days. Not that long ago, thinking I’ve heard some noise in the kitchen, I woke up my husband and sent him to go see if there was something, or most specifically somebody downstairs. I felt really bad about waking him up and decided to go with him (Actually, I was left alone in the bedroom and I was scared that somebody might jump out of the closet. I have a vivid imagination). I followed him, carrying with me a big, heavy…candle that I have on my chest of drawers. He looked at me: “what do you think you’re doing with this candle?” “Well…it was the first thing I saw, and I thought this might protect us if there was somebody downstairs!” There was nobody downstairs that day. But every time I hear a noise in our house, he jokes and reminds me not to forget to take my candle with me.
- I love cheese. Especially Goat cheese, Roquefort, Camembert, Brie, Feta, Gruyere, Ricotta and Comté.

The food bloggers I am tagging for a Meme are:
- Christine, from Holybasil
- Marion, from Il en faut peu pour etre heureux
- Lydia, from The Perfect Pantry
- Aimee, from Under the High Chair
- Shayne, from Fruitcake or Nuts
- Anne, from Foodie Froggy
- Terry B, from Blue kitchen

Ricotta Phyllo Parcel


Today’s recipe is very, very easy to make. The filling can be prepared a day, or even two days ahead and assembled the day you want to serve it. The golden phyllo dough gives this distinguish crunch to the dessert, and the creamy ricotta, infused with honey and cinnamon, adds a bewitching silkiness to the sautéed apples. I used Pink Lady Apples, because I love how both sweet and tangy they are, and how they hold their shape after cooking them. Avoid using ceramic or silicon muffin pans, as they retain moisture and you will end up with a mushy bottom.

You may also like:
Peach and Ricotta Parcels

Ricotta and apples Parcels

Recipe: serves 4
- 8 phyllo sheets, cut in half.
- 1 cup whole milk ricotta cheese
- 2 tbsp honey (use the one you like)
- ½ tsp ground cinnamon
- 1 gg
- 1 Pink Lady apple (or any excellent cooking apple), peeled, cored and diced
- 1 tbsp sugar
- 3 tbsp melted butter.
- 1 tbsp ground pistachios (optional)

Using a whisk, mix the ricotta with honey, ¼ tsp ground cinnamon and the egg, until well combined. Set aside. On a medium flame, Heat a teaspoon of butter in a pan, and sauté the diced apples with the remaining cinnamon and the sugar until lightly golden brown on the edges, about 5 minutes.
Brush the muffin pan with a little bit of melted butter. Brush the phyllo sheets with some of the remaining butter and line each muffin cup with four phyllo sheets. Put inside each phyllo “nest” a layer of ricotta, a layer of apples and top with a little of pistachios. Fold the phyllo sheets over the filling as you would fold a bag. Continue with the remaining phyllo cups. Brush each phyllo parcel with the remaining melted butter and bake at 350F for 20 minutes, or until the top is golden brown. Let it cool for 5 minutes inside the muffin pan and invert gently without breaking the top of the parcels. serve warm or cold, topped with a little bit of ground pistachios and icing sugar.

Ricotta and Apples


Croustillants de Ricotta et Pommes

In Francais Please:
Pour 4 Personnes
- 8 feuilles de filo, coupées en deux sur la largeur
- 200g de fromage de ricotta
- 2 c.s de miel (celui que vous preferez)
- ½ c.c de cannelle en poudre
- 1 oeuf
- 1 pomme Pink Lady, épluchée et coupé en des
- 1 c.s de sucre en poudre
- 3 c.s de beurre fondu
- 1 c.s de pistaches en poudre (facultatif0

A l’aide d’un fouet, mélanger la ricotta avec le miel, ¼ c.c de canelle et l’oeuf entier. Mettre de côté. Sur un feu moyen, faites fondre une c.c de beurre et faites sauter les pommes avec le reste de cannelle et le sucre, juqu’à ce qu’elle deviennent légerement dorées sur les bords, envirom 5 minutes.
Beurrer votre moule a muffins et vos feuilles de filo avec le beurre fondu. Laisser-en un peu pour la fin. Garnir chaque portion du moule avec 4 feuilles de filo et les remplir d’une couche de ricotta, puis une couche de pommes, et enfin un peu de pistaches en poudre. Fermer la pate à fillo sur la farce comme si vous fermez un sachet. Beurre la surface du beurre fondu restant. Faites cuire à 160C pendant 20 minutes. Laisser reffroidir 5 minutes dans le moule, puis démouler en faisant attention à ne pas abimer la surface. Servir tiède ou à temperature ambiante, saupoudré de pistaches en poudre et de sucre glace.

Ricotta Phyllo Parcels

Tuesday, February 19, 2008

Like A Soft Blanket / Comme Une Douce Couverture

Dersa

Hi there!

I hope you are having some sunshine where you are, because we’ve had quite a cold winter around here. Our driveway has been wearing a thick icy coat for a few days now, and when the sun shows up, it’s only for a few minutes a day.

I am not a winter person. The days are short, it’s cloudy most of the time, the air is dry, my skin is dry, and the temperature is rarely higher than 25F (-4C).
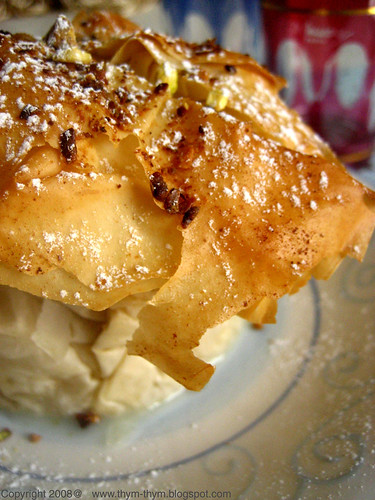
Yes, I do enjoy the first days of snowflakes gently falling down my kitchen window. I love sliding down the hills with my daughter tucked between my thighs, screaming and laughing out loud. I look forward to some cold breeze to make lentil stews, roasted root vegetables and apple pie. But after a month or so, I am done. Done as in wake-me-up-when-it’s-spring-done!

But I love winter for one thing. Actually two: Comforting food and Sunday naps.
Every Sunday, as I tip toe to the kitchen to set the breakfast table, I take a look outside to see how is the day shaping up. Lately, Sunday meant to be gray, snowy and cold. If we were to be in the same room at this exact moment, you would actually see me smile with content at this view.
Now before you start asking yourself what is going on with this girl who seconds earlier shamelessly pretended to hate winter, let me explain myself.

You see, for years now I have nurtured this vision about wintry Sundays: basically they are meant to be spent at home, around a warm, consoling meal and a nap on the couch, cuddled by my husband and a soft blanket.

Sunday naps are a good way to deal with winter. And so are soups.

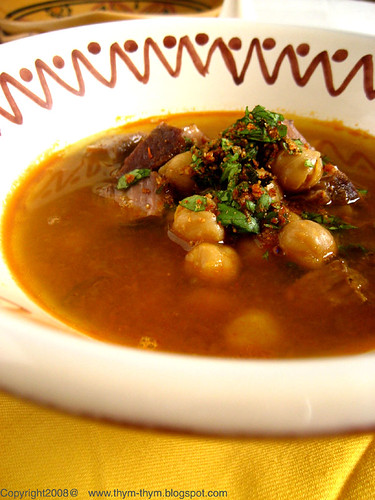
I could eat this soup every day of the week. It is the soup of my childhood, the soup I make all winter long. The one we make on weddings, for guests, on Ramadan, or just when we crave something spicy and warming on a cold day.
This soup is called “Harira”. It is a spiced chickpea and lamb soup that is widely popular in Algeria, especially the west part of the country, and Morocco. The traditional way would be to cook it using lamb meat, but you can use beef meat though the taste would be different. There is something about this soup that amazes me every time I make it. It never tastes the same.

 Harira can be thickened using 
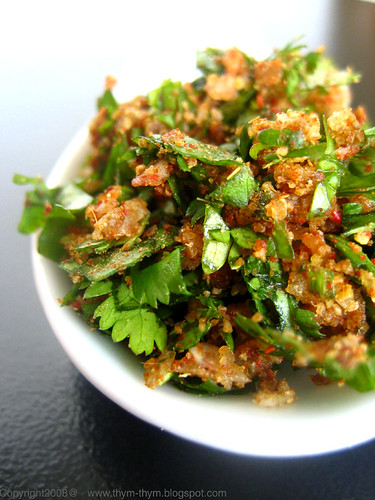
flour (about 2tbsp diluted in a little bit of cold water) or, in the case of today’s recipe, bulgur. Not only the soup gets its distinctive flavor from the spices, but also from the Dersa. Dersa is a sort of Algerian Condiment. It’s mainly chopped herbs with spices and garlic that we add to the dish to finish it up. In this Harira, Dersa is made with chopped fresh cilantro, garlic, ground caraway and paprika.

When serving the soup, I like to drizzle a few drops of freshly squeezed lemon juice and sprinkle some Dersa on top; because there is nothing like Harira to make me fall in love with winter again.


Harira

Harira: Fragrant Chickpeas and Lamb soup with Bulgur

Recipe: Serves 6 to 8
- ½ lb lamb chunks
- 1 tbsp vegetable oil
- 1 big onion, peeled and roughly diced
- 1 potato, peeled and roughly diced
- 1 tomato, roughly diced
- 3 carrots, peeled and roughly diced
- 1 ½ cup chickpeas, soaked overnight, wrapped in a cheesecloth for easy "fishing" before passing the soup through the food mill (if using canned chickpeas, add them at the end)
- 1 tbsp tomato paste
- 1 small bunch of fresh cilantro, tied with a string
- 1 generous tsp of allspice
- 1 tsp turmeric
- 1 tsp ground ginger
- 1 tsp ground caraway
- ¼ cinnamon stick
- 8 cups of water
- 1 sprig of mint (5 big leaves)
- ¾ cup wheat bulgur
- Kosher salt, freshly ground black pepper
- For the Dersa: (The herb and spices condiment)
- 3 tbsp cilantro leaves
- ½ tsp paprika
- 2 fat garlic, minced

- 1 tsp ground caraway

In a big pot, heat the oil on medium heat. Season the lamb chunks and sauté them on each sides until browned. Add the onions, tomatoes, potatoes, carrots, and chickpeas. Sauté until lightly colored, about 5 minutes. Add the spices, the bunch of cilantro, the tomato paste and stir to combine. Cover with the water. Season the soup with generous amount of salt and pepper and cover with a lid. Once the soup comes to a boil, lower the heat to medium-low and simmer for 20-30 minutes, or until the chickpeas cooked and the meat fork tender.
Discard the cilantro bunch and the stick of cinnamon. Put the meat and chickpeas in a plate, and, using a vegetable mill, puree all the rest of vegetables. You can also use a blender. But you will have to do it in batches, as the liquid is very hot.
Put the soup back on the stove. Add the chickpeas and the scattered meat. Bring to a boil and add the mint sprig and the bulgur. Stir to distribute the bulgur. Let it cook uncovered for about 15 minutes, or until the bulgur is cooked. Season with salt and pepper if needed.
Before serving the soup, make the Dersa: Using a sharp knife, or even a mortar would be great, chop finely the cilantro leaves with garlic, paprika and ground caraway.
Serve the Harira in individual bowls, squeeze a few drops of lemon juice on top and sprinkle a little of Dersa.


Harira Soup

Harira: Soupe Epicée aux Pois-chiches, agneau et Bulgur

In Francais Please: Pour 6 a 8 personnes
- 200g de morceaux d’agneau
- 1 gros oignon, grossierement hachée
- 1 pomme de terre, épluchée et coupe en gros dés
- 1 tomate, coupe en gros dés
- 3 carottes, épluchées et coupées en gros dés
- 375 ml de pois-chiches, trempés la veille
- 1 petit bouquet de coriandre, attaché avec une ficelle
- 1 c.s de tomate en conserve
- 1 c.c de carvi en poudre
- 1 genereuse c.c de piment de la jamaique (aussi connu sous le nom de kebeba)
- 1 c.c de curcuma (safran des indes)
- 1 c.c de gingembre en poudre
- ¼ de baton de canelle
- 2 ½ l d’eau
- 1 branche de menthe (environ 5 grosses feuilles)
- Un peu moins d’une tasse a café de bulgur
- Sel et poivre noir fraichement moulu
- Pour La Dersa (le mélange d’herbe et d’épices)
- 3 c.s de feuilles de coriandre
- 2 grosses gousses d’ail
- ½ c.c de paprika
- 1 c.c de carvi en poudre

Faites chauffer l’huile dans une grande cocotte sous un feu moyen. Assaisonner la viande et faites dorer de tous les cotés. Ajouter l’oignon, la tomate, pomme de terre, carottes et pois-chiches. Faites sauter jusqu’à ce que les légumes deviennent légerement colorés, environ 5 minutes. Ajouter les épices, la tomate en conserve et le coriandre. Mélanger bien le tout. Couvrir d’eau et assaisonner génereusement de sel et poivre noir. Couvrir du couvercle et laisser cuire. Dés que la soupe commence à bouillir, baisser le feu un peu et laisser mijoter jusqu’à ce que les pois-chiches soient cuits et la viande bien tendre, environ 20-30 minutes.
Jeter le bouquet de coriandre et le batonnet de cannelle. Retirer la viande et les pois chiches et les mettre dans une assiette. Passer le reste de legumes et bouillon à la moulinette. Remettre la soupe sur le feu et porter à ébullition. Ajouter la menthe et le bulgur et remuer pour bien répartir le bulgur. Laisser cuire encore 15 minutes, ou jusqu’à ce que le bulgur soit cuit.
Avant de servir, préparer la dersa: A l’aide d’un couteau eguisé, ou un mortier, hacher les feuilles de coriandre, ail, carvi et paprika jusqu’à ce que le mélange soit homogène.
Servir la Harira dans des bols individuels, avec quelques gouttes de citron et saupoudrée de Dersa

Tuesday, February 12, 2008

My First Achievement / Mon Premier Succès

White and Black Pudding


Though I didn’t win a trip to Napa, I wanted to thank all of you who showed up and voted for me and for my chocolate truffles. I was very honored to be in the final top 10, standing among such talented bloggers. Thank you very much! You have been so good to me.

And for last week Chocolate Sparklers Giveaway, I really wish I could send each and every one of you a gift. But, in the end, there can be only one-- so Congratulations to Brilynn. She will be receiving some edible love in her mailbox very soon. As for the others, there will plenty of edible love in the future.

Today’s recipe is probably the first dessert my mother has ever allowed to cook, all by myself. I had gone from peeling bananas and oranges for the fruit salad to actually cooking something; even if all I had to do was stirring never endings “eights” until my mother would say it’s done. In the life of a little girl, and aspired cook, this was a big achievement.

Over the years, this pudding had become my signature dessert. The one I would make when there was no dessert at all—or as my mother says: “You want some desert?” the one I would quickly whip up for some unexpected guests, the one I would turn to, at the end of the week, where all we had in the fridge was milk and two eggs. Chocolate was always present in our pantry.

It’s a basic chocolate and vanilla pudding, cooked in separate pans, on a low heat and thickened with the use of cornstarch. The vanilla layer is usually flavored with a teaspoon of orange blossom water. But I didn’t know how this latter will taste like with the use of chili powder in the chocolate layer. I preferred to play it safe. This time.


Black and White Pudding


Black and White Pudding

Recipe: Serves 6
- For the vanilla layer:
- 2 cups whole milk
- 2 tbsp sugar
- 2 tbsp cornstarch
- 1 egg yolk
- 1 tsp pure vanilla extract
- For the chocolate layer:
- 2 cups whole milk
- 1 tbsp sugar (or more, depending on your taste bud)
- 1½ tbsp cornstarch
- 1 egg yolk
- 1 3.5 bittersweet chocolate bar, chopped
- 1 tsp ground Ancho Chili (or your favorite chili powder)

In a heavy saucepan, mix sugar, egg yolk and cornstarch. Slowly add the milk. Cook over a low heat while stirring constantly to avoid lumps. When the mixture starts to thicken, about 10 minutes, remove from the heat, add the vanilla extract and whisk until well incorporated. Strain through a fine mesh to remove any lumps and pour into individual ramekins or a big ramekin. Set aside.

Clean your saucepan. Follow the same instruction as for the vanilla pudding. Just when the mixture starts to thicken, add the chocolate, the chili powder and continue stirring until smooth and thick (about 2 minutes).
Pour slowly over the vanilla layer, starting from the edges and going to the center. Cover with a plastic wrap direct on the surface of the pudding. Chill.

Pudding Noir et Blanc

In Francais Please: Pour 6 personnes
- Pour la couche a la vanille:
- ½ L de lait entier
- 2 c.s de sucre en poudre
- 2 c.s de maizena
- 1 jaune d’oeuf
- 1 c.c d’extrait de vanille
- Pour la couche au chocolat
- ½ L de lait
- 1 c.s de sucre en poudre ( ou plus, selon votre goût)
- 1 ½ c.s de maizena
- 1 jaune d’oeuf
- 1 c.c de piment rouge en poudre de votre choix
- 100g de chocolat noir (64% cacao), coup é en petits morceaux

Dans une casserole a fond épais, mélanger jaune d’ouef, sucre et maizena. Ajouter le lait doucement et continuer à mélanger. Mettre sur feu doux et faites cuire sans cesser de remuer afin d’éviter les grumeaux. Dés que le m élange commece a épaissir, environ 10 minutes, retirer du feu et y ajouter la vanille. M élanger pour bien l’incorporer et passer au chinois en cas ou il y’aurait des grumeaux.
Verser dans vos ramequins et mettre de coté.

Netoyer votre casserole et proceder de la même manière que pour le précédent. Au moment ou le mélange commence à s’epaissir, ajouter le chocolat et le piment. Continuer à mélanger jusqu’à ce que le pudding redevienne soyeux et épais, environ 2 minutes.
Verser sur la couche de vanille en allant des bords vers le centre. Si vous versez directement au centre, cela va penetrer le pudding à la vanille.

Monday, February 4, 2008

Beets: The Only Way / Betteraves: La seule Manière

Orange and Cumin Beets Salad

Twenty-four years, nine months and ten days. This is how much it took me to find out that beets can be roasted and are better than boiled ones. Much better.

Growing up, when my mother and I would go to the downtown market “looking for our lunch”, as she always says, we knew that buying beets meant one thing and one thing only: boiled beets salad with cumin. It is the only beet recipe I have in my recipe notebook. The only way I ate beets for the last twenty-four years, nine months and ten days. The only way I thought beets could be eaten.

Needless to say how confused and lost I felt when hearing about this cooking method on the radio. This was a lot worse than the day I discovered that the tooth fairy was in fact my parents sneaking into our bedroom, and hiding our teeth in my father’s diplomatic pouch- my sister and brothers didn’t want to believe me when I told them the truth and decided not to talk to me for two whole days.

I couldn’t wait to buy some beets last week and do the unthinkable: revisit my mother beets salad. The traditional way, or at least the way my mother would serve it, was to boil beets for nearly an hour, peel them, and serve them with ground cumin, parsley, sometimes boiled eggs, and an orange vinaigrette. My version is a little bit similar in the basis, as I love the combination of beets, cumin and orange, but so much better than the original in taste. Sorry Maman!

Roasting the beets really brings out their natural sweetness, preserve their vitamins and gives a meaty, caramelized texture to the beets- compared to watery boiled beets. Cumin seeds are roasted along with the beets to allow their smokiness to penetrate the flesh deeply, while the orange and honey vinaigrette freshens up the whole dish and sort of highlights each ingredient. It is really an explosion of smokiness, sweetness and warmth in one salad. It became our favorite root vegetable salad and the only way we will be eating beet salad from now on and for the second time in two weeks.


Cumin and Orange Beets Salad

My Roasted Beets Salad

Recipe: Serves 4
- 4 to 5 medium beets, rinsed and quartered
- 5 shallots, peeled and quartered
- 1 tbsp cumin seeds
- Olive oil
- For the Vinaigrette:
- 1 tbsp Meyer lemon juice (or a mix of orange juice and lemon juice)
- 1 tsp honey
- ½ cup extra virgin olive oil
- 1 tsp orange zest
- ¼ tsp salt
- A pinch of freshly grated black pepper
- Silvered Almonds, lightly toasted
- 1 tbsp chopped Parsley


Preheat the oven to 400F. Line a large sheet pan with foil. Put the beets, shallots, and cumin seeds in the middle of the foil. Season the mixture lightly with salt and pepper and drizzle with some olive oil. Toss to coat. Fold the sheet of foil over the vegetables as you would fold a letter, and bake until fork tender, about 45 minutes.
Meanwhile, whisk the honey with the Meyer lemon juice, half the chopped parsley, salt, pepper and the orange zest. Add the olive oil while whisking until the vinaigrette comes together but is still a little light.
Toss the hot roasted beets with the vinaigrette. Sprinkle the toasted silvered almonds on top, the remaining parsley, and a little bit of orange zest.

Serve warm. You can scatter some goat cheese too. It’s lovely with beets.

Beets salad
Ma Salade de Betteraves Rôties

In Francais Please: Pour 4 personnes
- 4 a 5 betteraves, lavées et coupées en quartiers
- 5 échalotes, épluchées et coupées en quartiers
- 1 c.c de graines de cumin
- Huile d’olive
- Pour la Vinaigrette:
- 1 c.s de jus de Meyer Citron (ou mélange jus de citron et orange)
- 1 c.c de miel
- 75 ml d’huile d’olive
- 1 c.c de zeste d’orange
- ¼ c.c de sel
- Une pincée de poivre noir fraichement moulu
- Amandes effilées, légerement grilles
- 1 c.s de persil haché

Préchauffer le four a 200C. Garnir une grande tôle de papier aluminium que vous laisser un peu déborder des bords. Mettre au milieu du papier les betteraves, les échalotes et les graines de cumin. Assaisonner de sel, poiver et huile d’olive pour bien couvrir les legumes. Mélanger pour bien répartir l’assaisonnement et faites cuire jusqu’à ce que les betteraves soient bien tendres, environ 45 minutes.
Entre temps, préparer votre vinaigrette. Battre à l’aide d’un fouet le jus de citron, le miel, la moitié de persil, sel, poivre et zeste d’orange. Verser dessus l’huile d’olive en filet.
Mélanger les betteraves encore chaudes a la vinaigrette. Décorer d’amandes effilées, le reste de persil et un peu de zeste d’orange.

Servir tiède. Vous pouvez aussi disperser un peu de fromage de chèvre au dessus. C’est superbement bon avec les betteraves.

Friday, February 1, 2008

Vote and Win A trip to Napa / Voter et Gagner un Voyage a Napa

Pain Perdu


My dear readers, I need your voices.

By now, you must have heard about the Death By Chocolate Contest organized by Culinate, where everyone is invited to vote for his or her favorite blog post about chocolate. The Grand Prize for this contest will be a trip for two to the gorgeous Napa to attend the Copia center’s “Death By Chocolate” Festival on February 28, 2008.

The best part about this contest is that you don’t have to be a food blogger to have a chance to win. You heard me right: Just by voting for you favorite food blogger, in this case me, you will have a chance to win a trip for two to Napa as well.
The winner among readers will be chosen at random from all entries.

I have submitted my all time favorites: Jacques Pépin’s Chocolate Truffles Trio. I hope you enjoyed them as much as I did sharing them with you.
Although there are some great chocolate entries out there, I am going to shamelessly ask you to please vote for me. The top ten vote-getting blog posts will move on the final round, where the winner will be chosen by an esteemed panel of culinary and chocolate experts.

Please, make this be a birthday present before my birthday (which actually is two months and seventeen days away). You will not only make one of my dreams come true, but also get yourself a chance to win a trip to Napa along the way.

You can register now for your chance to win then come back Monday, February 4 to vote, which will increase your chance to win. On the right column of my blog, there is a direct link (the Death by chocolate Logo) that will take you immediately to where you can vote for me. Voting will conclude February 8 and the winners will be announced February 9.

Good luck to all of you and don’t forget to come back Monday to vote. Your voices mean a lot to me!

Thank you so much!


Now we shall go back to the kitchen with this simple and delicious Almond crusted French Toasts that I made this morning for breakfast. The almonds browned in butter bring a nutty crunch to the French toast. If you have one of those nuts oil by La Tourangelle, I used the roasted walnuts oil, by all means use a bit of it with the butter. They really enhance the nuttiness of the finished toast. The best part about the recipe, besides being easy peasy, is that you can prepare the batter the night before and make your French Toasts in the morning. You can either dredge both sides in almonds or just one side, like I did. I used some leftover orange and fennel seeds Challah bread, but plain Challah, Brioche or even slices of Baguette are good substitutions.

These will give a note of sophistication and warmth to your breakfast but without the huff and puff of the usual sophisticated breakfast. I hope you will make them and enjoy them as much as we did.

Happy Weekend Everybody!


French Toast


Almond Crusted French Toast

Recipe: Gourmet, May 2006. Serves 4
- 4 large eggs
- 1 1/3 cups half-and-half
- 4 teaspoons sugar
- 1/2 teaspoon vanilla
- 1/8 teaspoon salt
- 1 1/4 cups sliced almonds (5 oz)
- 8 (3/4-inch-thick) slices Brioche or Challah or Baguette
- - 3 tablespoons unsalted butter
- 1 tablespoon Almond or Walnut oil (optional)
- Confectioners sugar

Put oven rack in middle position and preheat oven to 275°F.

Whisk together eggs, half-and-half, sugar, vanilla, and salt in a large shallow dish until combined well. Spread almonds on a large plate. Soak 4 slices of bread in egg mixture, turning over once, until saturated. Working with 1 slice at a time, remove bread, letting excess egg mixture drip off, then dredge in almonds to coat both sides, gently pressing to help adhere. Transfer to a plate or wax paper. Repeat procedure with remaining 4 slices.

Heat 1 1/2 tablespoons butter and 1 tbsp walnut oil in a 12-inch heavy skillet over moderate heat until foam subsides, then cook 4 bread slices, turning over once, until almonds and bread are golden brown, 5 to 6 minutes. Add remaining 1 1/2 tablespoons butter and cook remaining 4 slices in same manner. Transfer French toast to a baking sheet as cooked and keep warm in oven.

Serve with some confectioners sugar dusted on top.


Almonds French Toast


Pain Perdu aux Amandes

In Francais Please: Gourmet, Mai 2006. Pour 4 personnes
- 4 gros oeufs
- 325 ml de moitié lait, moitié crème
- 4 c.c de sucre en poudre
- 1/8 c.c de sel
- 100g d’amandes effilées
- 8 tranches de Brioche ou Challah ou Baguette
- 3 c.s de beurre
- 1 c.s d’huile d’amandes ou de noix (facultative)
- Sucre glace pour servir

Mettre votre grille du four au milieu et préchauffer a 135C.

Dans un grand bol, battre les oeufs, lait, crème, sucre, vanille, et sel. Mettre les amandes effilées sur une assiette. Faites tremper chaque tranche de pain des deux côtés. Laisser bien égoutter l’excès de liquide et presser chaque coté sur les amandes. Continuer avec le reste.

Faites chauffer 1 ½ c.s de beurre dans une poele assez large et faites frire les tranches de pain, de chaque côté et sans trop encombrer la poele, jusqu’à ce que le pain et les manades soientbien dorés, environ 5 a 6 minutes. Ajouter le beurre restant et continuer avec les reste des tranches. Servir tout de suite ou mettre au four au fur et mesure pour les tenir au chaud.