Tuesday, July 31, 2007

A Soup to Cool you Down / Une Soupe pour vous Rafraîchir

Pea Soup


Although we are still in the middle of summer, although it’s 92 degrees (33 C) outside and my feet are feeling bigger and bigger from the heat, I have this weakness lately for soups. Yes, soups. I can’t explain it but every time I see a new soup recipe I get all excited and run to the kitchen to start dicing, pouring and stirring. In the past two weeks, we had three different kinds of soups and I think my daughter is planning a strike along with her father behind my back.
The funny part about it is that I used to hate soups when I was a kid. I always associate it with my mother praising the merits of her extremely hot vegetable soup to heal our cold and flue. “The hot soup will go through your veins and you will feel much better,” she tells us.
We didn’t believe her story of veins, although it would have been funny to imagine it: “hot soup coming through! Watch out blood!” But still we really thought for years that it was our mother’s soup that cured us. Or maybe it really was!
Now, I make soups because I love them. They are easy, comforting, always versatile, and did I say easy and quick to make.
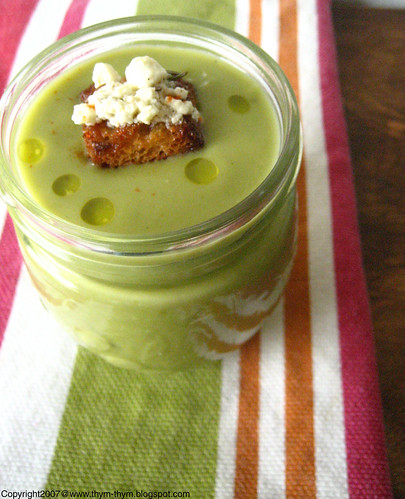
I made this pea, basil and feta soup a week ago when I spotted it on Wendy’s blog. It sounded so fresh and summery and Wendy’s writing about the sweetness of her garden peas convinced me even more to try it. Actually I didn’t need a lot of convincing.
The soup is wonderful on its own but I wanted to add a little bit of crunch to it by adding some croutons and instead of using plain feta I used my favorite marinated feta, along with the olive oil that it has been marinating in. I added one potato to the soup because I wanted it to have more body. Wendy added the feta at the end but being a feta lover, I added half of it before blending it and added the rest on the croutons.
This soup is already a favorite at home. It’s not only lovely but it also runs through your veins to cool you down and make you fell better. Trust my veins.

Pea and feta soup


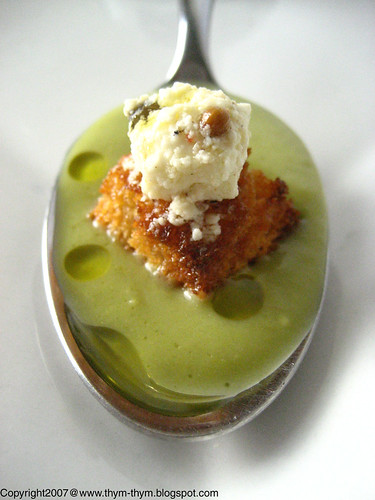
Pea, Feta and basil soup

Recipe: Serves 4
- 14oz frozen peas
- 1 medium potato, peeled and diced
- 1 onion, chopped
- 2 garlic clove, chopped
- 2 tbsp olive oil
- 3 cups chicken stock, vegetable stock or water
- A big handful of basil leaves
- 3 ½ oz marinated feta cheese, drained or plain feta
- Croutons
- Sal, pepper

In a Dutch oven, heat the olive oil. Add the onions then the garlic and let it cook until tender but not browned. Add the peas and potato and stir. Pour the stock or water and bring to a boil. Let it cook on medium heat, with the lid on for 15 min or until the potatoes are cooked through.
Remove from the heat and add the basil leaves and stir. Leave the soup to cool a bit before pouring it into the blender. Add half the feta cheese to the pea soup and blend until smooth. Taste the soup then season with salt if needed and pepper.
Brush the croutons with the olive oil from the marinated feta then broil for a few minutes until brown. Serve the soup with croutons, each topped with crumbled feta.

Soupe de Petits Pois, Basilic et Feta

In francais please:
Pour 4 personnes
- 400g de petits pois congele
- 1 pomme de terre moyenne, epluchee et coupe en des
- 1 oignon, hache
- 2 gousses d’ail hachee
- 2 c.s d’huile d’olive
- 750ml de bouillon de volaille, ou de legume ou de l’eau
- Une grosse poignee de feuilles de basilic
- 100g de feta marinee, ou sans marinade
- Des croutons
- Sel, poivre

Dans une cocotte, faites chauffer l’huile d’olive. Ajouter l’oigon puis l’ail. Laisser fondre mais pas brunir. Ajouter les petits pois et la pomme de terre et melanger. Couvrir de bouillon ou d’eau et porter a ebullition. Laisser cuire couvert, sur feu doux pendant 15 min ou jusqu’a ce que la pomme de terre soit cuite.
Hors du feu, ajouter les feuille de basilic et laisser la soupe refroidir un peu avant de la passer au mixeur. Passer votre soupe au mixeur avec la moitie du fromage feta jusqu’a ce que votre soupe devienne veloute. Gouter la soupe et ajouter le sel si necessaire, car la feta est naturellement salee. Poivrez.
Badigonne chaque crouton avec l’huile d’olive ou la feta se marinait et mettre sous le grill pour quelques minutes jusqu’a ce que les croutons brunissent. Servir la soupe decoree de croutons et sur chaque crouton mettre le reste de feta emiettee.

Friday, July 27, 2007

Sage / Sauge

Sage


Sage, also called Garden sage and Kitchen sage is native to southern Europe and the Mediterranean region. It has long, oval grayish leaves covered with bumps and blue to purple flowers that are decorative and comestible as well.

- How to grow:
Plant the sage in full sun 24 inch (61cm) apart. Grows to 24 inch (61 cm) tall. It blooms in June.
If you want to have your sage to come back every year, plant the Salvia Officianalis variety. Sage helps to keep white butterflies away from cabbage and bugs from carrots.
- How to use:
- Cooking:
Sage is known to have a slightly peppery and bitter taste. It has to be used in small amount as a little goes a long way. It is used as seasoning for cheese, vinegars, Veal, fish, sausage, stuffing, soups, and sauces. It is also used in Italian cuisine like Piccata, Saltimbocca, Rice Minestrone and Italian Vermouth. I like it in my salads and my caramelized baby carrots.
- Medicinal uses:
The Latin name for Sage is “salvia” which means to heal. Sage is believed for centuries to be a medicinal herb for Stomachache, cold, sore throat, gas, anxiety, excessive perspiration, and has been shown to boost memory.
But don’t take too much of it as it is toxic in excess or over long periods.
- How to dry:
Gather the sage in a bouquet but without their flowers. Hang upside down and place them in a dark, dry and well-ventilated room for two to three weeks. To keep them from the dust cover them with a paper bag with holes on it. But do not use plastic bags.
Keep your dried sage in paper bag, tightly closed.

Next week, I will show you how I used sage in a twist to an Old Italian recipe. Until then, have a good weekend my friends.

Source: Supetoinette.com

Thursday, July 26, 2007

Sweet Laziness / Douce Paresse

Peach Parcels2


I am a total bore sometimes. I wish I could tell you that this dessert has a story of sweet childhood memories and stained white little dresses. I wish I could tell you that this dessert has grown on me through the years, reminiscence of a peach tree planted in the courtyard of my grandparents. I wish I could tell you that my inspiration came from a trip to south of Spain years ago, sitting on my father’s shoulders and indulging myself to sweet peach tarts. I wish I could tell you that while making this dessert, unicorns were stirring my ricotta, birds were singing at my window and bees were offering me their honey.

peaches


But I won’t. Because my only excuses behind making this improvised yet delicious dessert were a promise I made, a lazy afternoon and some ripe peaches. I am such a lame. I know. You can boo at me all you want, for now. Because once you’ve tasted my peach parcel with creamy ricotta and fragrant lavender honey, you will start cheering me up and start singing the merits of laziness for generations to come.


Peach Parcels with Ricotta and Lavender Honey

Peach and Ricotta Parcels


Recipe: Serves 4
- 2 ripe yellow peaches
- 3.5 oz Ricotta cheese
- 2 tbsp honey
- ½ tsp Orange blossom water
- 1 egg yolk
- 1 tsp candied ginger, diced
- ½ tsp dried lavender flowers, plus a few for decorating
- 1 tbsp flaked almonds
- Filo dough
- 2 tbsp melted butter

Using a knife, make an incision on top of each peach. In simmering water, blanch your peaches for only 2 minutes then start peeling off the skin. Cut each peach in quarter and set aside. In a saucepan, put 1 tbsp of honey with lavender pods. Bring to boil then set aside to infuse the honey with the lavender. Using a whisk, mix the ricotta cheese with the remaining honey, the egg yolk and the orange blossom water.
Cut 4 small rectangular out of the filo dough, and then process layering (see picture) brushing the dough with butter at each stage. Sprinkle the candied peaches on the peaches and close your parcel by forming any shape you want. Just keep in mind to leave an opening on top of the parcel. Bush with some butter again and drizzle some of the lavender honey on top of each parcel. Sprinkle with some flaked almonds and bake in a preheated 350F oven for about 20 min or until golden brown on top. Serve warm with some lavender pods on each parcel.

Croustillant de Pêche a la Ricotta et Miel de Lavande

Peach Parcels


In francais please: Pour 4 personnes
- 2 peches jaunes, mures
- 100g de fromage ricotta
- 2 c.s de miel
- ½ c.c d’eau de fleur d’oranger
- 1 jaune d’oeuf
- 1c.c de gingembre confit
- ½ c.c de fleurs de lavande sechees, plus quelques fleurs pour decorer
- 1 c.s d’amandes effilees
- 2 c.s de beurre fondu

A l’aide d’un couteau, faites une incision en forme de croix sur chaque peche. Mettre de l’eau a bouillir dans une casserole puis faites blanchir les peches pendant 2 min. Eplucher les peches et couper chacune d’entre elles en quatre. Mettre de cote. Dans une autre casserole, mettre une c.s de miel avec les fleurs de lavande et des que le miel commence a bouillir, retirer- le du feu et laisser de cote pour infuser. A l’aide d’un foeut, melanger la ricotta avec le reste de miel, le jaune d’oeuf, et l’eau de fleur d’oranger.
Couper 4 petits rectangles de votre pate a filo, puis commencer a monter votre dessert (voir photo) en badigeonnant de beurre fondu a chaque etape. Parsemer quelques morceaux de gingembre confit sur chaque peche et fermer votre petit rectangle sous la forme que vous desirer. N’oubliez seulement pas de laisser une petite ouverture au sommet de chaque portion. Badigonner de beurre fondu toute la surface de la pate a filo, Verser une peu du miel parfume a la lavande sur chauqe portion et saupoudrer d’amandes effilees. Faites cuire dans un four prechauffe a 180C pendant 20 min ou jusqu’a ce que la surface soit bien doree. Servir a temperature ambiante saupoudrer de quelques fleurs de lavande sur chaque croustillant.

Monday, July 23, 2007

Celebrating Summer / Célébrer l'été

Red peppers


When I think about summer, I think about the beach, the long days spent at the beach with my parents and siblings and the painful sunburn on my shoulders and back.
When I think about summer, I think about the naps we would take my mother and I in the living room because it was the coolest room in the house. We would sleep on a thin mattress right on the floor and wake up sore all over and completely disoriented. We would swear to never take a nap on hot days again but would do it again the next day.
When I think about summer I think about my father bringing home every afternoon two watermelons, a melon and three pounds of prickly pears that he had bought from roadside stands. I see my father sitting on his favorite small bench in the kitchen deck, holding the prickly pear with newspaper paper in one hand, the knife in the other hand to open the fruit and asking my mother to remove the fruit from its prickly skin.
When I think about summer, I think about children in my neighborhood cooling off as much as they can by swimming in the fountain square.
When I think about summer, I think about open-air markets, fishermen yelling: “Sardines! Sardines! La belle sardine!” fruits and vegetables trying to steal the highlight from one another, people laughing, speaking out loud and bumping into one another. When I think about summer, I think about my mother’s frenzy for red peppers. Every time we would go to the market, she would go straight to the red peppers stand, claiming that there is not much left at home. Although I know and she knows and our fridge knows that it’s already full of red peppers. Raw, grilled, stuffed, roasted, she is always looking for new ways to cook it, but the most recurrent and craved red pepper dish at home is simply roasted and marinated in olive oil, salt and garlic.
In this personalized recipe I took my mother’s recipe, added some crumbled goat cheese, sage, laid it on a flaky crust and drizzled some honey on top of each tartlets. The spiciness of the sage and goat cheese is balanced by the sweetness of the honey and the red peppers, and the crust is so flaky that you wouldn’t need to use a knife or even a fork. These kinds of tartlets are perfect as a light summer lunch, along with, if I may suggest, a bowl of mixed green. A bite of them and you will find yourself sitting next to the peppers stand of our market. Just don’t serve my mother some of your red peppers if you see her coming your way.


Red peppers, sage and goat cheese tartlets


Recipe: Serves 4
- See
this recipe for the crust, but without sugar and orange blossom water
- 4 red peppers, roasted and peeled
- 3 big garlic cloves, finely diced
- Some soft goat cheese, crumbled
- 1 sprig of sage, chopped plus extra for decoration
- Honey
- ¼ cup extra virgin olive oil
- Salt, pepper

Cut the peppers into thick juliennes. Season with salt peppers and add the olive oil, leaves of sage chopped and garlic. Toss and let marinate for ½ hour or more if you have time. The more you let it marinate, the better it will be. Make the crust following the recipe. Using a cookie cutter, cut discs into your crust and decorate with some crust leaves or whatever you desire. Bake your discs at a preheated 400F oven for 10min then reduce to 350F and continue baking until lightly brown. Spoon the mixture of red peppers into the crust discs, trying not to over fill it and not let it drip too much with olive oil, and top each tartlets with the crumbled goat cheese, a leaf of sage and drizzle some honey on top. Return them to the oven for 5-7 min until the cheese has slightly began to melt and brown. Let cool on a wire rack. Serve warm

Red peppers tartelettes


Tartelettes aux poivrons rouges, fromage de chèvre et sauge

In francais please: Pour 4 personnes
- Voir le recette de la pate ici, mais sans sucre et sans l'eau de fleur d'oranger
- 4 poivron rouges, grilles et epluches
- 3 grosses gousses d’ail, hachees
- Du fromage de chèvre, emiette
- 1 brin de sauge, les feuilles hachees plus quelques feuille pour deco
- Miel
- 60 ml d’huile d’olive
- Sel, poivre

Couper les poivrons en lamelles et les melanger a l’ail, feuilles de sauge, sel, poivre et huile d’olive. Laisser mariner ½ heures ou plus si vous avex le temps. Plus vous le laisser mieux le resultat sera. Faire votre pate selon la recette. A l’aide d’un emporte piece, couper des discs de la pate, decorer avec des feuilles ou autres selon votre desir. Faites cuires vos discs de pate dans un four prechauffe a 200C pendant 10m min, puis reduire le four a 160C et laisser cuire jusqu’a ce la pate brunisse legerement (voir photo). Mettre un peu du mélange de poivron rouge sur vos discs de pate, en faisant en sorte de pas mettre trop d’huile d’olive sur les discs de tartelettes et en evitant de trop remplir ces dernieres. Decorer chaque tartelette de fromage de chevre emiette, d’une feuille de sauge et de quelques gouttes de miel. Retourner les tartelettes au four pendant 5 –7 min juste afin que le fromage fonde un peu et se colore legerement. Laisser refroidir sur une grille a patisserie puis servir tiede accompagnees d’une simple salade verte.

Friday, July 20, 2007

Peaches / Les pêches

Peaches


Because I thought my blog should be more than a recipe repertoire, I decided to start this fun, technique section where every Friday I will give you some helpful tips and informations about the food you eat and how to get the best of it.
Today, my first subject is going to be one of my favorite fruits, and which happened to be in season in Michigan: Peach.

Peaches

The peach is a fruit originating from China, where it symbolizes fertility, longevity and where the peach flowers are used in Chinese wedding. There are over 400 varieties of peaches and the most popular one are the velvety and the smooth peaches.
- How to choose them:
Choose them in season when they should are ripe with a delicate skin; a good color and no blemishes or finger marks. Your peach should be fragrant. If you want to keep them for a few days before eating them, then choose them a little unripe. They will continue their maturation at room temperature.
- How to store them:

Store your peaches at room temperature and without piling them up. Depending on how ripe you brought them, they will keep from two to three days in your basket. Just avoid touching them too much as they get bruises easily.
Peaches don’t like spending days in the fridge, as they get dried and their flesh becomes like cotton wool. Just remember to get them out of the fridge hours before eating them so they can fully develop their aroma.
- How to freeze them:

Halved, pitted and blanched for two minutes in boiling water with a dash of lemon juice. Peaches with yellow flesh (nectarines, Springlady, Diamond princess, Early O’Henri, Redtop…etc) chosen just ripe can stand freezing better than other varieties.
- How to eat them:
Peaches can be eaten raw or cooked. It can be baked, sautéed, caramelized, in syrup, in a jam or compote, in pies, tarts, muffins, cupcakes and cakes.
Peaches go also very well with white meat and Monkfish and fresh herbs like basil and mint.
- Diet and Beauty:
Peaches are an excellent source of fiber, water, vitamin C, B3, B5 and vitamin E.
Squashed, it makes also a good, natural and moisturizing facial masque; at least if you can stop yourself or others from licking your face constantly.

My peaches are screaming to be taken to the kitchen for some weekend experimenting that I will be sharing with you in the near future. If you have some Peach recipes that you would like to share, please let me know in the comments.
Until then, have a great weekend everyone.

Source: Supertoinette.com


Monday, July 16, 2007

Never Say Never / Ne Jamais Dire Jamais

Black forest verrines2


“Who can wear this kind of cowboy boots?” my husband asked me, referring to a multi colored cowboy boots a girl was wearing.
“If you knew me when I was in high school, I would have probably wore this kind of boots along with my mother’s old jumper dress”, I replied.
My fondness for such eccentric clothes didn’t mean that I was outdated or had bad taste, I hope not; but because I have never been the kind of person who wears the latest fashions. My style went from masculine in middle school to heels and skirts in high school and Jean’s and blouse collection in college. My mother would ask me every time she saw me with a new trend: “What is your style already?” “My style is original and unique mommy”. I would answer her proudly. If the trend this season were to wear skinny Jean’s I would wear dresses. If it were in to wear candy pink I would wear pale pink. A rebel? Maybe!
So when it comes to food, you would imagine that I don’t give in to a trend easily. I would wait and wait until I know everything about this newly embraced way of eating. I tell myself that I would never try it if I don’t fell in love with it. “I am original and unique”. Remember? It would ruin my reputation of rebel in front of my entourage. So it took me some time before I decided to try on the Current trend in Paris: Les Verrines and went for a Black Forest Verrine.
Black Forest gateau is a southern German dessert (Schwarzwalder Kirschtorte), it is typically a chocolate cake, layered with whipped cream, cherries and decorated with additional whipped cream and cherries and chocolate shavings. Traditionally, Kirshwasser is added to the cake, but having some great results the last time I used orange blossom water with cherries I decided to use it again. The idea of converting Black Forest gateau into a verrine came to me because I wanted to make individual desserts just for my hubby and I. Since I don’t have individual cake molds I thought that Black Forest being a layered cake, it would work wonderfully with the concept of verrines. That way we can have our dessert and keep the chocolate cake left for our afternoon’s snacks. My cherries being sweet I didn’t want to add too much sugar to the heavy cream nor the compote. Depending on the sweetness of the cherries you can either add or reduce the amount of sugar to suit your taste.
Having a layered cake in a glass is a fun and mess-free adventure. Both my hubby and I went sighing and smacking our lips every time we brought our tall spoon to our mouth, with nothing else to say except that being trendy has never felt that good.

Verrines


Black Forest Verrines

Recipe: For two tall verrines
For the chocolate cake:
- 3.5 oz plain flour
- 5 oz unsalted butter, melted
- 6 eggs
- 7 oz sugar
- 1 tsp vanilla extract
- 1.5 oz cocoa
- A pinch of salt
- Grated chocolate to decorate
- 20 cherries pitted and halved
For the cream:
- 1 cup heavy cream
- 1 tbsp sugar
- 1 tsp vanilla extract
For the cherry compote:
- 1 cup sweet cherries pitted
- 1 tsp sugar
- 2 tbsp orange blossom water

Sift the cocoa, the flour and the salt. Set aside. Mix the eggs with the sugar and the vanilla until thick and pale. Add the dry ingredients in 3 batches until well incorporated. Add the melted butter and mix just until blended. Put the batter in a greased and floured cake pan and bake in a preheated 375F oven for 25-30 min until a toothpick inserted in the cake comes out clean. Let cool 5 min in the pan then invert into a wire rack to cool completely.
For the cream, whip the heavy cream on high speed for 1 min until fluffy then add the sugar and vanilla and continue whipping until soft peaks form. Let cool in the fridge.
For the cherry compote: In a saucepan, put the cherries, the sugar, the blossom flour water and cook covered until the cherries start to burst and thicken slightly. Puree the cherry compote and let cool in the fridge.
Assemble the Verrine by scooping a layer of the compote into the bottom of the glass, then a layer of crumbled chocolate cake, a layer of fresh cherries, a layer of cream, a layer of chocolate cake, a layer of cherries, a layer of cream and finish by sprinkling some grated chocolate and decorating with fresh cherries. Chill until served.

Black Forest Verrines


Verrines de Forêt Noire

In francais please: Pour 2 Verrines
Pour le gateau au chocolat:
- 100g farine
- 150g beurre, fondu
- 6 oeufs
- 200g de sucre
- 1 c.c d’extrait de vanille
- 50g de cacao
- Une pincee de sel
- Du chocolat rape pour decoration
- 20 cerises, denoyautees et coupees en deux
Pour la crème:
- 225ml de crème liquide
- 1 c.s de sucre
- 1 c.c d’extrait de vanille
Pour la compote de cerise:
- 150g de cerises denoyautees
- 1c.c de sucre
- 2 c.s d’eau de fleur d’oranger

Tamiser la farine, le sel et le cacao et mettre de cote. Dans un bol, melanger les oeufs, le sucre et la vanille jusqu’a ce que le mélange devienne pale et epais. Ajouter les ingredients secs en 3 fois jusqu’a tout soit bien incorpore. Verser dessus le beurre et melanger juste pour bien l’incorporer a la pate. Verser votre pate a gateau dans un moule beurré et farine et mettre a cuire dans un four prechauffe a 180C pendant 25-30 min, jusqu’a ce que la pointe du couteau inserre dans votre gateau en ressort propre. Laisser refroidir dans le moule pendant 5 min puis demouler et laisser refroidir completement dans une grille a patisserie.
Pour la crème, a l’aide d’un batteur, batter votre crème liquide pendant 1 min a grande vitesse jusqu’a ce que la crème devienne mousseusse. Arreter le bateur, ajouter le sucre et la vanille puis continuer a batter a grande vitesse jusqu’a ce que la crème devienne ferme et onctueuse. Mettre au frais.
Pour la compote de cerises, mettre les cerises, le sucre et l’eau de fleur d’oranger dans une casserole. Mettre sur feu doux. Couvrir et laisser cuire jusqu’a ce que les cerises ramollissent et que la compote devienne legerement epaisse. Passer au mixeur votre compote et mettre au frais.
Pour assembler vos verrines, Mettre au fond de chaque verre un peu de compote de cerises, suivi d’une couche de gateau au chocolat émiette, une couche de cerises fraiches et une couche de crème. Recommencer avec une couche de gateau au chocolat, une couche de cerises et une couche de crème. Mettre au frais jusqu’au moment de servir.

Thursday, July 12, 2007

Help The Children / Aidez Les Enfants

Brioches


The purpose of this post today is to bring your attention to a very important fund raising campaign that is happening across the country to help stop childhood hunger in America. As mentioned in The Food Network, The Great American Bake Sale is hosting its fourth national campaign where people, from everywhere in the country can host their own bake sale and donate the entire profit of the sale to Share Our Strength to help end childhood hunger.
The following text is extracted from Share Our Strength website.

Tonight over 12million children in America will go to bed wondering if they will have something to eat in the morning. A survey conducted in February by the Broward Regional Health Planning Council and paid for by the Children’s Service Council showed that nearly two-thirds of low-income families can’t always afford to give their children a balanced meal.
It is hard to believe that in a country with unlimited resources, millions of children are at risk of hunger.
13.4 million children in America live in poverty today, representing roughly 1 in 6 children. More than 13% of Americans- 38 million – live below the poverty threshold of $19,800 for a family of four. The scientifically recognized consequences of hunger are both devastating and lifelong: poorer overall health, reduced social and psychological well-being; and lower academic achievement. This is why Share Our Strength’s Great American Bake Sale believes that America can- and must – end childhood hunger by providing a fun and easy way for individuals, families, business, students and organizations to make a difference for those children at risk of hunger.
Share Our Strength, one the nation’s leading organizations working to end childhood hunger in America invite participants to host their own bake sale anywhere in the US from May 19- August 31 and send their proceeds to Share Our Strength to help organizations in their community end childhood hunger.
Since 2003, the campaign has raised over $3 million and engaged more than 1 million people in baking, selling or buying goods.
Because no child deserves going to bed hungry, we invite each and every one of you to get your muffins, cupcakes and brownies pans, have some friends to join the fun and start the fight to stop Childhood Hunger in America one cupcake or one brioche at a time.


Recipe: Makes 20 little brioches
- 2 ¼ cups white flour, plus extra for kneading
- Pinch of salt
- 3 tbsp superfine sugar
- 1 package dry yeast
- 3 eggs, beaten, plus extra egg for glazing
- 3 tbsp warm milk
- ½ cup unsalted butter
- Dark chocolate, broken into squares

Sift the flour and salt into a bowl and stir in the stir in the sugar and yeast. Add the eggs and milk and start incorporating it slowly to the dry ingredients. Knead until the dough is fairly soft and elastic. The dough should feel softer and lighter than bread dough. If the dough is too sticky, add flour a little at a time while kneading. Add the butter to the dough, a few pieces at a time, alternating it each time with a little bit of flour to help the butter get into the dough. When all the butter has been incorporated, transfer the dough to a clean, lightly oiled bowl. Cover it with plastic film and let it rise for at least 1 hour in a warm, draft-free room.
Lightly grease 20 individual brioche tins set on a baking sheet. Divide the brioche dough into 20 pieces and shape each into a smooth ball. Place a small chocolate square into each ball and bring up the sides of the dough while pressing the edges firmly together to seal. Smooth the ball by rolling it between your hands and place it, join side down, in the prepared tins. Continue with the remaining brioche pieces, cover and leave them for about 30 min or until doubled in size.
Brush the brioches with beaten egg and bake in a preheated 400F for 12-15 min, until well-risen and golden brown. Let cool on a wire rack slightly, turn out of the pan and serve warm.

Tips: If you intend serving the brioches for breakfast, the dough can be left overnight in the fridge. Brioches freeze very well for up to a month. Thaw overnight at room temperature, and then reheat on baking sheet in a low oven until warm.


Brioche


Brioches faciles au Chocolat

In francais please: Pour 20 petites brioches
- 250g de farine, plus un peu pour le petrissage
- Une pincee de sel
- 3 c.s de sucre
- 3 oeufs, battu legerement plus 1oeuf pour badigeonner
- 3 c.s de lait tiede
- 115g de beurre, coupe en petits morceaux
- Chocolat coupe en des

Tamiser la farine et les sel dans un grand bol. Ajouter le sucre et la levure, puis verser dessus le lait et les oeufs. Incorporer doucement le malange lait a la farine. Petrir la pate jusqu’a ce qu’elle devienne lisse et souple. Si la pate est collante ajouter la farine petit a petit tout en petrissant. La pate doit avoir une constistence plus legere que celle du pain. Ajouter les morceaux de beurre petit a petit, en alternant a chaque fois avec un peu de farine pour faciliter l’absorption du beurre par la pate. Quand le beurre est entierement incorpore, transvaser la pate dans un bol propre et legerement huile. Laisser reposer pendant 1 h, ou jusqu’a c que la pate soit double. Diviser la pate en 20 petits ronds. Dans chaque rond, mettre un petit morceau de chocolat et rabattre les bords dessus. Rouler en boule et mettre dans des moules a brioche huiles en faisant en sorte que la “fermeture” soit dessous. Continuer avec le reste des brioches. Couvrir les brioches d’une serviette et laisser reposer 30 min. Badigeonner les brioches de l’oeuf battu et faire cuire dans un four prechauffe a 200 C pendant 12-15. Laisser refroidir sur une grille a patisserie et servir tiede.

Petites astuces: Si vous compter servir les brioches au petit dejeuner, vous pouvez laisser la pate, avant de la former en boule, au frigo pendant toute la nuit. Les brioches se congelent trs bien pendant 1 mois. Laisser les brioches a temperature ambiante la veille, puis les faire chauufer dans un four doux. Servir tiède.


Chocolate Brioche

Thursday, July 5, 2007

Baking Forecasting / Prévision Culinaire

Apricot


ARIES
(March 21 –April 19)
Organization has never been your thing.
- How dare you! You don’t know me, I mean; yes …I can be…sometimes…but not always.
Your ruler; Mars, is driving you to get the big stuff done- like finding the perfect pair of furry boots, or getting your MySpace profile just right.
- Note the signification of “The big stuff”! We are in July; I don’t think I would need some furry boots. As for MySpace profile, I don’t have one anyway.
You’ll be quite accomplished in 28 days’ time.
- It will take that long! Why not 26 days? Does it have to do with my lack of organization? What should I do in the meantime? Sleep!
You’ll also be more intense than usual. A pleasantly casual hookup? Not on the schedule this month.
- Wait a second: you first accuse me of being disorganized, and then superficial, then slow and now you say that I am “intense!” What does it mean? Do you have something against Aries? And for your information, I am married so back up couple breaker!

Apricots- Nuts Bread

Here is how I would rewrite my own, personalized Horoscope of the week:

ARIES
(March 21 –April 19)
As the week begins, you will feel the need to get things done, to battle the winds, read your forgotten Marguerite Duras’ books and go back to the gym, something you have been talking about 3 months ago, but don’t wait too long as the weather man has predicted some rain for Tuesday and Wednesday and being active during bad weather has never been your thing. We don’t say this often, but it’s time to look like a woman a little bit, a little make up doesn’t hurt! Make a trip to the store near you where they have 75% sale on select cosmetics. A steal!
Tuesday will be your day of great baking achievement. You will finally make the apricot-nuts bread of your dreams that wasn’t that good a couple of weeks ago. At least now you know that starting to bake something, without making sure that you have all the ingredients is stupid; and why we said previously that organization has never been your thing!

Apricots-Nuts Bread

Apricot- Nuts Bread


Recipe:
- 1 ½ cups plain flour
- ½ cup rye flour
- 1 ½ tsp baking powder
- ½ tsp baking soda
- ¼ tsp salt
- 1 tbsp grated lemon zest
- ½ cup walnuts, toasted and chopped
- 1 tbsp crystallized ginger, finely chopped
- 12 dried apricots, diced
- 1 tbsp sunflower seeds
- 2 large eggs
- ¾ cup firmly packed golden brown sugar
- 6 tbsp unsalted butter, melted
- ½ cup whole milk

Position a rack in the middle of the oven, and preheat to 350F. Butter and flour a 9-by-5-inch loaf pan.
Stir together the flours, baking powder, baking soda, salt, zest, ginger, apricots and nuts. Set aside.
In a large bowl, combine the eggs, brown sugar, butter, and milk. Beat just until blended. Add the dry ingredients in 3 batches and mix just until mixed. Do not overmix.
Pour the batter into the prepared pan and smooth the top with a rubber spatula, which you lightly wet (it helps a lot). Bake until a toothpick inserted comes out clean, 55-60 min. Transfer to a wire rack and let cool, first 5 min n the pan, then turn it out onto the rack and cool completely. You can store it in an airtight container at room temperature for 2-3 days or freeze it for up to a month.

Pain d’Abricots et de noix

Slices Of It


In francais please:
- 235g de farine
- 75g de farine de seigle
- 1 ½ tsp de levure chimique
- ½ c.c de bicarbonate de soude
- ¼ tsp de sel
- 1 c.s de zest de citron
- 60g de noix, grilles legerement et hachees
- 1 c.s de gingembre crystalise, hache
- 12 abricots secs, coupes en des
- 1 c.s de graines de tournesol
- 2 gros oeufs
- 185g de sucre brun
- 90g de beurre, fondu
- 125ml de lait entier

Positionner votre grille au milieu du four et prechauffer a 180C. Beurrer une moule a cake de 23 cm de longueur sur 13 cm de largeur.
Melanger ensemble les farines, la levure chimique, la bicarbonate de soude, le sel, le zest, le gingembre, les abricots et les noix. Mettre de cote.
Dans un grand bol, melanger les oeufs, le sucre brun, le beurre et le lait jusqu’a ce que le mélange soit homogene. Ajouter les ingredients secs en 3 fois et melanger jusqu’a incorporation complete. Eviter de trop melanger.
Mettre votre pate dans le moule a cake prepare et lisser la surface avec une spatule en caoutchouc ou une cuillere en bois, que vous mouillez legerement. Faire cuire jusqu’a ce qu’un cure-dent insere dans le pain en ressorte propre, 55-60 min.
Laisser votre pain refroidir sur une grille a patisserie, d’abord 5 min dans le moule puis demouler et laisser refroidir completement sur la grille. Le pain se garde parfaitement dans une boite hermetique a temperature ambiante, pendant 2 a 3 jours comme il peut etre congele jusqu’a 1 mois.

Pause Chocolat chaud

Monday, July 2, 2007

A Man and A Kitchen / Un Homme et Une Cuisine

My chermoula


My hubby can be a great cook when he wants to. He also has his own way of heating up the kitchen and his own way of getting things done, too.
First, he puts some music on, usually some salsa music. Then, he starts dancing his way to the kitchen; with some great moves I must say.
Standing in the middle of the kitchen, he asks me: “Ok! What are we going to do?”
“What are we going to do? What are you going to do?” “I thought you already knew!”
“Yes, Yes. I am just teasing you”, he always says.
He then starts chopping, dicing and using all my plates and my kitchen space while going back and forth to turn up the music volume. Between cooking, washing the dirty dishes, dancing, singing and stirring the pan every two seconds, it takes him about two hours or more to have dinner on the table.
When it was only the two of us, having him in the kitchen was assured to be a lot of fun, messy but fun. But now, with a crawling baby who loves running between our legs and who requires our attention every minute, time gets really precious.
So now, even though he doesn’t cook and doesn’t dance as much often as I want him to, he still amazes me with his “nothing special” dishes, as he calls them, like this Chermoula that is not only quick but most of all demands the use of a single kitchen item: A mortar.
Chermoula is a Maghrebi (North African) marinade used mostly to flavor fish or seafood but would work as well with vegetables and meats. The basic ingredients to Chermola are herbs, lemon, olive oil, garlic and spices. After that you can vary the recipe by adding other ingredients like onions, diced jalapeno, if you like it spicier, or saffron. Whatever you choose to do with this recipe, the only advice that I would give is not substituting parsley for the cilantro because it just doesn’t give the same delicate and lemony flavor that cilantro gives to the marinade. My hubby likes to use a mortar in making Chermoula because it lets him control the consistency of the Chermoula, which should be thick, and the pestle allows the spices and herbs to develop their aroma slowly by grinding them.

chermoula


Chermoula and Calamari

Recipe:
- 1 lemon
- 3 garlic cloves, diced
- 1 tsp ras el hanout
- ½ tsp cumin seeds, toasted
- ½ tsp paprika
- ¼ tsp hot red pepper, diced (optional)
- A pinch of salt
- The leaves of a small bunch of cilantro
- 2 tbsp olive oil
- 2 pounds calamari rings

In a mortar, put the zest of the lemon, the spices, the salt and the garlic and grind using your pestle until it resembles a uniform paste. Add the juice of half the lemon, the cilantro leaves only and 1 tbsp of olive oil. Grind to form a paste and add the remaining olive oil if the chermoula is too thick. Season to taste. Let the chermoula rest for about 15 min at room temperature. Mix the chermoula into the calamari and let it marinate for an hour. Heat a non-stick pan. Sauté the calamari in the pan for two min on each side until golden brown. Serve immediately.

Chermoula avec du calamar

In francais please:
- 1 citron jaune
- 3 gousses d’ail, hachees
- 1 c.c de ras el hanout
- ½ c.c de graines de cumin, grilles
- ½ c.c paprika
- ¼ c.c de piment rouge, cisele
- Une pincee de sel
- Les feuilles d’un petit bouquet de coriandre
- 2 c.s d’huile d’olive
- 1 kg d’anneaux de calamar

Dans le mortier, mettre les epices, le sel, le zest du citron et les gousses d’ail. Concasser a l’aide de votre pilon jusqu’a ce que le mélange ressemble a une pate homogene. Ajouter le jus d’un demis citron, les feuilles de coriandre et une c.s d’huile d’olive. Concasser encore et ajouter le reste d’huile d’olive si le mélange vous semble trop epais. Gouter et assaisonner selon le gout. Laisser la chermoula de cote pendant 15 min. Melanger la chermoula aux anneaux de calamari et laisser mariner pendant une heure. Faites chauffer une poele anti-adhesive et faites sauter les anneaux de calamar pendant deux min de chaque cote jusqu’a ce que ils soient bien dores. Servir tout de suite.

calamari